1. Introduction
This user manual provides detailed instructions for the safe and effective operation of your Huepar 2-Line Green Laser Level, Model 9211GA. This precision instrument is designed for various leveling and alignment tasks in construction, renovation, and DIY projects, offering high visibility green laser lines for accurate measurements.
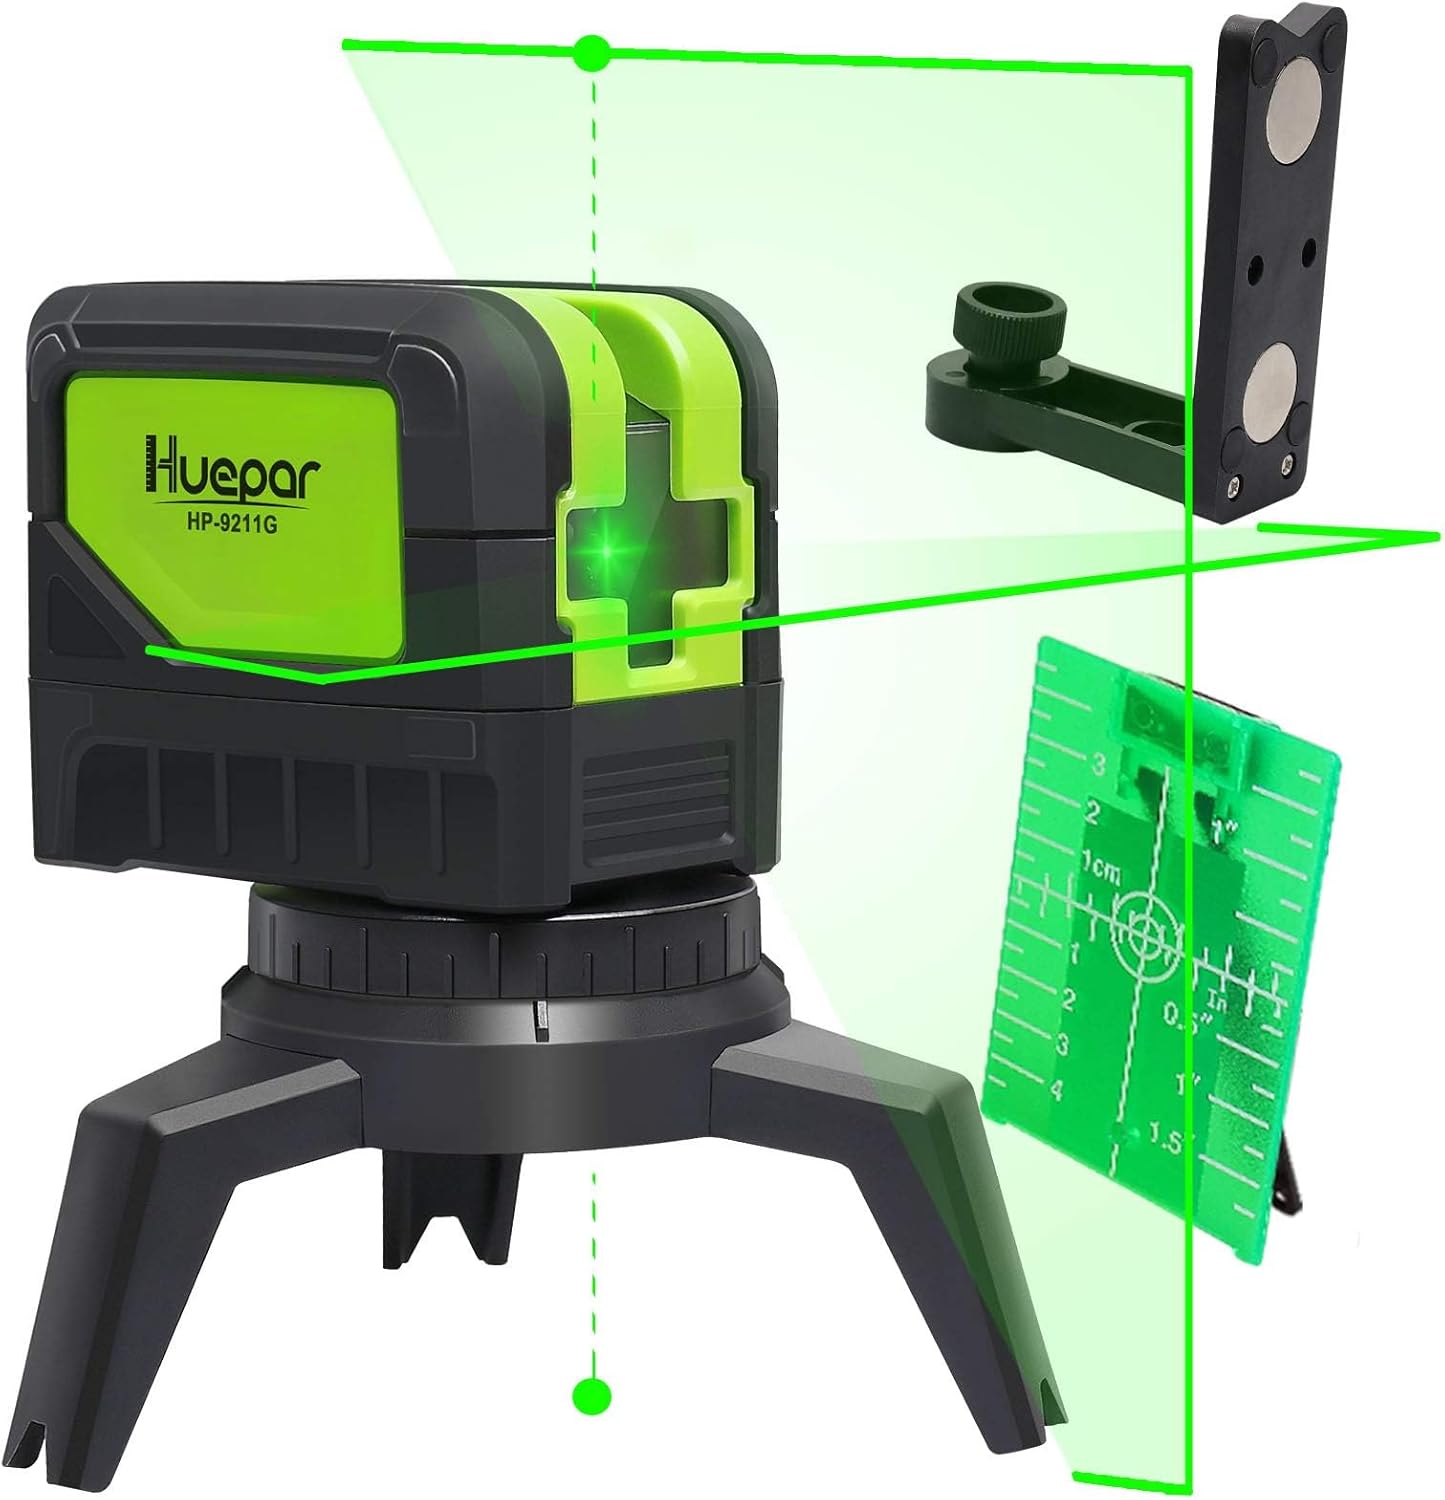
Figure 1: Huepar 2-Line Green Laser Level and included accessories.
2. Safety Information
2.1 Laser Safety
WARNING: This product contains a Class 2 laser. Avoid direct eye exposure to the laser beam. Do not stare into the beam or view directly with optical instruments.
- Do not intentionally direct the laser beam at people or animals.
- Do not operate the device in explosive environments.
- Keep the device out of reach of children.
2.2 General Safety Precautions
- Always use the device in a stable and secure position.
- Do not attempt to modify or disassemble the laser level.
- Protect the device from extreme temperatures and moisture.
3. Package Contents
Verify that all items listed below are included in your package:
- Huepar 2-Line Green Laser Level (Model 9211GA)
- User Manual (Japanese, but English content provided here)
- Packing Case
- Storage Bag
- Laser Target Plate
- AA Alkaline Batteries (x2) - for testing purposes, 1500mAh or higher capacity recommended for regular use.
- Magnetic Pivoting Base / Mount Base
- Connection Adapters (5/8-11 thread, 1/4-20 thread)

Figure 2: All items included in the product package.
4. Product Overview
Familiarize yourself with the components and controls of your laser level:

Figure 3: Product dimensions and key components.
- Power Button: Turns the device on/off and cycles through laser modes.
- Laser Window: Emits the green laser beams.
- Lock/Unlock Button: Engages/disengages the pendulum for self-leveling or manual mode.
- Battery Case: Houses the AA batteries.
- Thread Mounts (1/4-20 & 5/8-11): For attaching to tripods or other mounting accessories.
4.1 Mounting Options
The laser level comes with versatile mounting options:
- Integrated Tripod Base: For stable placement on flat surfaces.
- Magnetic Pivoting Base: Allows attachment to metal surfaces and provides 360° rotation for precise alignment.
- Tripod Compatibility: Equipped with 1/4-20 and 5/8-11 thread mounts for standard tripods.

Figure 4: Various mounting and connection options.
5. Setup
5.1 Battery Installation
- Open the battery compartment cover located on the side of the device.
- Insert two AA alkaline batteries, ensuring correct polarity (+/-).
- Close the battery compartment cover securely.
5.2 Initial Placement
Place the laser level on a stable surface or mount it using a tripod or the magnetic bracket. Ensure the surface is as level as possible for optimal performance in self-leveling mode.
6. Operating Instructions
6.1 Powering On/Off
- To power on, slide the lock/unlock button to the unlocked position. The laser lines will activate.
- To power off, slide the lock/unlock button to the locked position. This also protects the pendulum during transport.
6.2 Operating Modes
The Huepar 9211GA offers two primary operating modes:
6.2.1 Self-Leveling Mode
- Slide the lock/unlock button to the unlocked position.
- The pendulum will self-level within a range of ±4°. If the device is outside this range, the laser lines will flash rapidly to indicate an out-of-level condition.
- Press the power button to cycle through laser configurations: horizontal line, vertical line, or both.
6.2.2 Manual/Tilt Mode
- With the device powered off (lock/unlock button in locked position), press and hold the power button for 3 seconds to enter manual mode.
- In this mode, the laser lines can be projected at any angle, and the self-leveling function is disabled. The laser lines will flash slowly to indicate manual mode.
- This mode is useful for tasks like installing handrails on stairs or angled decorations.

Figure 5: Manual Tilt Mode (left) and Automatic Leveling Mode (right).
6.3 Understanding Laser Lines and Plumb Points
The 9211GA projects two lines and two plumb points:
- Horizontal Line: Provides a level reference across a surface.
- Vertical Line: Provides a plumb reference from floor to ceiling, with an emission angle of up to 180°.
- Up/Down Plumb Points: Projects a point directly above and below the device, useful for transferring points or aligning objects vertically.

Figure 6: Illustration of 2-line, 2-point projection.
6.4 Pulse Mode (Outdoor Use)
To extend the working range outdoors or in bright conditions, activate pulse mode. This mode allows the laser level to be used with a Huepar Line Laser Receiver (sold separately). Press and hold the power button briefly to activate pulse mode. The laser lines will appear slightly dimmer but will be detectable by the receiver.
6.5 Applications
The Huepar 9211GA is suitable for a wide range of applications, including:
- Painting and wallpapering
- Tile installation
- Stair layout and installation
- Furniture assembly and installation
- Woodworking projects
- Wall decoration and picture hanging

Figure 7: Common applications for the laser level.
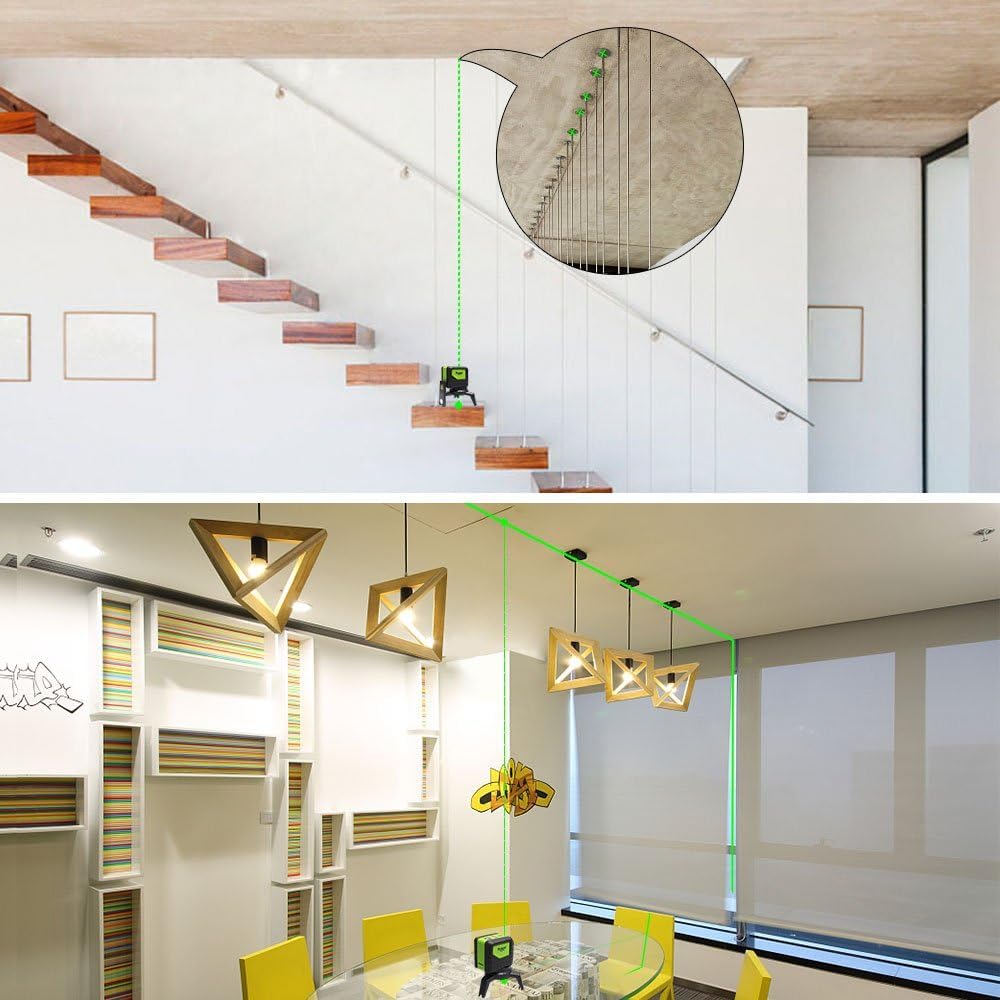
Figure 8: Examples of laser level use for stairs and ceiling work.
7. Maintenance
7.1 Cleaning
- Wipe the device with a soft, damp cloth. Do not use abrasive cleaners or solvents.
- Keep the laser windows clean to ensure clear and accurate laser projection.
7.2 Battery Care
- Remove batteries if the device will not be used for an extended period to prevent leakage.
- Replace batteries when the laser lines become dim or the device does not power on.
7.3 Storage
- Store the device in its original packing case or storage bag to protect it from dust and impact.
- Store in a cool, dry place, away from direct sunlight and extreme temperatures.
7.4 Durability Features
The Huepar 9211GA is designed with durability in mind:
- Rubber Overmolding: Provides shock resistance, capable of withstanding drops from 1 meter.
- IP54 Rating: Offers protection against dust and splashing water, making it suitable for various job site conditions.

Figure 9: Dustproof and Splashproof design.
8. Troubleshooting
| Problem | Possible Cause | Solution |
|---|---|---|
| Laser lines are flashing rapidly. | Device is out of its self-leveling range (±4°). | Place the device on a more level surface or adjust its position until the lines stabilize. |
| Laser lines are flashing slowly. | Device is in Manual/Tilt Mode. | If self-leveling is desired, turn off the device and then slide the lock/unlock button to the unlocked position to power on in self-leveling mode. |
| Laser lines are dim or not visible. | Low battery or bright ambient light. | Replace batteries. For outdoor use or bright conditions, activate Pulse Mode and use a laser receiver. |
| Device does not power on. | Batteries are dead or incorrectly installed. | Check battery polarity and replace with fresh batteries. Ensure the lock/unlock button is in the unlocked position. |
9. Specifications
| Feature | Specification |
|---|---|
| Laser Color | Green |
| Laser Class | Class 2 (IEC/EN60825-1/2014) |
| Laser Wavelength | 505-520nm |
| Leveling Accuracy | ±3mm at 10 meters |
| Self-Leveling Range | ±4° |
| Working Range | Up to 20 meters (65 feet) indoors; Up to 50 meters (165 feet) with Huepar Laser Receiver |
| Vertical Line Emission Angle | 180° |
| Horizontal Line Emission Angle | 110° |
| IP Rating | IP54 (Dustproof and Splashproof) |
| Power Source | 2 x AA Alkaline Batteries |
| Operating Temperature | -10°C to 50°C (14°F to 122°F) |
| Storage Temperature | -20°C to 70°C (-4°F to 158°F) |
| Product Dimensions | 8cm (L) x 9.3cm (W) x 6.4cm (H) (approx.) |
| Product Weight | 710g (approx.) |
10. Warranty and Support
10.1 Warranty Policy
Huepar offers the following warranty and support for this product:
- 30-Day Free Exchange or Refund: If the product arrives damaged or faulty within 30 days of purchase, you are eligible for a free exchange or full refund.
- 1-Year Warranty: A standard 1-year warranty period is provided from the date of purchase.
- 2-Year Extended Warranty: Register your product account to extend the warranty period to 2 years.
- Lifetime Technical Support: Enjoy free technical support for the lifetime of the product.
10.2 Customer Support
Should you encounter any issues with your product, such as damage or malfunction, please contact us directly. Our support team is committed to responding within 24 hours.
To contact support, please click on the 'Contact Seller' option on the product page or through your order history.
Seller: Huepar JP


