1. Introduction
This manual provides detailed instructions for the installation, operation, and maintenance of the MOXA EDS-508A 8-Port Managed Ethernet Switch. The EDS-508A is designed for industrial applications, offering robust performance and advanced network management features including VLAN, IGMP Snooping, Port Trunking, RMON, and Quality of Service (QoS). Please read this manual thoroughly before operating the device to ensure proper usage and optimal performance.
2. Safety Information
- Power Supply: Ensure the power supply voltage is within the specified range for the device. Use only approved power adapters.
- Environment: Install the switch in a well-ventilated area, away from direct sunlight, heat sources, and excessive moisture.
- Grounding: Proper grounding is essential for safe operation and protection against electrical surges.
- Maintenance: Do not attempt to open or repair the device yourself. Refer all servicing to qualified personnel.
- Cabling: Use appropriate Ethernet cables (e.g., Cat5e or better) for reliable network connections.
3. Package Contents
Verify that your package contains the following items:
- MOXA EDS-508A 8-Port Managed Ethernet Switch
- Quick Installation Guide
- Documentation CD (or link to online resources)
- Terminal block for power input
- Wall mounting kit (if applicable)
If any of these items are missing or damaged, please contact your vendor immediately.
4. Product Overview
The MOXA EDS-508A is an industrial-grade managed Ethernet switch featuring 8 10/100BaseTx ports. It supports a wide range of advanced network management functions, making it suitable for demanding industrial environments.
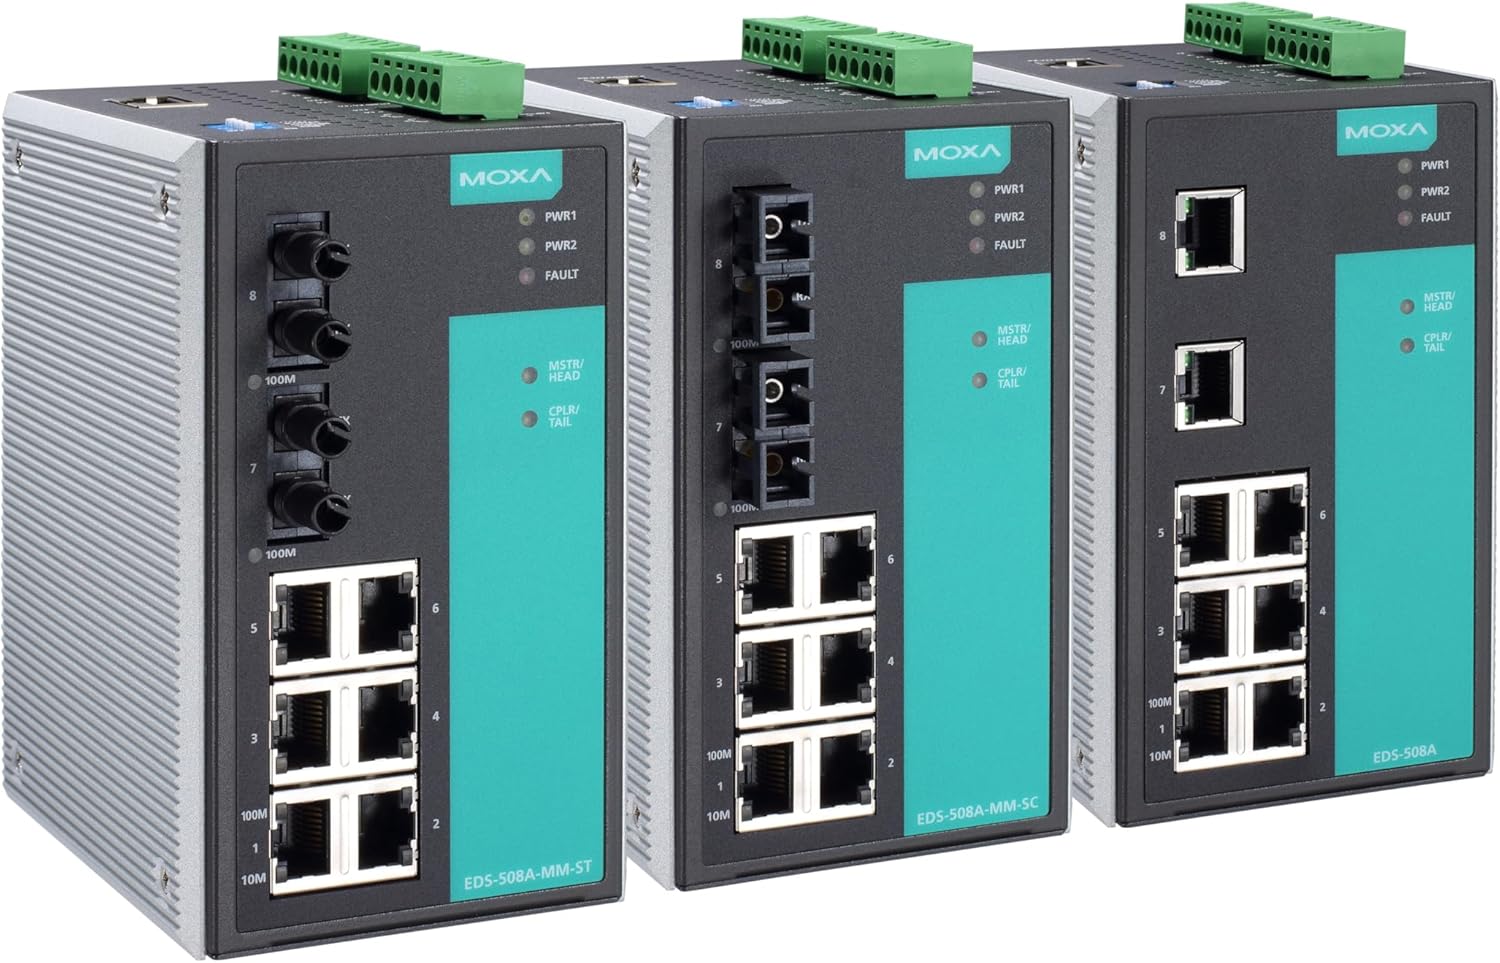
Figure 4.1: MOXA EDS-508A Series Switches. This image displays three variants of the MOXA EDS-508A industrial Ethernet switch. From left to right, the first switch (EDS-508A-MM-ST) features 6 RJ45 10/100BaseTx ports and 2 100M ST fiber ports. The middle switch (EDS-508A-MM-SC) has 6 RJ45 10/100BaseTx ports and 2 100M SC fiber ports. The third switch (EDS-508A) is equipped with 8 RJ45 10/100BaseTx ports. All models include dual power inputs (PWR1, PWR2) and a fault indicator, along with MSTR/HEAD and CPLR/TAIL indicators for redundancy features.
Key Features:
- 8 10/100BaseTx Ethernet Ports
- Advanced Network Management: VLAN, IGMP Snooping, Port Trunking
- Traffic Management: RMON, Quality of Service (QoS)
- Industrial Design: Wide operating temperature, redundant power inputs
- Easy Deployment: DIN-rail or wall mounting options
5. Setup
5.1 Physical Installation
- Mounting: Securely mount the EDS-508A on a DIN-rail or to a wall using the provided mounting kit. Ensure adequate space for ventilation and cable routing.
- Power Connection: Connect the primary and secondary DC power sources to the terminal block on the top of the switch. The EDS-508A supports redundant power inputs for enhanced reliability. Ensure correct polarity.
- Grounding: Connect the grounding wire from the switch to a proper earth ground. This is crucial for electrical safety and EMI protection.
5.2 Network Connection
- Ethernet Ports: Connect your network devices (e.g., PCs, PLCs, IP cameras) to the 10/100BaseTx RJ45 ports using standard Cat5e or Cat6 Ethernet cables.
- Fiber Ports (if applicable): For models with fiber optic ports (e.g., EDS-508A-MM-ST, EDS-508A-MM-SC), connect appropriate fiber optic cables to extend network reach over longer distances.
5.3 Initial Configuration
- Power On: Apply power to the switch. The PWR1 and PWR2 LEDs should illuminate, indicating successful power-up.
- IP Address: The switch typically comes with a default IP address (refer to the Quick Installation Guide for the specific default IP). Connect a PC directly to one of the switch's Ethernet ports and configure your PC's IP address to be in the same subnet.
- Web-based Management: Open a web browser on your PC and enter the switch's default IP address. Log in using the default username and password (consult the Quick Installation Guide).
- Basic Settings: Change the default IP address, username, and password for security. Configure basic network settings such as system time and SNMP.
6. Operating
6.1 LED Indicators
- PWR1/PWR2: Solid green indicates power input is active.
- FAULT: Solid red indicates a system fault or power failure.
- MSTR/HEAD: Indicates the switch's role in a redundant ring topology (e.g., Turbo Ring).
- CPLR/TAIL: Indicates the switch's role in a redundant ring topology.
- Port LEDs: Solid green indicates a link is established. Blinking green indicates data activity.
6.2 Advanced Features Configuration
Access the web-based management interface or console port to configure the following features:
- VLAN (Virtual Local Area Network): Segment your network into logical groups to improve security and performance.
- IGMP Snooping: Optimize multicast traffic delivery, preventing flooding of multicast packets to all ports.
- Port Trunking (Link Aggregation): Combine multiple physical links into a single logical link for increased bandwidth and redundancy.
- RMON (Remote Monitoring): Monitor network traffic and performance statistics for diagnostic purposes.
- QoS (Quality of Service): Prioritize critical network traffic (e.g., industrial control data, video streams) to ensure consistent performance.
- Redundancy Protocols: Configure Moxa's Turbo Ring, Turbo Chain, or other industry-standard redundancy protocols for network resilience.
7. Maintenance
7.1 Firmware Updates
Periodically check the Moxa website for the latest firmware updates. Firmware updates can provide new features, performance improvements, and security patches. Follow the instructions provided with the firmware package for a safe update process.
7.2 Cleaning
Ensure the switch remains free of dust and debris. Use a soft, dry cloth to clean the exterior. Do not use liquid cleaners or solvents. Ensure power is disconnected before cleaning.
7.3 Configuration Backup
Regularly back up your switch's configuration settings. This allows for quick restoration of settings in case of a device replacement or accidental configuration changes.
8. Troubleshooting
This section provides solutions to common issues you might encounter.
- No Power (PWR LEDs Off):
- Check power cable connections to the terminal block and power source.
- Verify the power source is active and providing the correct voltage.
- Ensure the terminal block is securely fastened.
- No Link on Port (Port LED Off):
- Verify the Ethernet cable is securely connected at both ends.
- Check the cable for damage. Try a different cable.
- Ensure the connected device is powered on and functioning correctly.
- Check port settings (e.g., speed/duplex) on both the switch and the connected device.
- Cannot Access Web Interface:
- Ensure your PC's IP address is in the same subnet as the switch.
- Verify the switch's IP address.
- Check for IP address conflicts on the network.
- Try pinging the switch's IP address.
- If all else fails, consider resetting the switch to factory defaults (refer to the Quick Installation Guide for procedure).
- Network Performance Issues:
- Check for excessive network traffic or broadcast storms.
- Review QoS settings to ensure critical traffic is prioritized.
- Inspect cable quality and length.
- Utilize RMON data for traffic analysis.
9. Specifications
| Feature | Description |
|---|---|
| Brand | Moxa |
| Model | EDS-508A |
| Number of Ports | 8 |
| Port Type | 10/100 BaseTx (RJ45) |
| Managed Features | VLAN, IGMP Snooping, Port Trunking, RMON, QoS |
| Package Dimensions | 14.49 x 8.86 x 3.94 inches |
| Item Weight | 3.05 pounds (1.39 Kilograms) |
| ASIN | B079C7Q34H |
| UPC / GTIN | 613739924624 |
| Manufacturer | Moxa Inc. |
| Date First Available | January 26, 2018 |
10. Warranty and Support
Moxa products are designed for reliability and come with a standard warranty. For specific warranty terms and conditions, please refer to the warranty information included with your product or visit the official Moxa website.
For technical support, product documentation, and software downloads, please visit the Moxa support portal: www.moxa.com/support.
When contacting support, please have your product model (EDS-508A) and serial number ready.