Introduction
Thank you for purchasing the Docooler L-938 Mini FM Radio Digital Portable Speaker. This device combines a high-fidelity FM radio with an MP3 audio player, offering versatile entertainment in a compact design. It supports USB drives, TF/SD/MMC cards, and features a clear 1.5-inch display. This manual provides detailed instructions for setup, operation, and maintenance to ensure optimal performance and longevity of your device.
Safety Information
- Do not expose the device to extreme temperatures, direct sunlight, or high humidity.
- Avoid dropping or subjecting the device to strong impacts.
- Do not disassemble or attempt to repair the device yourself. Refer to qualified service personnel.
- Keep the device away from water and other liquids.
- Use only the specified charging cable and power source to prevent damage.
- Dispose of batteries properly according to local regulations.
Package Contents
Please check the package for the following items:
- Docooler L-938 Mini FM Radio Digital Portable Speaker
- Mini USB Charging Cable
- English User Manual (this document)
Product Overview
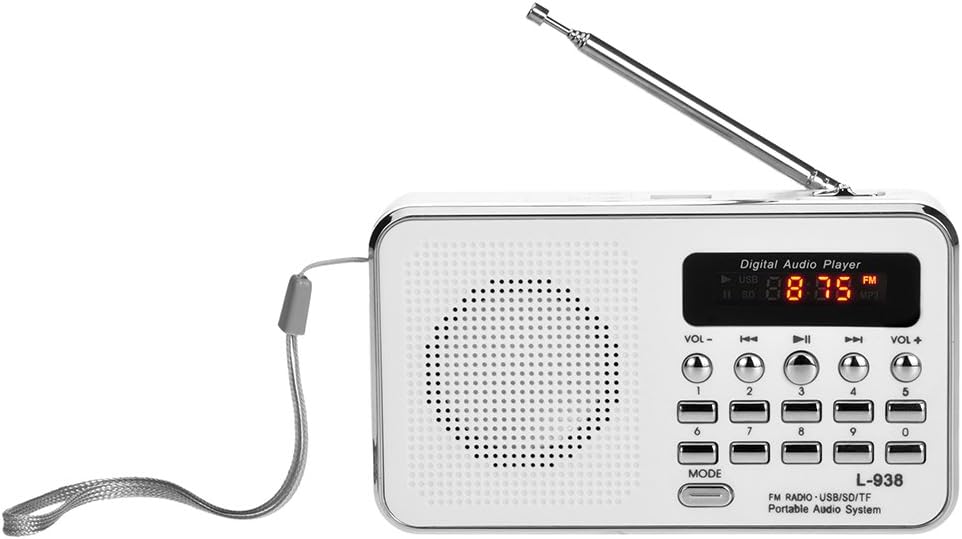
Front view of the Docooler L-938 Mini FM Radio, showing the speaker grille, display, and control buttons.

Detailed view of the Docooler L-938 Mini FM Radio with key components labeled for easy identification. Dimensions are approximately 12.5cm x 7.2cm x 3.3cm.
Component Identification:
| No. | Component |
|---|---|
| 1 | Volume- |
| 2 | Previous Track |
| 3 | Play / Pause |
| 4 | Next Track |
| 5 | Volume+ |
| 6 | Mode Switch |
| 7 | TF Card Slot |
| 8 | USB Port |
| 9 | Power On / Off Switch |
| 10 | Earphone Jack (3.5mm) |
| 11 | AUX-IN Port |
| 12 | SD / MMC Card Slot |
| 13 | Charging Port (Mini USB) |
| 14 | Speaker |
Setup
1. Battery Installation and Charging

Image illustrating the replaceable 850mAh battery and charging process. A full charge typically takes 2-3 hours.
- Locate the battery compartment on the back of the device.
- Insert the provided 850mAh rechargeable battery, ensuring correct polarity.
- Close the battery compartment cover securely.
- Connect the included Mini USB charging cable to the Charging Port (13) on the device and the other end to a standard USB power adapter (not included) or a computer USB port.
- The display will indicate charging status. A full charge typically takes 2-3 hours.
2. Initial Power On
- Slide the Power On/Off Switch (9) to the "ON" position. The display will light up.
Operating Instructions
1. Power On/Off
- To turn on: Slide the Power On/Off Switch (9) to "ON".
- To turn off: Slide the Power On/Off Switch (9) to "OFF".
2. Mode Selection
- Press the Mode Switch (6) button to cycle between FM Radio mode and MP3 Player mode (USB/TF/SD/MMC).
3. FM Radio Operation

The radio features an external antenna for improved FM signal reception and automatic channel searching.
- Ensure the device is in FM Radio mode.
- Extend the external antenna for better reception.
- Automatic Channel Search: Press and hold the "Play / Pause" button (3) to initiate an automatic scan for available FM stations. The radio will scan and save stations automatically.
- Manual Station Selection: Use the number buttons (0-9) to directly input the frequency of a desired FM station (e.g., for 87.5 MHz, press 8-7-5).
- Navigate Saved Stations: Use the "Previous Track" (2) and "Next Track" (4) buttons to cycle through saved FM stations.
4. MP3 Player Operation (USB/TF/SD/MMC Card)

The device supports playing MP3 audio files directly from TF/SD/MMC cards and USB drives.
- Insert a USB drive into the USB Port (8) or a TF/SD/MMC card into the respective slots (7 or 12).
- The device will automatically switch to MP3 mode and begin playing audio files. If not, press the Mode Switch (6) button.
- Press the "Play / Pause" button (3) to pause or resume playback.
- Use the "Previous Track" (2) and "Next Track" (4) buttons to skip between tracks.
- The device will remember the last played MP3 track when powered off and resume from that point when powered on again.
5. Volume Control
- Press the "Volume-" button (1) to decrease the volume.
- Press the "Volume+" button (5) to increase the volume.
6. Earphone Use

The device supports earphone connection for private listening, offering high fidelity sound quality.
- Plug standard 3.5mm earphones (not included) into the Earphone Jack (10). The sound will automatically switch from the speaker to the earphones.
Maintenance
- Cleaning: Use a soft, dry cloth to clean the exterior of the device. Do not use abrasive cleaners or solvents.
- Storage: When not in use for extended periods, store the device in a cool, dry place, away from direct sunlight and extreme temperatures.
- Battery Care: If the device will not be used for a long time, it is recommended to charge the battery periodically to maintain its lifespan.
Troubleshooting
| Problem | Possible Cause | Solution |
|---|---|---|
| Device does not power on. | Battery is low or depleted. | Charge the battery using the provided Mini USB cable. |
| No sound from speaker. | Volume is too low or muted. Earphones are plugged in. | Increase volume using "Volume+" button. Unplug earphones if not desired. |
| Poor FM radio reception. | Antenna not extended. Weak signal area. | Fully extend the external antenna. Try moving to a location with better signal. |
| MP3 files not playing. | Incorrect mode. USB drive/card not inserted correctly or corrupted. Unsupported file format. | Ensure device is in MP3 mode. Reinsert USB drive/card. Ensure files are in MP3 format. |
Specifications
| Feature | Detail |
|---|---|
| Brand | Docooler |
| Model Number | 7545864291 (L-938) |
| Product Dimensions | 4.92 x 2.83 x 1.3 inches (12.5cm x 7.2cm x 3.3cm) |
| Item Weight | 7.8 ounces |
| Display Screen | 1.5 Inch |
| Tuner Technology | FM |
| Radio Bands Supported | FM |
| Connectivity Technology | USB, Mini USB |
| Power Source | Battery Powered (850mAh replaceable battery) |
| Supported Media | USB Drive, TF/SD/MMC Card |
| Audio Output | 3W Stereo Speaker, 3.5mm Earphone Jack |
| Special Feature | Portable, High Fidelity Sound Quality |
| Included Components | English User Manual, Mini USB Charging Cable |
Warranty and Support
For warranty information and technical support, please refer to the retailer or the official Docooler website. Keep your purchase receipt as proof of purchase for any warranty claims.
Docooler is committed to providing quality products and customer satisfaction. If you encounter any issues not covered in this manual, please contact customer service for assistance.


