
1. Product Overview
The Whirlpool W10830274 is a genuine Original Equipment Manufacturer (OEM) replacement door gasket designed for Whirlpool side-by-side refrigerators. This part ensures a proper seal for your refrigerator door, maintaining optimal cooling efficiency and preventing energy loss. It replaces part numbers W10294127 and W10443273.

Figure 1: The Whirlpool W10830274 refrigerator door gasket as packaged.
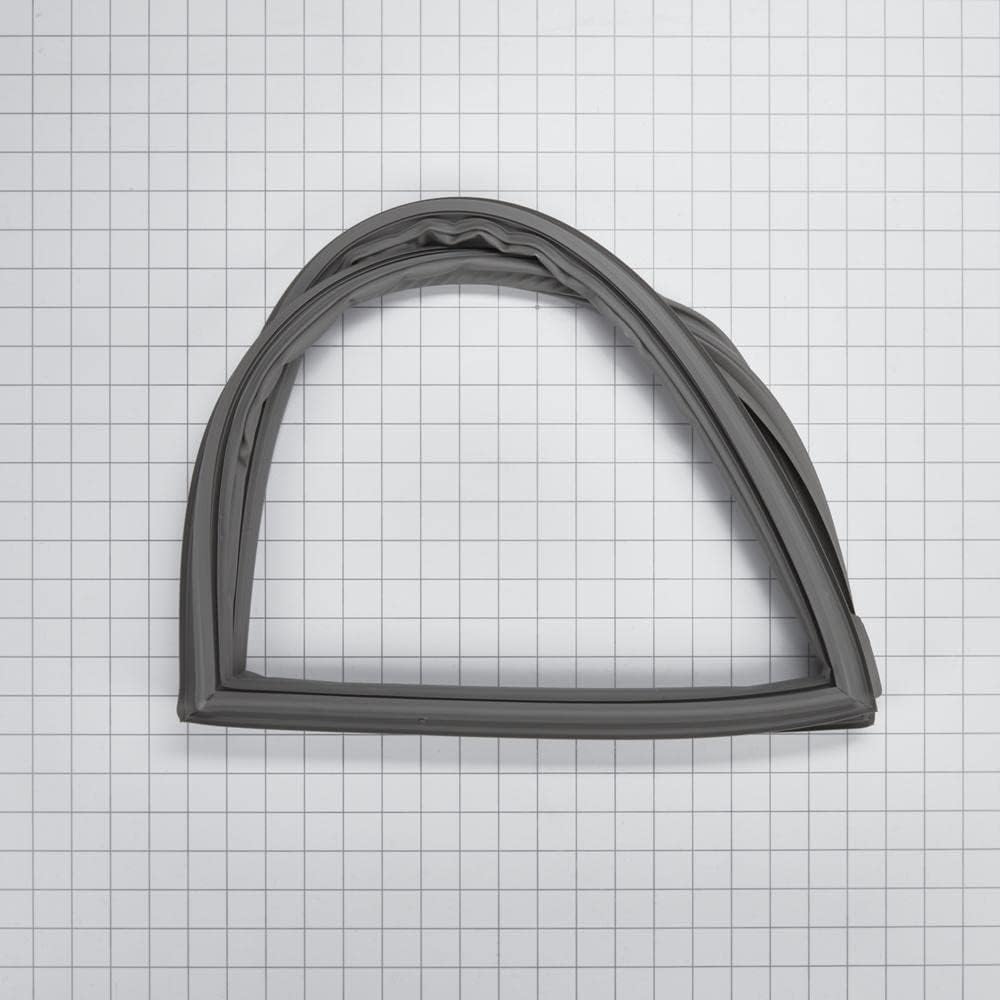
Figure 2: The Whirlpool W10830274 refrigerator door gasket laid flat, showing its full shape.

Figure 3: An illustration highlighting the authenticity of Whirlpool OEM parts, ensuring compatibility and performance.
Understanding Genuine OEM Parts
Genuine OEM (Original Equipment Manufacturer) parts are specifically designed and tested by Whirlpool to ensure perfect fit, optimal performance, and durability for your appliance. Using genuine parts helps maintain the longevity and efficiency of your refrigerator.
Video 1: An informational video from Whirlpool Service Parts explaining the benefits and importance of using genuine OEM parts for Whirlpool appliances.
2. Important Safety Information
Always prioritize safety when performing any appliance repair. Failure to follow these safety instructions could result in property damage, personal injury, or death.
- Disconnect Power: Before beginning any repair, always unplug the refrigerator from its power source or turn off the circuit breaker to prevent electrical shock.
- Wear Protective Gear: Use appropriate personal protective equipment, such as gloves, to protect your hands.
- Handle with Care: Gaskets can be stiff. Handle them carefully to avoid damage during installation.
- Keep Work Area Clear: Ensure your work area is clean, dry, and free of obstructions.
3. Before You Begin Installation
Tools and Materials Required:
- New Whirlpool W10830274 Door Gasket
- Phillips head screwdriver (if needed for trim removal)
- Hairdryer or heat gun (on low setting)
- Mild soap and water solution
- Clean cloth
Preparation Steps:
- Unpack the Gasket: Carefully remove the new gasket from its packaging. Due to packaging, the gasket may be twisted or creased.
- Soften the Gasket: To ensure a proper fit and seal, it is highly recommended to soften the new gasket before installation. Lay the gasket flat in a warm area, such as direct sunlight, for a few hours. Alternatively, you can use a hairdryer on a low setting to gently warm and relax any creases or twists. This will make the gasket more pliable and easier to install.
- Clear the Area: Ensure there is enough space around the refrigerator door to work comfortably.
4. Installation Instructions
Follow these steps carefully to replace your refrigerator door gasket.
Step 1: Remove the Old Gasket
- Disconnect Power: Unplug the refrigerator from the wall outlet.
- Open the Door: Open the refrigerator door that requires the gasket replacement.
- Locate the Gasket Channel: The gasket is typically held in place by a channel around the perimeter of the door panel. It may be tucked under a plastic trim piece or simply pressed into a groove.
- Pull Off the Old Gasket: Starting from a corner, gently but firmly pull the old gasket away from the door panel. It should peel out of the channel. If there are screws holding a trim piece, remove them first.
Step 2: Clean the Door Channel
- Clean the Groove: With the old gasket removed, thoroughly clean the gasket channel on the refrigerator door using a mild soap and water solution and a clean cloth. Remove any dirt, debris, or old adhesive residue.
- Dry the Area: Ensure the channel is completely dry before installing the new gasket.
Step 3: Install the New Gasket
- Align the Gasket: Begin by aligning one corner of the new gasket with a corner of the door channel.
- Press into Place: Carefully press the gasket's ribbed edge into the channel around the entire perimeter of the door. Work your way around, ensuring the gasket is fully seated and snug.
- Reinstall Trim (if applicable): If you removed any trim pieces, reattach them and tighten any screws.
- Check for Proper Seating: Once installed, run your hand along the entire gasket to ensure it is evenly seated and there are no gaps or bulges.
Step 4: Post-Installation Check
- Close the Door: Gently close the refrigerator door. It may feel tighter than usual initially.
- Perform the "Paper Test": Place a piece of paper between the door and the refrigerator frame, then close the door. Try to pull the paper out. If there is proper seal, you should feel resistance. Repeat this test at several points around the door.
- Allow Time to Settle: It may take a day or two for the new gasket to fully settle and conform to the door frame, achieving its optimal seal.
- Reconnect Power: Plug the refrigerator back into the wall outlet.
5. Maintenance
Regular maintenance of your refrigerator door gasket will extend its lifespan and ensure efficient operation of your appliance.
- Regular Cleaning: Clean the gasket regularly with a mild soap and water solution and a soft cloth. This prevents the buildup of food particles, dirt, and mold that can compromise the seal.
- Inspect for Damage: Periodically inspect the gasket for any signs of wear, tears, cracks, or hardening. Early detection of damage can prevent larger issues.
- Avoid Harsh Cleaners: Do not use abrasive cleaners, solvents, or sharp objects on the gasket, as these can cause damage.
6. Troubleshooting
If you experience issues after installing your new gasket, consider the following troubleshooting steps:
- Door Not Sealing Properly:
- Ensure the gasket is fully seated in its channel around the entire door.
- Re-warm the gasket with a hairdryer on a low setting to help it conform to the door frame, paying attention to any areas that appear to be gapping.
- Check for any obstructions (e.g., food items, shelves) preventing the door from closing completely.
- Gasket Appears Twisted or Creased:
- This is common due to packaging. Apply gentle heat with a hairdryer to soften the gasket and allow it to relax into its proper shape.
- Ensure the gasket is not stretched or pulled too tightly during installation, which can cause it to deform.
- Door is Difficult to Open/Close:
- A new gasket creates a very tight seal, which can make the door harder to open initially. This should ease with use.
- Ensure the refrigerator is level. An unlevel refrigerator can cause door alignment issues.
7. Specifications
| Feature | Detail |
|---|---|
| Brand | Whirlpool |
| Part Number | W10830274 |
| Item Model Number | W10830274 |
| Item Weight | 2.49 pounds |
| Product Dimensions | 1 x 1 x 1 inches (packaging dimensions) |
| Finish | Matte |
| Item Package Quantity | 1 |
| Batteries Included? | No |
| Batteries Required? | No |
| Date First Available | March 6, 2018 |
8. Warranty and Support
Warranty Information:
This Whirlpool W10830274 door gasket comes with a 30-day return policy and a 90-day defective returns policy. Please retain your proof of purchase for warranty claims.
Customer Support:
For further assistance, technical support, or to inquire about warranty claims, please contact Whirlpool Customer Service. You can find contact information on the official Whirlpool website or through your product documentation.
For more information on genuine Whirlpool parts, visit the Whirlpool Store on Amazon.


