1. Introduction
This manual provides detailed instructions for the safe and effective operation of the MeterTo Victor 1010D Lux Meter. This device is designed for measuring luminosity (light intensity) in various environments.
2. Safety Information
Please read all safety warnings and instructions carefully before using this product to prevent injury or damage to the device.
- Do not expose the device to extreme temperatures, humidity, or direct sunlight.
- Avoid strong impacts or dropping the device.
- Keep the light sensor clean and free from obstructions for accurate readings.
- Remove batteries if the device will not be used for an extended period.
3. Product Overview
The MeterTo Victor 1010D Lux Meter consists of a main unit with an LCD display and control buttons, and a separate light sensor connected by a coiled cable.
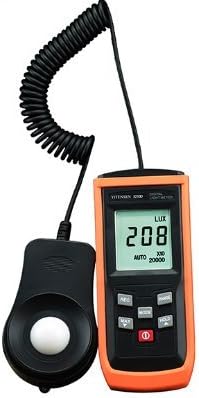
Figure 1: MeterTo Victor 1010D Lux Meter. This image shows the main handheld unit with its LCD screen displaying '208 LUX' and the separate light sensor connected by a coiled cable.
Component Identification
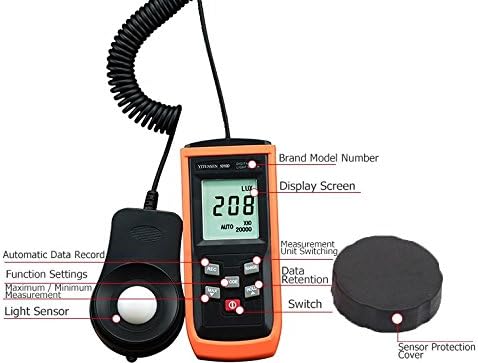
Figure 2: Labeled components of the MeterTo Victor 1010D Lux Meter. Key parts include the Brand Model Number, Display Screen, Measurement Unit Switching button, Data Retention button, Power Switch, Light Sensor, Automatic Data Record button, Maximum/Minimum Measurement button, and Sensor Protection Cover.
- Display Screen: Shows measurement readings, units, and other indicators.
- Light Sensor: Detects light intensity. Ensure it is clean and unobstructed.
- Sensor Protection Cover: Protects the light sensor when not in use.
- Power Switch: Turns the device on or off.
- Measurement Unit Switching Button: Toggles between LUX and FC units.
- Data Retention Button (HOLD): Freezes the current reading on the display.
- Maximum/Minimum Measurement Button (MAX/MIN): Displays the maximum or minimum recorded value.
- Automatic Data Record Button (REC): Initiates or stops data recording.
4. Key Features
- Wide Measuring Range: Up to 200,000 LUX.
- High Resolution Display: 0.1 LUX / 0.01 FC.
- Automatic Gear Selection Function.
- Measures Maximum / Minimum Values.
- LUX / FC Unit Selection.
- Reading Lock Function (Data Hold).
- Automatic Data Record Function.
- 3 1/2 Digits LCD Display.
5. Setup
5.1 Battery Installation
- Locate the battery compartment cover on the back of the main unit.
- Open the cover.
- Insert two AAA (7V) batteries, ensuring correct polarity (+/-).
- Close the battery compartment cover securely.
5.2 Initial Power-On
- Remove the sensor protection cover from the light sensor.
- Press the Power Switch to turn on the device. The LCD display will illuminate.
6. Operating Instructions
6.1 Taking a Measurement
- Ensure the device is powered on and the sensor cover is removed.
- Position the light sensor at the desired measurement point, facing the light source.
- The current light intensity will be displayed on the LCD screen. The device automatically selects the appropriate range.
6.2 Changing Measurement Units (LUX/FC)
Press the "Measurement Unit Switching" button to toggle between LUX (lux) and FC (foot-candle) units.
6.3 Data Hold Function
Press the "Data Retention" (HOLD) button to freeze the current reading on the display. Press it again to release the hold and resume live measurements.
6.4 Maximum/Minimum Value Measurement
Press the "Maximum/Minimum Measurement" (MAX/MIN) button to cycle through the maximum, minimum, and current readings recorded since the function was activated. Press and hold to reset the recorded values.
6.5 Data Recording
Press the "Automatic Data Record" (REC) button to start recording data. Press it again to stop recording. Refer to the full manual for details on accessing recorded data if applicable.
7. Maintenance
- Cleaning: Wipe the device and sensor with a soft, dry cloth. Do not use abrasive cleaners or solvents.
- Storage: Store the device in a cool, dry place, away from direct sunlight and extreme temperatures. Always replace the sensor protection cover when not in use.
- Battery Replacement: Replace batteries when the low battery indicator appears on the display.
8. Troubleshooting
| Problem | Possible Cause | Solution |
|---|---|---|
| Device does not power on. | Dead or incorrectly installed batteries. | Check battery polarity; replace batteries. |
| Inaccurate readings. | Dirty sensor; sensor cover still on; incorrect positioning. | Clean sensor; remove cover; ensure sensor faces light source correctly. |
| Display shows "OL" or "OVER". | Measurement range exceeded. | The device has an auto-ranging feature, but extremely high light levels might exceed its maximum. Move to a less intense light source or verify the range. |
9. Specifications
| Parameter | Value |
|---|---|
| Display | 3 1/2 Digits LCD, Max. Display 1999 |
| Measuring Range | 200 LUX, 2000 LUX, 20000 LUX, 200000 LUX |
| Resolution | 0.1 LUX (for 200 LUX range), 1 LUX (for 2000/20000/200000 LUX ranges) |
| Accuracy | ±3%+10dgts (200/2000 LUX), ±4%+10dgts (20000/200000 LUX) |
| Color Temperature Calibration | 2856k Standard Flat Lamp |
| Power Source | 2 x AAA (7V) Battery |
| Product Size (Main Unit) | 185mm (L) × 55mm (W) × 30mm (H) |
| Sensor Size | 87mm (L) × 55mm (W) × 20mm (H) |
| Product Weight | Approx. 150g |
| Manufacturer | MeterTo |
| ASIN | B078YLMCH7 |
10. Warranty and Support
For warranty information and technical support, please refer to the documentation provided with your purchase or contact MeterTo customer service. Keep your purchase receipt as proof of purchase.


