1. Introduction
This manual provides detailed instructions for the setup, operation, and maintenance of your Partron Urban S+ PWB-250 Fitness Band. Please read this manual thoroughly before using the device to ensure proper functionality and to maximize your user experience. The Urban S+ is designed to track various fitness and health metrics, including heart rate, steps, distance, calories burned, sleep patterns, and altitude.

Image 1.1: The Partron Urban S+ PWB-250 Fitness Band, a sleek black activity tracker with an OLED display showing time and date.
2. Product Overview
2.1 Key Features
- Heart Rate Monitor: Tracks heart rate with high precision, supporting various exercise modes.
- Activity Tracking: Monitors steps, distance, and calories burned.
- Sleep Monitoring: Automatically detects and analyzes sleep patterns.
- Water Resistance: IPX8 rated, suitable for use up to 1 meter underwater.
- Altitude Check: Provides altitude data based on atmospheric pressure.
- Notifications: Displays call, text, and alarm alerts.
- Long Battery Life: Up to 20 days of working time (with specific settings).
- Connectivity: NFC and Bluetooth for seamless pairing with Android and iOS devices.
- Display: OLED screen for clear information display.
- Interchangeable Bracelet: Allows for customization.

Image 2.1: An infographic highlighting the key features of the Urban S+ Fitness Band, including IPX8 water resistance, heart rate monitoring, activity tracking, exercise tracking, long battery life, and altitude checking.
2.2 Components
The Partron Urban S+ PWB-250 Fitness Band package includes:
- Urban S+ PWB-250 Fitness Band device
- Charging cable (USB 5-pin)
- User Manual (this document)
3. Setup
3.1 Charging the Device
Before initial use, fully charge your Urban S+ Fitness Band. The device uses a magnetic attachment type charging method.
- Connect the USB 5-pin cable to the magnetic charging connector.
- Align the magnetic charging connector with the charging points on the back of the fitness band. Ensure a secure connection for proper charging.
- Connect the USB end of the cable to a power source (e.g., computer USB port, USB wall adapter).
- The display will indicate charging status. A full charge typically provides up to 20 days of working time depending on usage and settings.
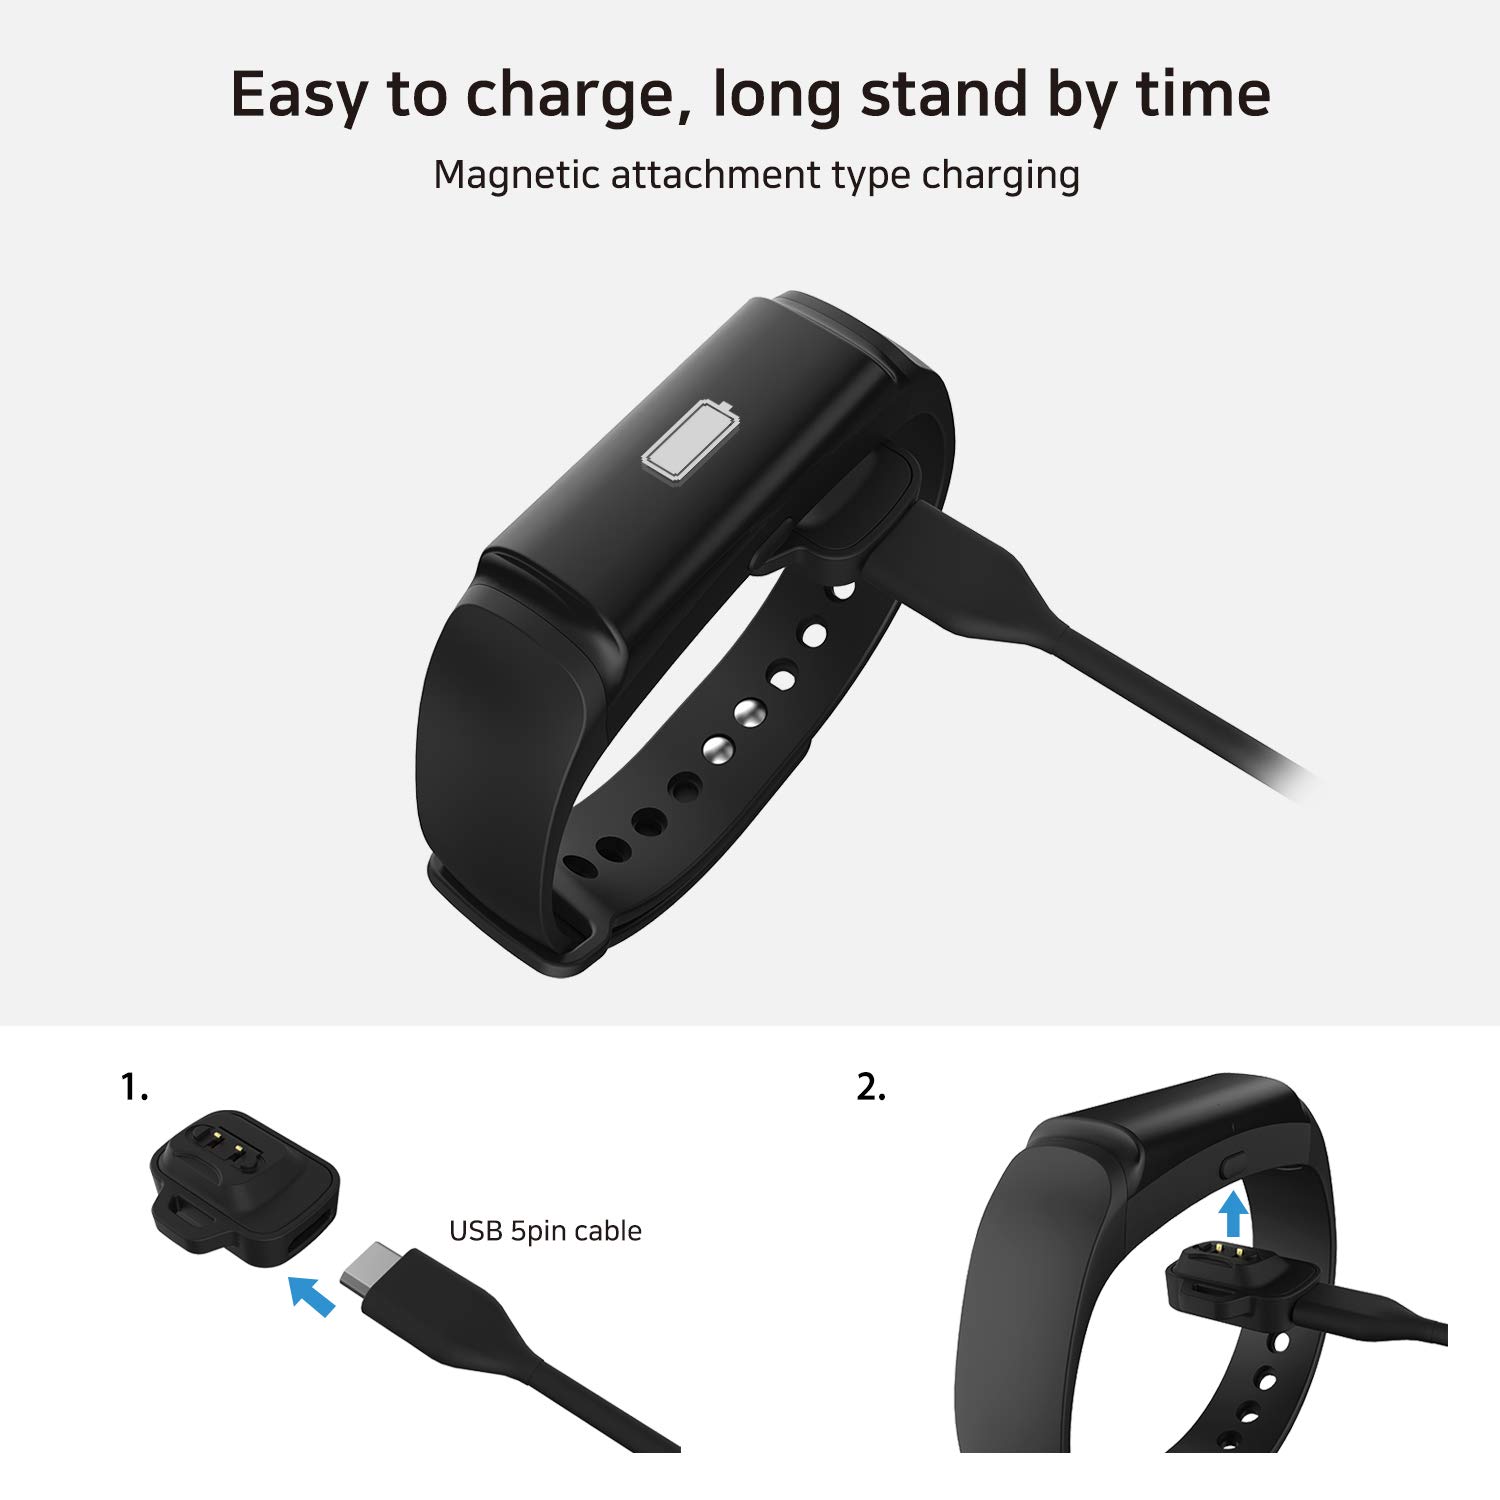
Image 3.1: Illustration of the magnetic charging process for the Urban S+ Fitness Band, showing the USB 5-pin cable connecting to the magnetic charger, which then attaches to the band.
3.2 App Installation and Pairing (Samsung Health)
The Urban S+ Fitness Band is compatible with the Samsung Health app on Galaxy mobile devices, as well as other Android and iOS devices. Follow these steps to connect your band:
- Download and install the Samsung Health app from your device's app store (Google Play Store for Android, Apple App Store for iOS).
- Open the Samsung Health app.
- Tap the menu icon (usually three horizontal lines or dots) at the top right corner of the app page.
- Navigate to Settings.
- Select Accessories.
- Tap Scan for accessories at the bottom of the screen.
- Select your Smart Band (e.g., 'URBAN-S+') from the list of scanned devices to connect.
- Update your profile information (e.g., height, weight) if prompted.
- Enter the 4-digit PIN displayed on your fitness band into the app when requested. To display the PIN, press the multi-function key on the band three times in rapid succession.
- Confirm the Bluetooth pairing request.

Image 3.2: A four-step visual guide demonstrating how to connect the Urban S+ Fitness Band to the Samsung Health application, including navigating settings, scanning for accessories, and entering the pairing PIN.
3.3 Strap Adjustment
The Urban S+ features an interchangeable bracelet. Ensure the band fits snugly but comfortably on your wrist for accurate readings. Medium and Large sizes are available.
- Medium Size: 5.2 in - 7.5 in (133 mm - 190 mm)
- Large Size: 6.1 in - 8.8 in (155 mm - 223 mm)
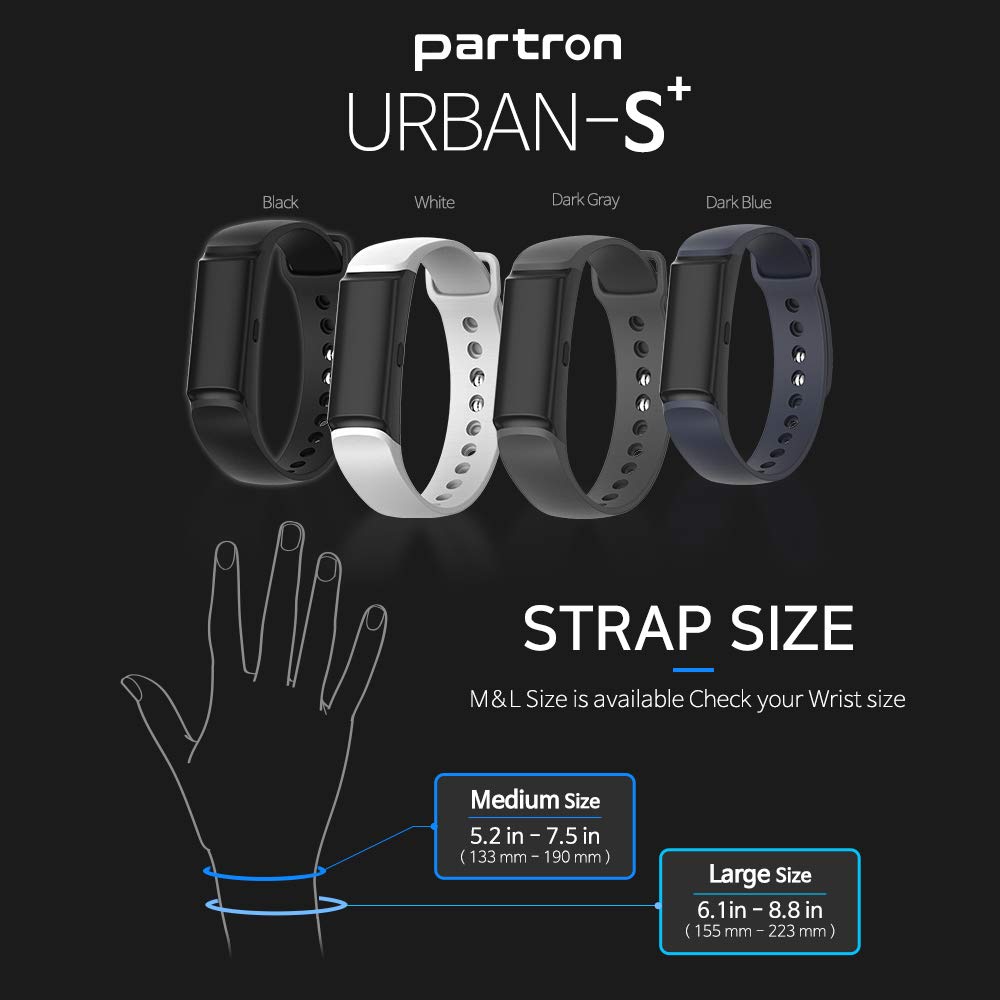
Image 3.3: A visual guide showing the available strap colors (Black, White, Dark Gray, Dark Blue) and a size chart for Medium and Large wrist sizes.
4. Operating Instructions
4.1 Basic Navigation (Multi-function Key)
The Urban S+ Fitness Band is operated using a single multi-function key located on the device.
- One Click: Moves to the next information screen (e.g., time, steps, heart rate).
- Double-Click: Initiates exercise mode.
- Press and Hold: Ends exercise mode.
- Three Consecutive Clicks: Displays a unique 4-digit number, used for Bluetooth pairing.
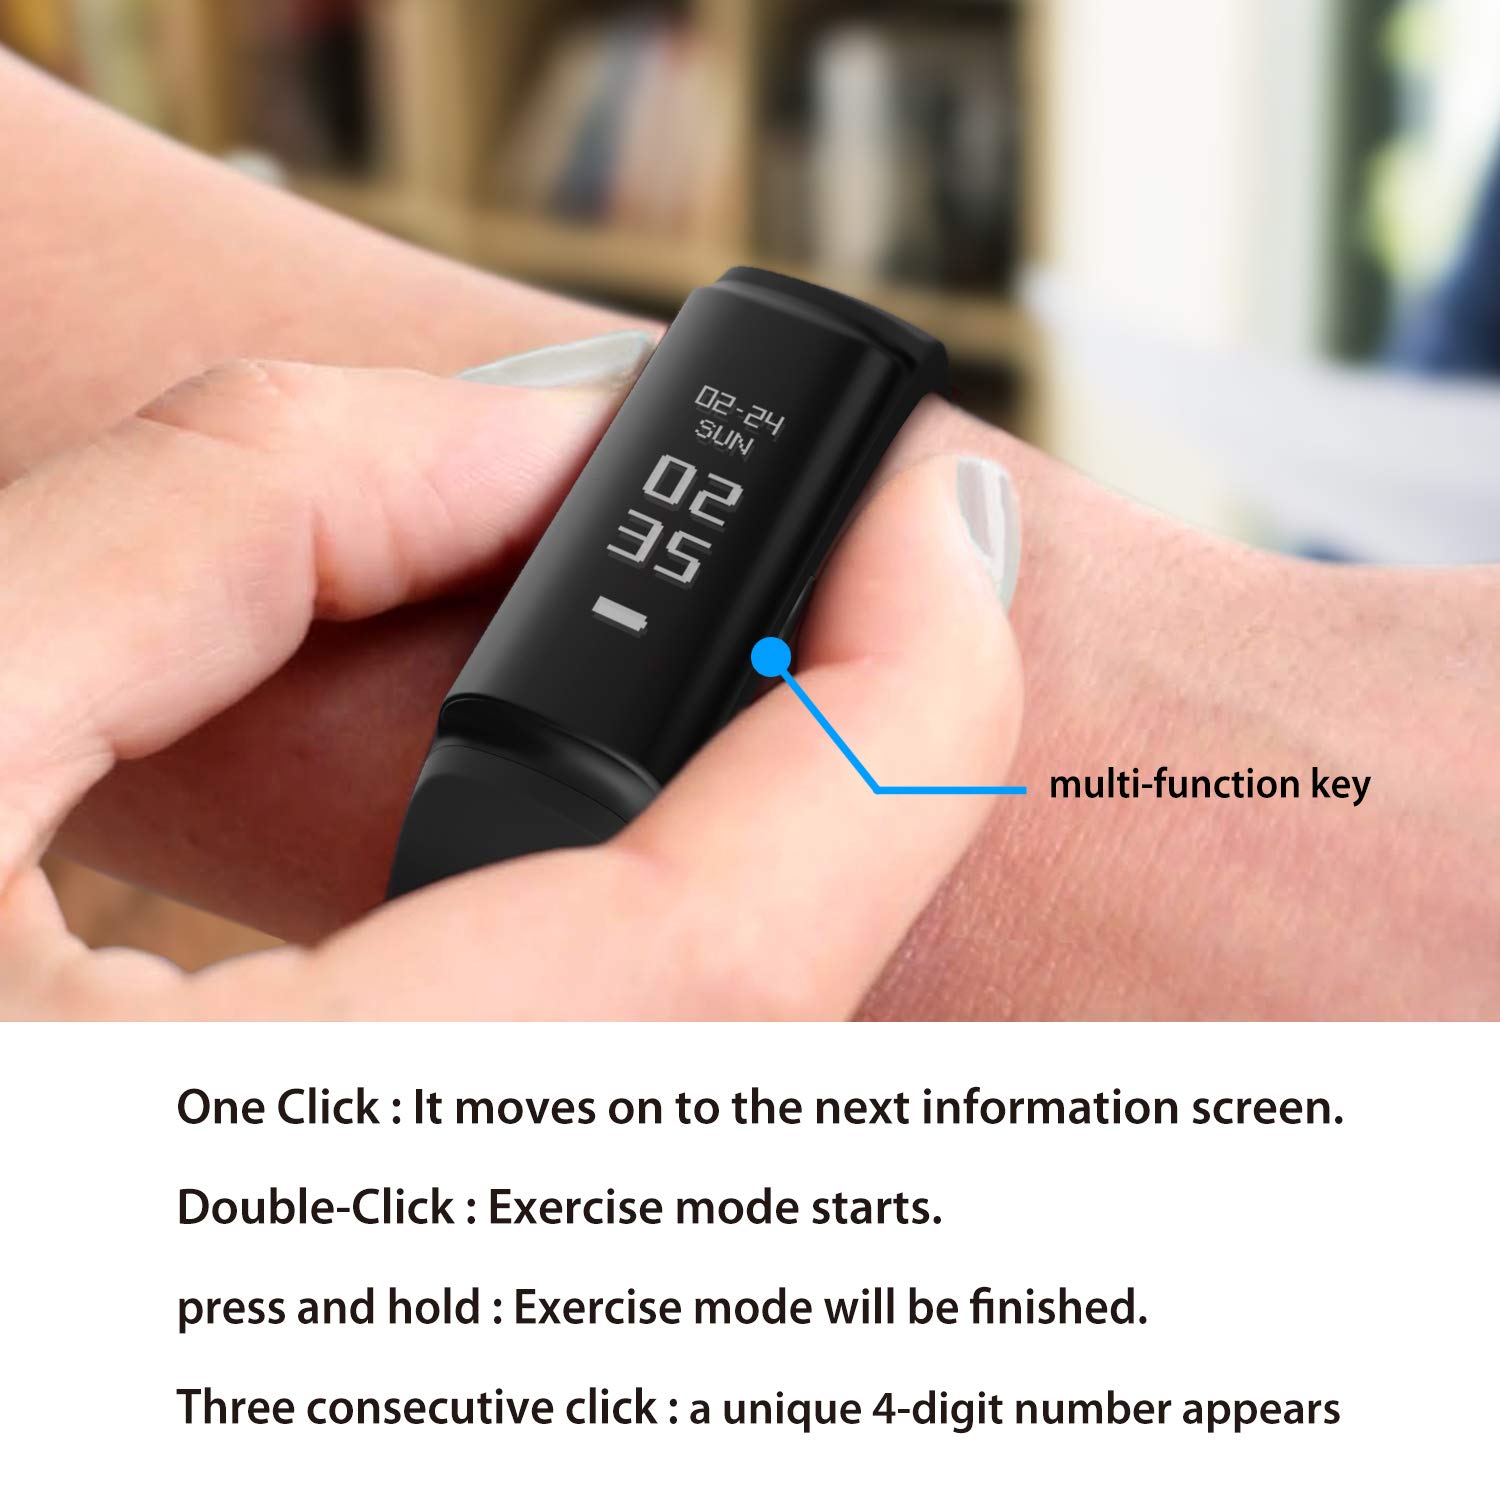
Image 4.1: A close-up of the Urban S+ Fitness Band on a wrist, highlighting the multi-function key and listing its operational commands: single click for screen navigation, double-click to start exercise mode, press and hold to finish exercise mode, and three consecutive clicks to display a 4-digit number.
4.2 Activity Tracking
The band continuously tracks your daily activity, including steps taken, distance covered, and calories burned. This data is synchronized with the connected app, allowing you to monitor your progress over time.
4.3 Heart Rate Monitoring
The Urban S+ features a highly accurate heart rate monitor. It measures your heart rate at set intervals and records the data for health analysis. During exercise, it provides accurate heart rate data based on the Karvonen formula.
4.4 Sleep Monitoring
The device automatically detects when you fall asleep and wake up, tracking your sleep duration and patterns. Detailed sleep analysis is available in the connected app.
4.5 Notifications
Once paired with your smartphone, the Urban S+ can display notifications for incoming calls, text messages, and alarms directly on its OLED screen.
4.6 Water Resistance
The Urban S+ is rated IPX8, meaning it is protected against continuous immersion in water up to 1 meter. It is suitable for activities like swimming, but not for diving or high-pressure water activities.
4.7 Altitude Check
Equipped with a barometer sensor, the band can measure and record altitude data, which is particularly useful during activities such as hiking or climbing.
5. Maintenance
5.1 Cleaning
Regularly clean your fitness band to ensure hygiene and proper sensor function. Use a soft, damp cloth to wipe the device and strap. Avoid harsh chemicals or abrasive materials.
5.2 Battery Care
To prolong battery life, avoid exposing the device to extreme temperatures. Charge the device fully before long periods of inactivity. Ensure the charging contacts on both the band and the charger are clean and free of debris for optimal connection.
6. Troubleshooting
- Device not turning on: Ensure the device is fully charged. Connect it to the charger and check if the charging indicator appears.
- Cannot pair with smartphone:
- Ensure Bluetooth is enabled on your smartphone.
- Make sure the fitness band is within range of your smartphone.
- Restart both the fitness band and your smartphone.
- Follow the pairing instructions in Section 3.2 carefully, ensuring the correct PIN is entered.
- Inaccurate readings (heart rate, steps):
- Ensure the band is worn snugly on your wrist, not too loose or too tight.
- Clean the sensors on the back of the device.
- Ensure your profile information (height, weight) in the app is accurate.
- Charging issues: Ensure the magnetic charging connector is firmly attached and the contacts are clean. Try a different USB power source.
- Display not responding: Try restarting the device. If the issue persists, ensure it is charged.
7. Specifications
| Feature | Specification |
|---|---|
| Brand | Partron |
| Model Number | PWB-250 |
| Operating System Compatibility | Android, iOS |
| Special Features | Distance Tracker, Heart Rate Monitor, Sleep Monitor, Altitude Check |
| Connectivity Technology | NFC, Bluetooth |
| Water Resistance | IPX8 |
| Sensors | 6-axis Accelerometer+Gyro, Heart Rate, Barometer |
| Display | OLED |
| Battery Life | Up to 20 days (depending on usage) |
| Item Weight | 79 g |
| Shape | Rectangular |
8. Warranty and Support
For warranty information and technical support, please refer to the documentation provided with your purchase or contact Partron customer service directly. Details can typically be found on the manufacturer's official website or through your retailer.


