
1. Introduction
The FEELWORLD F6 Pro is a compact and versatile 5.5-inch on-camera monitor designed for professional videography and photography. It features a 4K HDMI input/output, a 1600-nit high-bright Full HD IPS touch screen, and an external install and power kit for accessories. This manual provides detailed instructions to help you effectively set up, operate, and maintain your F6 Pro monitor.
2. Package Contents
Please verify that all items listed below are included in your package. If any items are missing or damaged, please contact your retailer.

Image: The FEELWORLD F6 Pro monitor shown with its complete set of included accessories, such as the NP-F970 battery, charger, storage case, HDMI cable, tilt arm, sunshade, Type-C to USB adapter, disassemble wrench, and user manual.
- FEELWORLD F6 Pro Monitor
- NP-F970 Battery
- Battery Charger
- Portable Carrying Case
- HDMI Cable
- Tilt Arm
- Sunshade
- Type-C to USB Adapter
- Disassemble Wrench
- User Manual
3. Product Overview
The F6 Pro monitor features a robust design with intuitive controls and versatile connectivity options.
3.1 Monitor Interfaces and Controls

Image: Side view of the F6 Pro monitor, highlighting the HDMI input, HDMI output, DC OUT 8.4V, headphone jack, and DC IN 5V (Type-C) ports.
- HDMI IN: Connects to your camera or video source.
- HDMI OUT: Outputs video signal to another monitor or device.
- DC OUT 8.4V: Provides power to external devices.
- DC IN 5V (Type-C): Power input via USB Type-C.
- Headphone Jack: For audio monitoring.

Image: Top view of the F6 Pro monitor, displaying the F1, F2, F3 function buttons, TOUCH button, MENU, navigation buttons, and EXIT/Power button.
- F1, F2, F3 Buttons: Customizable function buttons for quick access to features.
- TOUCH Button: Activates/deactivates touch screen functionality.
- MENU Button: Accesses the main menu.
- Navigation Buttons (Up/Down): Used for menu navigation.
- EXIT/Power Button: Exits menus or powers the monitor on/off.
3.2 External Install and Power Kit
The monitor features an integrated F970 external install and power kit on the rear, allowing you to attach and power compatible accessories such as wireless transmitters or LED lights directly from the monitor's battery.
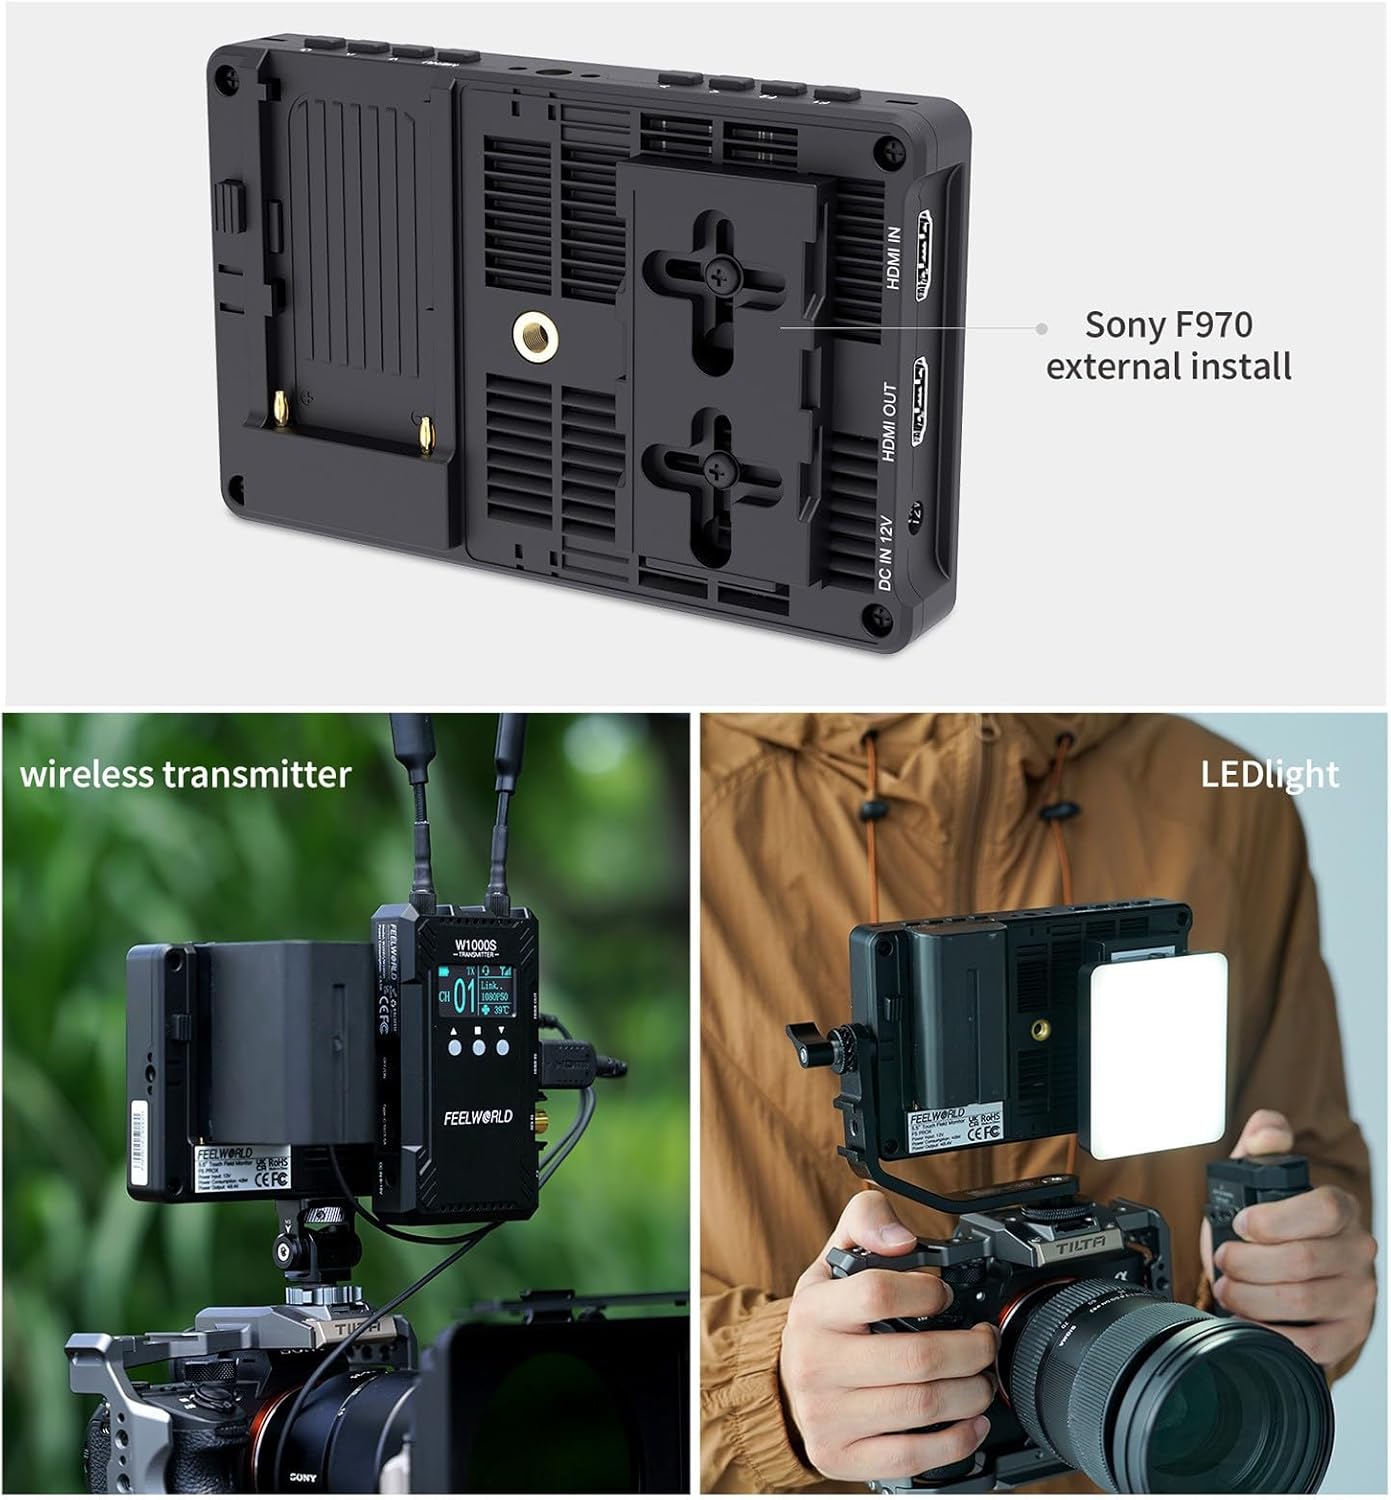
Image: The rear of the F6 Pro monitor showing the Sony F970 battery plate and examples of a wireless transmitter and an LED light mounted and powered via the external kit.
4. Setup
4.1 Powering the Monitor
The F6 Pro monitor can be powered by an NP-F series battery, a DC power adapter, or via a USB Type-C connection.
- NP-F Battery: Insert a charged NP-F series battery into the battery slot on the rear of the monitor.
- DC Power Adapter: Connect a compatible DC 12V power adapter to the DC IN port.
- USB Type-C: Connect a 5V power source via the USB Type-C port.

Image: Illustration of the different power input methods: NP-F series battery, DC adapter, and Type-C power supply.
4.2 Mounting the Monitor
The F6 Pro can be mounted using the included tilt arm or via multiple mounting points.
- Tilt Arm: Attach the tilt arm to your camera's hot shoe or cold shoe mount. Then, secure the monitor to the tilt arm. The tilt arm allows for 360-degree rotation.
- Multiple Mounting Points: The monitor features 1/4-inch screw threads on the bottom and sides for flexible mounting on various camera rigs, cages, or stands.

Image: The F6 Pro monitor mounted on a camera using the tilt arm, demonstrating its rotational capability.

Image: Examples of the F6 Pro monitor mounted in different positions, illustrating its multiple mounting points.
4.3 Connecting HDMI
Connect your camera or video source to the monitor using an HDMI cable. The monitor supports 4K HDMI input and output.
- Connect one end of the HDMI cable to your camera's HDMI output port.
- Connect the other end to the HDMI IN port on the F6 Pro monitor.
- To output the video signal to another display, connect an HDMI cable from the HDMI OUT port on the F6 Pro to the input of the secondary display.

Image: A visual guide demonstrating how to connect HDMI input from a camera and HDMI output to a larger monitor, highlighting 4K signal support.
5. Operating Instructions
5.1 Basic Operation
- Power On/Off: Press and hold the EXIT/Power button.
- Touch Screen: The 5.5-inch touch screen allows for intuitive navigation of menus and features. Tap the screen to access controls.
- Function Buttons (F1, F2, F3): These buttons can be customized to quickly activate frequently used features. Access the menu to assign functions.
- Menu Navigation: Use the MENU button to enter the main menu. Use the navigation buttons or touch screen to select options.
5.2 Professional Auxiliary Tools
The F6 Pro includes a suite of professional tools to assist with focus, exposure, and color accuracy.

Image: A visual representation of various professional auxiliary tools available on the F6 Pro, including 3D LUT, Waveform, Vectorscope, Histogram, Peaking Focus, Check Field, False Color, Zoom, Anamorphic, and more.
- Peaking Focus: Highlights in-focus areas with a selectable color, aiding in precise manual focusing.
- Check Field: Displays the image in monochrome (red, green, blue, or mono) to assist with color calibration.
- False Color: Uses color overlays to represent different exposure levels, helping to identify overexposed or underexposed areas.
- Zoom: Magnifies a portion of the image for detailed inspection of focus and composition.
- Anamorphic Mode: De-squeezes anamorphic footage for proper viewing.
- Over Exposure (Zebras): Displays zebra patterns on areas exceeding a set exposure threshold.
- Waveform (RGB Parade, YUV Parade, Y Parade): Graphical representation of video signal levels, useful for exposure and color balance.
- Vectorscope: Displays color information, aiding in color correction and consistency.
- Histogram: Shows the distribution of brightness levels in the image.
- 3D LUTs: Supports uploading up to 32 custom 3D LUTs for real-time color grading preview. Built-in DE-log LUTs are also available.

Image: The F6 Pro monitor displaying advanced monitoring tools such as waveform, vectorscope, and histogram simultaneously, providing comprehensive video analysis.
5.3 Daylight Viewability
With 1600 nits of brightness, the F6 Pro monitor is designed for clear visibility even in bright outdoor conditions, often eliminating the need for a sun-hood.

Image: The F6 Pro monitor in an outdoor setting, demonstrating its high brightness and clear visibility under daylight conditions.
5.4 Multi-Language Support
The F6 Pro supports up to 11 languages, allowing users to select their preferred language for menu navigation and display.

Image: The F6 Pro monitor screen showing various language options, including Chinese, Japanese, Spanish, Korean, Russian, German, French, Portuguese, English, and Dutch.
6. Maintenance
- Cleaning: Use a soft, dry cloth to clean the monitor's exterior. For the screen, use a specialized screen cleaning solution and a microfiber cloth. Avoid harsh chemicals or abrasive materials.
- Storage: When not in use, store the monitor in its protective carrying case in a cool, dry place, away from direct sunlight and extreme temperatures.
- Battery Care: If using NP-F batteries, ensure they are charged regularly and stored properly. Remove batteries if the monitor will not be used for an extended period.
- Avoid Impact: Protect the monitor from drops and impacts, which can damage internal components or the screen.
7. Troubleshooting
This section addresses common issues you might encounter with your FEELWORLD F6 Pro monitor.
| Problem | Possible Cause | Solution |
|---|---|---|
| Monitor does not power on. | Low or uncharged battery; power cable not connected; faulty power source. | Ensure battery is charged and properly inserted. Verify power cable connection. Try a different power source. |
| No video signal displayed. | HDMI cable not connected properly; incorrect input selected; camera not outputting signal; incompatible resolution. | Check HDMI cable connections. Ensure camera is powered on and outputting video. Verify monitor input settings. Adjust camera output resolution if necessary. |
| Touch screen is unresponsive. | Touch function disabled; screen protector interference; software glitch. | Press the TOUCH button to enable touch functionality. Remove or adjust screen protector. Restart the monitor. |
| Image is distorted or flickering. | Faulty HDMI cable; signal interference; incompatible refresh rate. | Try a different HDMI cable. Ensure cables are not near strong electromagnetic sources. Check camera's refresh rate settings. |
| Audio issues (no sound or distorted sound). | Headphones not connected properly; audio settings incorrect; camera not sending audio. | Check headphone connection. Verify audio settings on the monitor and camera. Ensure camera is configured to send audio via HDMI. |
8. Specifications
Detailed technical specifications for the FEELWORLD F6 Pro monitor.
| Feature | Detail |
|---|---|
| Display Size | 5.5 inches |
| Resolution | 1920x1080 (Full HD) |
| Brightness | 1600 nits |
| Contrast Ratio | 1000:1 |
| Viewing Angle | 160° |
| Color Gamut | 16.7M (8bit) |
| HDMI Input/Output | 4K@30Hz support |
| Power Input | NP-F Battery, DC 12V, USB Type-C 5V |
| Power Output | DC OUT 8.4V |
| Item Weight | 7.1 ounces (200 Grams) |
| Item Model Number | EA702130 |
| ASIN | B078TJV5TJ |
| UPC | 600346552876 |
9. Warranty and Support
FEELWORLD products are designed for reliability and performance. For warranty information, please refer to the warranty card included with your product or visit the official FEELWORLD website. For technical support or service inquiries, please contact FEELWORLD customer service through their official channels or your authorized retailer.