1. Introduction
This manual provides detailed instructions for the installation, operation, and maintenance of your TOPGREENER TDOS5-JD Dual Load Motion Sensor Switch. This device is designed to automatically control two separate loads, such as lights and a fan, based on occupancy or vacancy detection using Passive Infrared (PIR) technology. Please read this manual thoroughly before installation and use to ensure proper function and safety.
2. Safety Information
- WARNING: To avoid fire, shock, or death, turn off power at the circuit breaker or fuse box and test that the power is off before wiring.
- Installation must be performed by a qualified electrician or in accordance with all local and national electrical codes.
- This device requires a ground wire for proper operation.
- This device does not require a neutral wire.
- Do not use this device with loads exceeding its specified ratings.
- For indoor use only.
3. Package Contents
- TOPGREENER TDOS5-JD Dual Load Motion Sensor Switch
- Instruction Manual
- Mounting Screws
- Wire Nuts
4. Product Features
- Dual Load Control: Connect and automate two separate loads (e.g., lights and a fan) from a single unit.
- PIR Motion Sensor: Detects motion with a 180° field of view, covering up to 40ft in front and 20ft on either side. Advanced PIR technology helps reduce false triggers.
- Walk-Through Feature: Automatically turns off loads after 2.5 minutes if no further motion is detected within 30 seconds of the initial trigger.
- Multiple Operating Modes:
- Occupancy Sensor Mode (OCCS): Loads turn ON automatically when motion is detected and OFF after a set time delay when the area is vacant.
- Dual Occupancy Mode (OCCD): Both loads operate in occupancy mode.
- Vacancy Sensor Mode (VACD): Loads are turned ON manually and turn OFF automatically after a set time delay when the area is vacant.
- Adjustable Time Delay: Configurable options for 15 seconds (Test mode), 5 minutes, 10 minutes, 20 minutes, and 30 minutes.
- No Neutral Wire Required: Simplifies installation in older homes or locations without a neutral wire.
- Ground Wire Required: Essential for safe operation.
- Electrical Ratings: 120/277VAC@60Hz; 800W incandescent/halogen, 150W LED/CFL, 1/4HP motor.
- Compliance: Compliant with Title 20 & Title 24.
- Single-Pole Only: Designed for single-pole applications.
5. Installation
Before you begin: Ensure power is OFF at the circuit breaker. This device is for single-pole installations only and requires a ground wire.
- Turn Off Power: Locate the circuit breaker controlling the switch you are replacing and turn it OFF. Verify power is off using a voltage tester.
- Remove Existing Switch: Carefully remove the wall plate and unscrew the existing switch from the wall box. Disconnect the wires.
- Identify Wires: You should have a Line (hot) wire, two Load wires (one for each load, e.g., light and fan), and a Ground wire. This switch does not require a neutral wire.
- Wire the Sensor Switch: Connect the wires from the wall box to the corresponding wires on the TDOS5-JD switch using wire nuts.
- Connect the Line (hot) wire from the wall box to the switch's Line wire.
- Connect the Load 1 wire (e.g., for lights) from the wall box to the switch's Load 1 wire.
- Connect the Load 2 wire (e.g., for fan) from the wall box to the switch's Load 2 wire.
- Connect the Ground wire from the wall box to the switch's Ground wire.
- Mount the Switch: Carefully fold the wires into the wall box and secure the switch with the provided screws. Attach the wall plate.
- Restore Power: Turn the power back ON at the circuit breaker.
- Warm-Up Period: After installation, allow 1-2 minutes for the device to warm up and calibrate before it functions correctly.
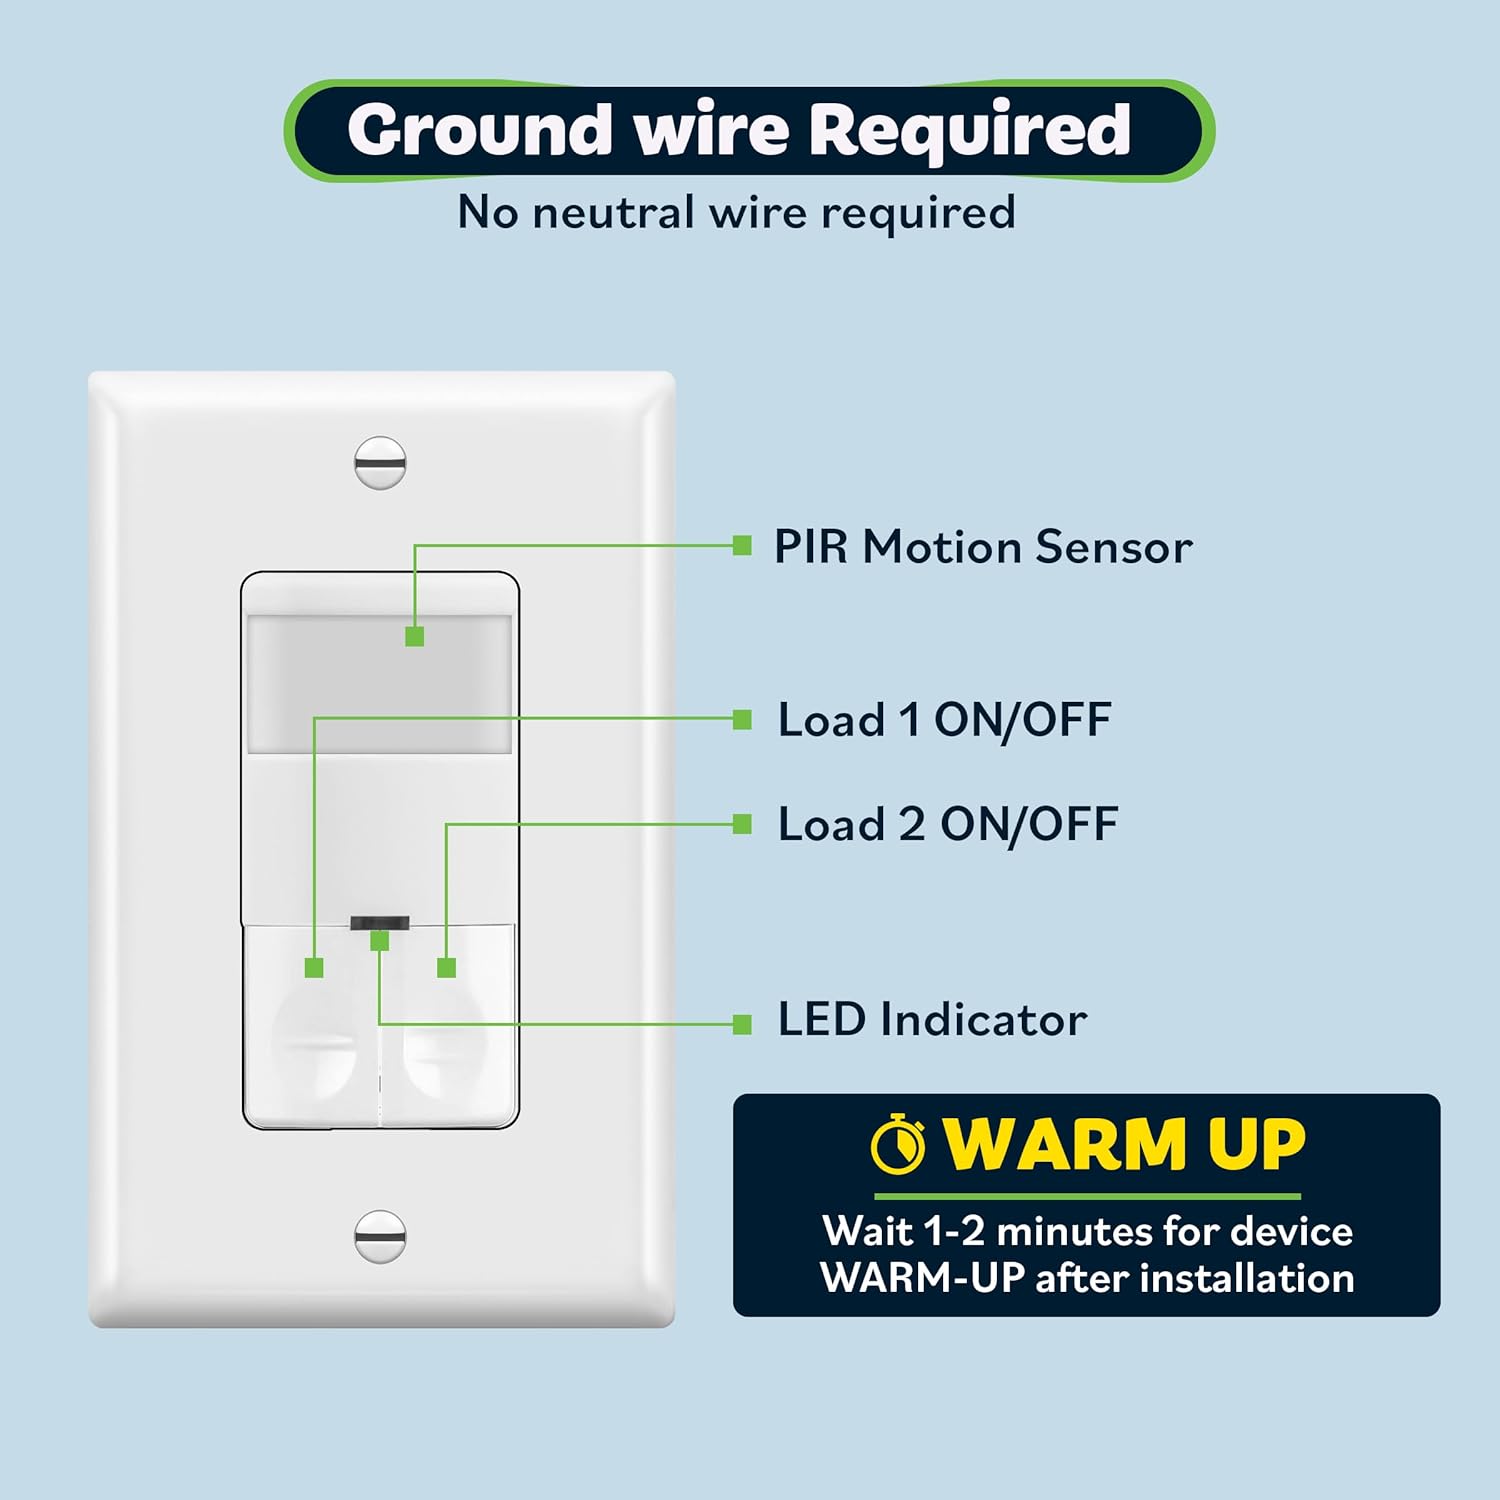
Figure 1: Components of the TDOS5-JD sensor switch, indicating the PIR sensor, Load 1/2 ON/OFF buttons, LED indicator, and a note about the warm-up period after installation. It also highlights that a ground wire is required and no neutral wire is needed.
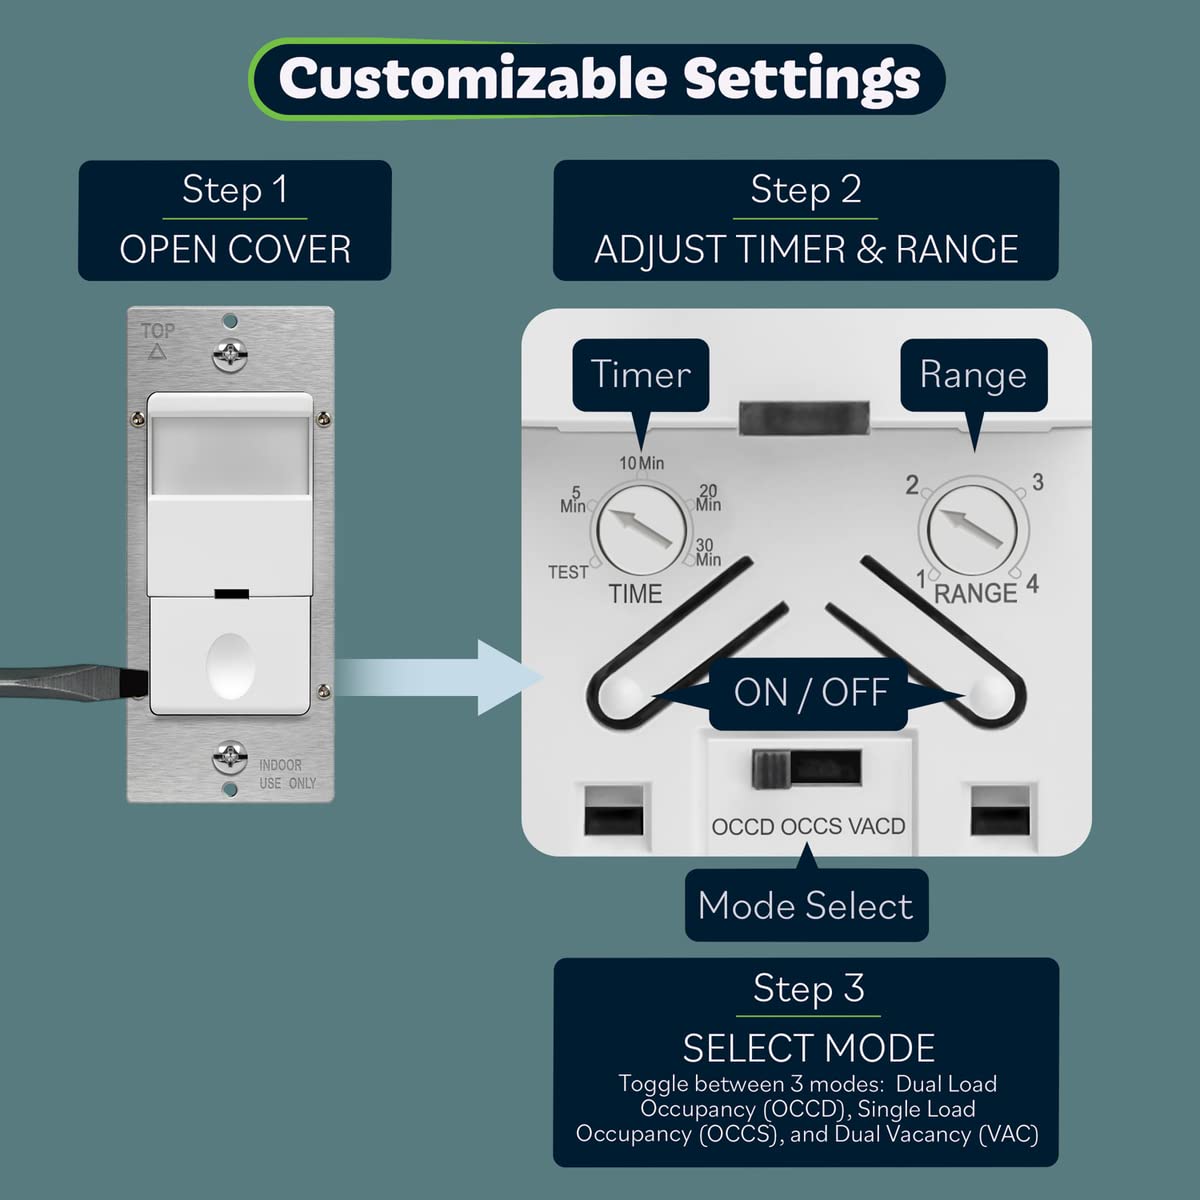
Figure 2: An image showing the TOPGREENER TDOS5-JD motion sensor switch being carefully inserted into a standard electrical wall box during the installation process.
6. Operation
Once installed and powered, the TDOS5-JD switch will operate according to the selected mode (Occupancy or Vacancy) and configured settings.
- Automatic Control: In Occupancy modes, the sensor detects motion and automatically turns on the connected loads. After the area becomes vacant for the set time delay, the loads will turn off. In Vacancy mode, loads are turned on manually and turn off automatically.
- Manual ON/OFF: The switch features two ON/OFF buttons, one for each load, allowing for manual control. Pressing an ON/OFF button will toggle the respective load.
- LED Indicator: A small LED indicator provides visual feedback on the switch's status.

Figure 3: A person carrying a laundry basket walks into a room, and the lights automatically turn on, illustrating the hands-free lighting capability of the motion sensor switch.

Figure 4: A modern bathroom setting where the TOPGREENER dual load sensor switch controls both the overhead lights and the exhaust fan automatically, demonstrating its energy-saving potential.
7. Customization and Settings
The TDOS5-JD switch offers adjustable settings for time delay, sensitivity (range), and operating mode. These settings are located behind the faceplate.
- Access Settings: Gently pry open the outer cover of the switch to reveal the adjustment dials and mode switch.
- Adjust Time Delay: Use a small screwdriver to turn the 'TIME' dial to select the desired delay: Test (15 seconds), 5 minutes, 10 minutes, 20 minutes, or 30 minutes.
- Adjust Sensor Range: Use a small screwdriver to turn the 'RANGE' dial to adjust the motion detection sensitivity from 1 (lowest) to 4 (highest).
- Select Operating Mode: Use the small switch labeled 'OCCD OCCS VACD' to choose your desired mode:
- OCCD: Dual Occupancy Mode
- OCCS: Single Occupancy Mode
- VACD: Vacancy Mode

Figure 5: A detailed diagram illustrating the steps to customize the sensor switch settings. It shows how to open the cover, and then adjust the 'Time' dial (Test, 5, 10, 20, 30 Min), 'Range' dial (1-4), and the 'Mode Select' switch (OCCD, OCCS, VACD).

Figure 6: An image depicting a modern bathroom with the sensor switch installed on the wall. A magnified inset shows the adjustable time delay and range dials, emphasizing the customization options for automatic light control.
8. Troubleshooting
| Problem | Possible Cause | Solution |
|---|---|---|
| Lights/Fan do not turn ON with motion. | No power; incorrect wiring; sensor blocked; incorrect mode; range too low. | Check circuit breaker. Verify wiring connections. Ensure sensor lens is clear. Confirm correct operating mode (OCCS/OCCD). Increase sensor range. |
| Lights/Fan stay ON too long or turn OFF too quickly. | Incorrect time delay setting; continuous motion detected; walk-through feature activated. | Adjust time delay setting. Ensure no constant motion within sensor's view. Understand walk-through feature behavior. |
| Lights/Fan turn ON without apparent motion (false triggers). | Sensor too sensitive; heat sources or air drafts; sensor facing high-traffic area. | Decrease sensor range. Relocate sensor away from heat sources (HVAC vents, direct sunlight) or drafts. Adjust sensor direction if possible. |
| Timer not functioning as expected (e.g., only extreme settings work). | Dial mechanism issue; specific unit calibration. | Carefully re-adjust the time dial. If issue persists, contact customer support. |
| One load works, but the other does not. | Incorrect wiring for the non-working load; faulty bulb/fan. | Verify wiring connections for Load 1 and Load 2. Test the bulb or fan directly to ensure it is functional. |
9. Specifications
- Model Number: TDOS5-JD
- Dimensions: 2.5 x 2.5 x 4.5 inches
- Weight: 6 ounces
- Power Source: Corded Electric
- Voltage: 120/277VAC, 60Hz
- Incandescent/Halogen Load: 800W max
- LED/CFL Load: 150W max
- Motor Rating: 1/4HP max
- Coverage Area: Up to 1200 square feet
- Field of View: 180 degrees
- Maximum Range: 40 feet (in front), 20 feet (sides)
- Operating Temperature: 32-131°F (0-55°C)
- Wiring: Ground wire required, no neutral wire required
- Certifications: UL Listed, Compliant with Title 20 & Title 24
10. Maintenance
The TOPGREENER TDOS5-JD motion sensor switch requires minimal maintenance.
- Cleaning: Periodically wipe the sensor lens and faceplate with a soft, damp cloth. Do not use abrasive cleaners or solvents, as these can damage the finish or sensor.
- Inspection: Occasionally check the switch for any visible damage or loose connections. If any issues are found, turn off power at the circuit breaker and address them or consult a qualified electrician.
11. Warranty and Support
TOPGREENER products are designed for reliability and performance. For specific warranty information, including terms and conditions, please refer to the warranty documentation provided with your purchase or visit the official TOPGREENER website. For technical support or assistance with troubleshooting, please contact TOPGREENER customer service.
Manufacturer: TOPGREENER
Contact Information: Please visit the TOPGREENER official website for the most current contact details and support resources.


