Introduction
The NEXPEAK NX501 OBD2 Scanner is an advanced diagnostic tool designed to help vehicle owners understand and resolve engine-related issues. This manual provides comprehensive instructions for setting up, operating, and maintaining your scanner, ensuring optimal performance and longevity.
What's Included
The NEXPEAK NX501 package contains the following items:
- NX501 OBD2 scanner
- OBDII Extension Cable
- OBD2 User Manual
- Mini-USB cable
- Carry Case
- Gift Type Retail Box

Figure 1: NEXPEAK NX501 Package Contents
Important Safety Information
Please read and understand all safety instructions before using the device. Failure to do so may result in damage to the device, vehicle, or personal injury.
- The Smart Update Service for the NX501 scanner is compatible only with Windows XP, Windows Vista, Windows 7, Windows 8, and Windows 10 (both 32-bit and 64-bit operating systems).
- Ensure your vehicle is OBD II compliant before purchase and use. Verify by checking the Vehicle Emission Control Information (VECI) label, typically located under the hood or near the radiator.
- This automotive code scanner is designed to check engine-related system fault codes ONLY. It is NOT intended for use with any other vehicle systems (e.g., airbags, ABS).
- Always ensure proper connection of the OBDII cable to avoid electrical shorts or damage to the vehicle's ECU.
- Do not leave the scanner plugged into your car when not in use, as it may drain the vehicle's battery over time.
Setup Guide
1. Software Installation (for PC Connectivity)
To utilize features like printing diagnostic reports or updating the scanner's firmware, you need to install the "UPLINK" software on a Windows computer. The software is compatible with Windows XP, Vista, 7, 8, and 10.
- Visit the official NEXPEAK website (refer to your product's user manual for the exact URL).
- Navigate to the "Service" or "Download Center" section.
- Locate and download the "UPLINK" program specifically for the NX501 model. This will typically be a `.exe` file within a `.zip` archive.
- Extract the downloaded `.zip` file and run the installer. Follow the on-screen prompts to complete the software installation.
2. Connecting the Scanner to a Computer
Once the UPLINK software is installed, connect your NX501 scanner to your computer using the provided Mini-USB cable.
- Ensure the UPLINK software is running on your computer.
- Connect one end of the Mini-USB cable to the USB port on the NX501 scanner.
- Connect the other end of the Mini-USB cable to an available USB port on your computer.
- The scanner will power on automatically. The UPLINK software should detect the device and indicate a successful connection (e.g., "Device connected to COMx").

Figure 2: Connecting the NX501 for Print & Update
Operating the NX501 Scanner
1. Main Menu Overview
Upon powering on, the NX501 displays a user-friendly main menu with various functions:
- Diagnose: Accesses the main diagnostic functions.
- DTC Lookup: Allows you to look up Diagnostic Trouble Code definitions.
- Review: View previously recorded data.
- Tool Setup: Configure device settings (language, units, etc.).
- Print Data: Upload stored data to a PC for printing.
- Help: Access on-device help information.

Figure 3: NX501 Main Menu Interface
2. Diagnostic Functions (Full OBD2 Modes)
The NX501 supports all 10 OBD2 diagnostic modes, providing comprehensive vehicle analysis:
- Read Codes: Displays current, pending, and permanent Diagnostic Trouble Codes (DTCs) that have triggered the Check Engine Light.
- Erase Codes: Clears DTCs from the vehicle's ECU and turns off the Malfunction Indicator Lamp (MIL). Use after repairs are completed.
- I/M Readiness: Checks the readiness of the emission monitoring systems to determine if the vehicle is ready for a smog check. Green ticks indicate completed tests.
- Data Stream: Displays real-time live sensor data from the vehicle's ECU. This can be viewed in text or graphical format for detailed analysis.
- Freeze Frame: Captures a snapshot of critical vehicle operating conditions at the moment a fault code is set, aiding in diagnosis.
- O2 Sensor Test: Retrieves O2 sensor monitoring test results for the most recently completed tests from the vehicle's on-board computer.
- On-Board Monitoring (Mode 6): Retrieves results for on-board diagnostic monitoring tests of specific components/systems that are not continuously monitored.
- EVAP System Test (Mode 8): Initiates a test of the Evaporative Emission Control System (EVAP) for leaks.
- Vehicle Information: Retrieves the Vehicle Identification Number (VIN), Calibration ID (CALID), and Calibration Verification Number (CVN) of the vehicle.

Figure 4: Enhanced OBD2 Diagnostic Functions
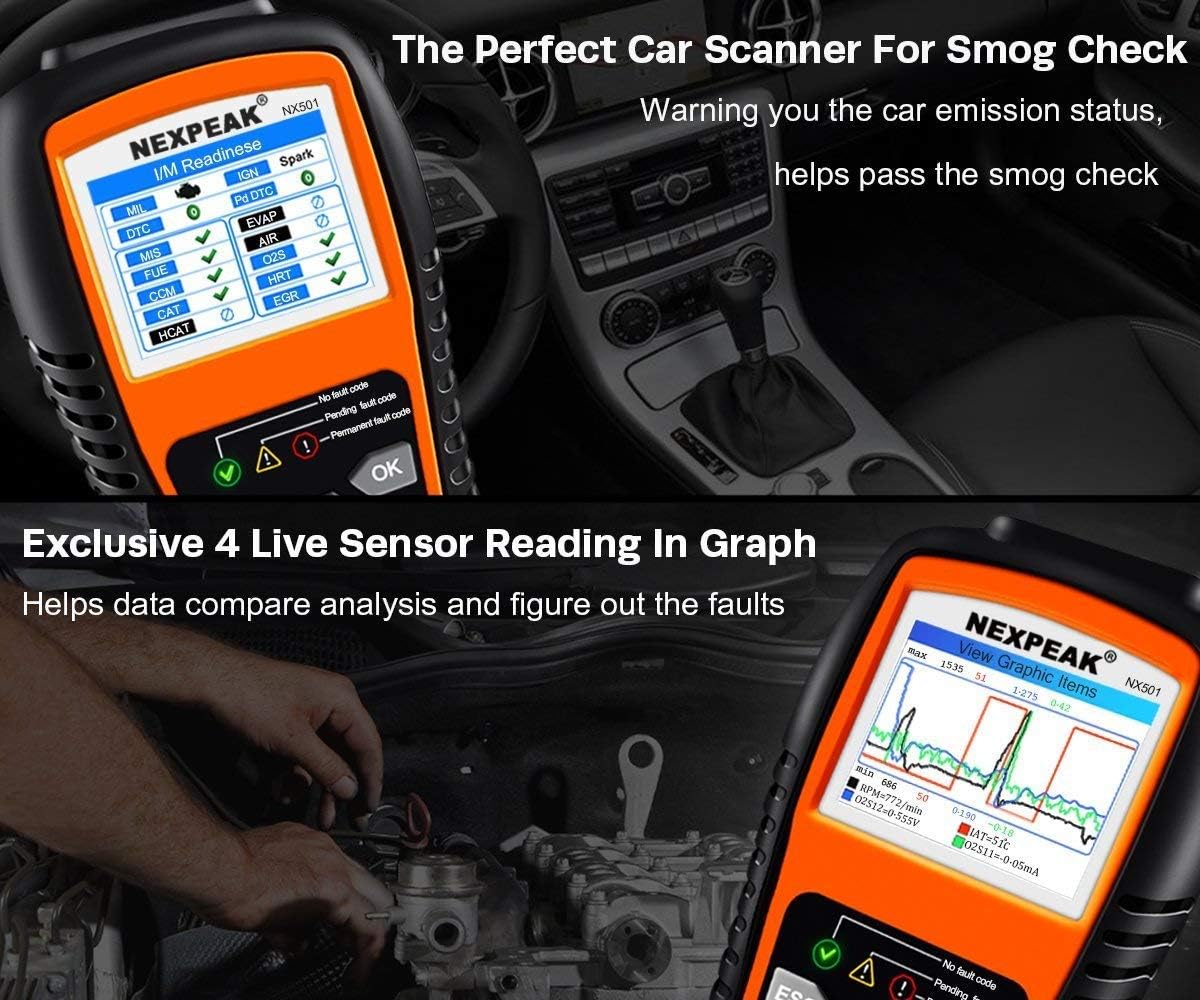
Figure 5: Smog Check and Live Sensor Data Graph
Video 1: Demonstration of NEXPEAK OBD2 Scanner's diagnostic capabilities, including monitor status and menu navigation for various tests.
3. Battery Health Monitoring
The NX501 continuously monitors your car's battery voltage during OBD diagnostic operations. It provides real-time battery health status and alerts you when the battery may need replacement, preventing unexpected breakdowns.

Figure 6: Integrated Diagnostic and Battery Test Functions
Maintenance and Updates
1. Software Updates
The NX501 OBD2 scanner supports lifetime free smart update service. Regularly updating the software ensures you have the latest vehicle compatibility and diagnostic features. Refer to the Setup Guide section for detailed instructions on downloading and installing the UPLINK software and connecting your device for updates.
2. Device Care
- Keep the scanner clean by wiping it with a soft, dry cloth. Avoid using abrasive cleaners or solvents.
- Store the device in its provided carry case when not in use to protect it from dust, moisture, and physical damage.
- Avoid exposing the scanner to extreme temperatures or direct sunlight for prolonged periods.
Troubleshooting
If you encounter issues with your NEXPEAK NX501 scanner, refer to the following common troubleshooting tips:
- Scanner not powering on: Ensure the OBDII cable is securely connected to the vehicle's OBDII port. The scanner draws power directly from the vehicle. If connecting to a PC, ensure the USB cable is properly connected.
- No communication with vehicle: Verify that your vehicle is OBDII compliant (model year 1996 or newer for US vehicles). Check the vehicle's OBDII port for any damage or loose connections. Ensure the ignition is in the ON position (engine off or running, depending on the test).
- Software update issues: The UPLINK software is for Windows computers only. Ensure your operating system is supported (Windows XP-10). If issues persist, refer to the official website for updated drivers or contact NEXPEAK after-sale service.
- Incorrect readings or errors: Ensure the vehicle's battery voltage is stable (monitored by the scanner). If the issue persists, try clearing codes and re-running the diagnostic.
For any persistent issues, please refer to the comprehensive user manual included in the package or contact NEXPEAK customer support.
Product Specifications
| Brand | NEXPEAK |
| Model | NX501 |
| Operating System (for PC Software) | Windows XP, Vista, 7, 8, 10 (32/64 bit) |
| Display | 2.8'' Color LCD Screen |
| Connectivity | 16 PIN OBDII Interface, Mini-USB |
| Supported Protocols | KWP2000, ISO9141, J1850 VPW, J1850 PWM, CAN |
| Item Weight | 1.5 pounds |
| Product Dimensions | 7.75 x 3.9 x 1.4 inches |
| Voltage | 12 Volts |
Warranty and Support
The NEXPEAK NX501 OBD2 Scanner comes with a 3-year manufacturer's warranty, ensuring peace of mind regarding product quality and performance.
For technical support, warranty claims, or any inquiries regarding your device, please contact NEXPEAK customer service through the platform where you purchased the product or visit the official NEXPEAK website for contact information.


