1. Introduction
The Travor 48 Macro LED Ring Flash Light is specifically designed for close-up photography, including macro shots, scientific research, medical applications, and personal photography. It provides consistent and adjustable illumination to enhance detail and clarity in your subjects.

Figure 1: Complete Travor 48 Macro LED Ring Flash Light Bundle.
2. Package Contents
Please verify that all items listed below are included in your package:
- 1 x Macro Ring Flash Unit
- 1 x Power Control Unit with LCD Display
- 4 x Flash Diffusers (various colors)
- 8 x Adapter Rings (49mm, 52mm, 55mm, 58mm, 62mm, 67mm, 72mm, 77mm)
- 1 x User Manual (this document)
3. Key Features
- 48 SMD LED Design: Consists of 48 high-luminance SMD LEDs for bright and efficient lighting.
- High CRI: Delivers impressive Color Rendering Index (CRI) values of 90 for true-to-life color rendering.
- LCD Display: High-definition LCD for clear and intuitive control in various lighting conditions.
- 7-Level Brightness Adjustment: Stepless dimmer allows precise control over light output.
- 4 Lighting Flash Modes: Includes Full Flash, Left Flash, Right Flash, and Full Light Steady-On modes.
- Multiple Diffusers: Four color diffusers (orange, blue, white, transparent) for adjusting color temperature.
- Wide Compatibility: Compatible with various DSLR cameras and lenses via included adapter rings.
4. Compatibility
The Travor 48 Macro LED Ring Flash Light is designed to be compatible with a wide range of DSLR cameras and lenses. It fits cameras with a hot shoe and lenses with filter threads ranging from 49mm to 77mm.
4.1. Compatible Camera Brands:
- Canon (e.g., 750D, T6i, T6s, 7D Mark II, T2i, T3i, T4i)
- Nikon (e.g., D500, D5500, D750, D7200, D800E)
- Sony (e.g., a6500, A6300, A7 II, A7R II, A6000)
- Pentax
- Olympus (Note: Only works with E-M10, PEN-F, E-P5, E-M5, E-M1 II, E-M10 II, E-M1, E-PL8, E-PL7, E-PL5 series)
- Panasonic
4.2. Compatible Lens Filter Thread Sizes:
- 49mm
- 52mm
- 55mm
- 58mm
- 62mm
- 67mm
- 72mm
- 77mm
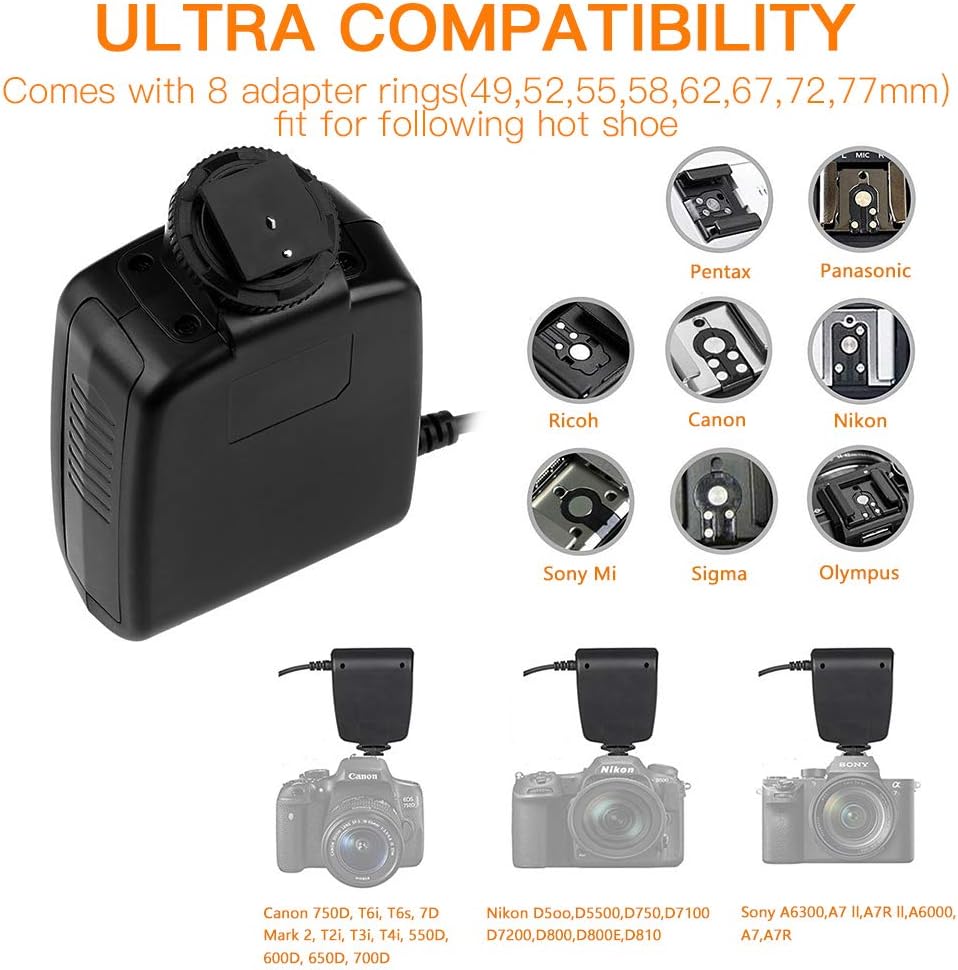
Figure 2: Visual representation of hot shoe and lens compatibility.
5. Setup and Installation
Follow these steps to set up your Travor Macro LED Ring Flash Light:
- Install Batteries: Open the battery compartment on the power control unit and insert 4 AA batteries (not included), ensuring correct polarity.
- Attach Adapter Ring: Select the appropriate adapter ring for your camera lens. Screw the adapter ring onto the front filter thread of your lens. Ensure it is securely fastened.
- Mount Ring Flash: Align the Macro Ring Flash unit with the adapter ring on your lens. Gently push and twist the ring flash onto the adapter ring until it clicks into place.
- Mount Power Control Unit: Slide the power control unit's hot shoe mount into your camera's hot shoe. Tighten the locking wheel to secure it.
- Connect Cables: Connect the coiled cable from the ring flash unit to the corresponding port on the power control unit.
- Attach Diffusers (Optional): To modify the color temperature of the light, select one of the four diffusers and gently snap it onto the front of the ring flash unit.
Video 1: Setup and Operation Guide for Travor Ring Flash.
Figure 3: Installation of adapter rings and power control unit.

Figure 4: Attaching color diffusers to the ring flash.
6. Operating Instructions
The power control unit features an intuitive LCD display and control buttons for easy operation.
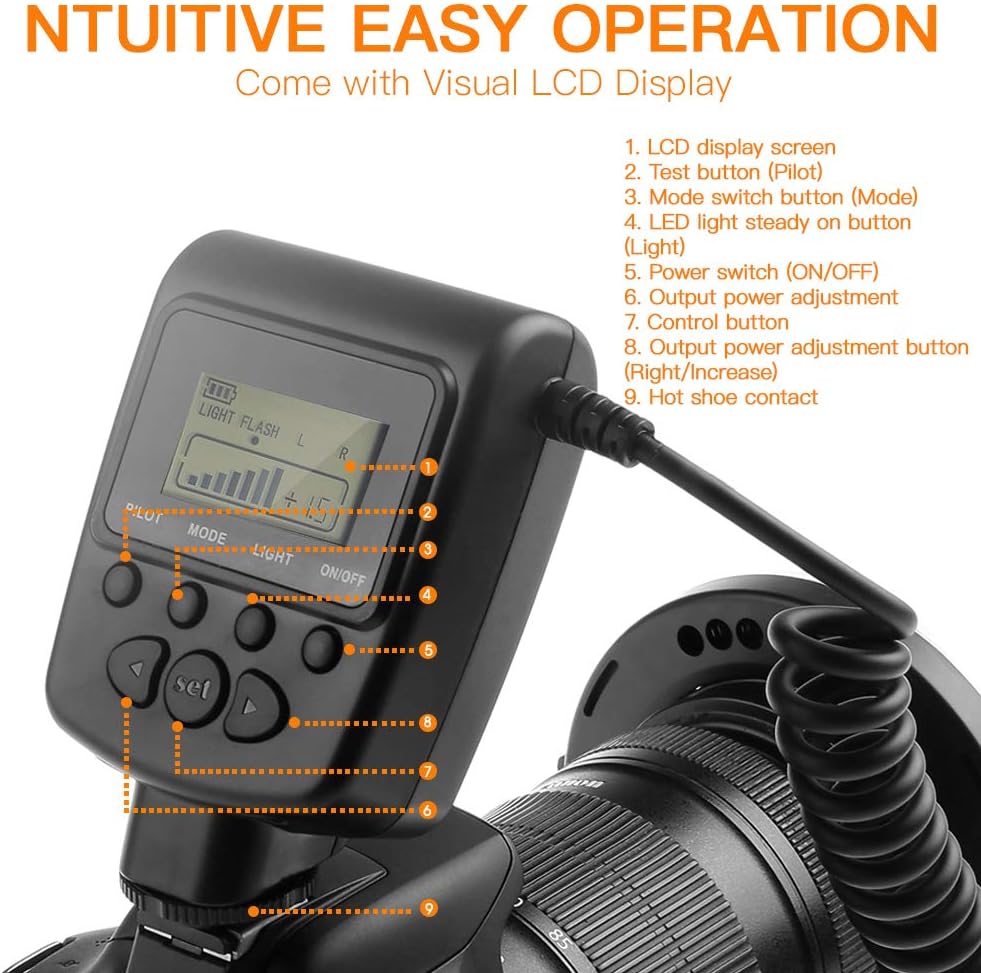
Figure 5: LCD Display and Control Buttons Overview.
- Power On/Off: Press the ON/OFF button to turn the unit on or off.
- Brightness Adjustment: Use the Output Power Adjustment (Right/Increase) and Output Power Adjustment (Left/Decrease) buttons to adjust the brightness. There are 7 levels of brightness adjustment.
- Mode Selection: Press the Mode Switch Button (Mode) to cycle through the four lighting modes:
- Full Flash: Both sides of the ring flash fire simultaneously.
- Left Flash: Only the left half of the ring flash fires.
- Right Flash: Only the right half of the ring flash fires.
- Full Light Steady-On: Both sides of the ring flash provide continuous light.
- Test Flash: Press the Test Button (Pilot) to manually trigger a test flash.
- LCD Display: The LCD screen displays current settings such as battery level, flash mode, and output power adjustment.

Figure 6: Brightness adjustment effect.

Figure 7: Different lighting modes for versatile photography.
7. Maintenance
- Keep the unit clean by wiping it with a soft, dry cloth. Avoid using harsh chemicals or abrasive materials.
- Remove batteries if the unit will not be used for an extended period to prevent leakage.
- Store the flash in a cool, dry place away from direct sunlight and extreme temperatures.
- Handle the ring flash and power control unit with care to avoid physical damage.
8. Troubleshooting
| Problem | Possible Cause | Solution |
|---|---|---|
| Flash does not power on. | Low or dead batteries; incorrect battery insertion. | Replace batteries with fresh ones; ensure correct polarity (+/-). |
| Flash does not fire. | Loose connection; incorrect camera settings; unit not fully charged (if rechargeable). | Check all cable connections; ensure power control unit is securely mounted on hot shoe; verify camera flash settings; allow unit to charge if applicable. |
| Uneven lighting. | Incorrect flash mode selected (e.g., Left/Right flash instead of Full Flash). | Switch to Full Flash or Full Light Steady-On mode for even illumination. |
| LCD display is dim or unreadable. | Low battery power. | Replace batteries. |
9. Specifications
- Model Number: 717390452004
- Product Dimensions: 6.1 x 5.12 x 3.54 inches
- Item Weight: 14.9 ounces
- LED Quantity: 48 pieces SMD LED
- Color Rendering Index (CRI): 90
- Flash Sync Speed: 1/250
- Power Source: 4 x AA Batteries (not included)
10. Warranty and Support
The Travor 48 Macro LED Ring Flash Light comes with a 1-year warranty from the date of purchase.
If you encounter any problems with your product or require assistance, please do not hesitate to contact Travor customer service. You can typically find contact information by clicking on "travor camera accessories" and then "Ask a question" on the product's retail page. Our team is dedicated to providing the best and most satisfactory solutions.
