
Introduction
Welcome to your new Mebus 40645 Projection Alarm Clock. This manual provides detailed instructions for the setup, operation, and maintenance of your device to ensure optimal performance and longevity. Please read this manual thoroughly before using the product.
Product Features
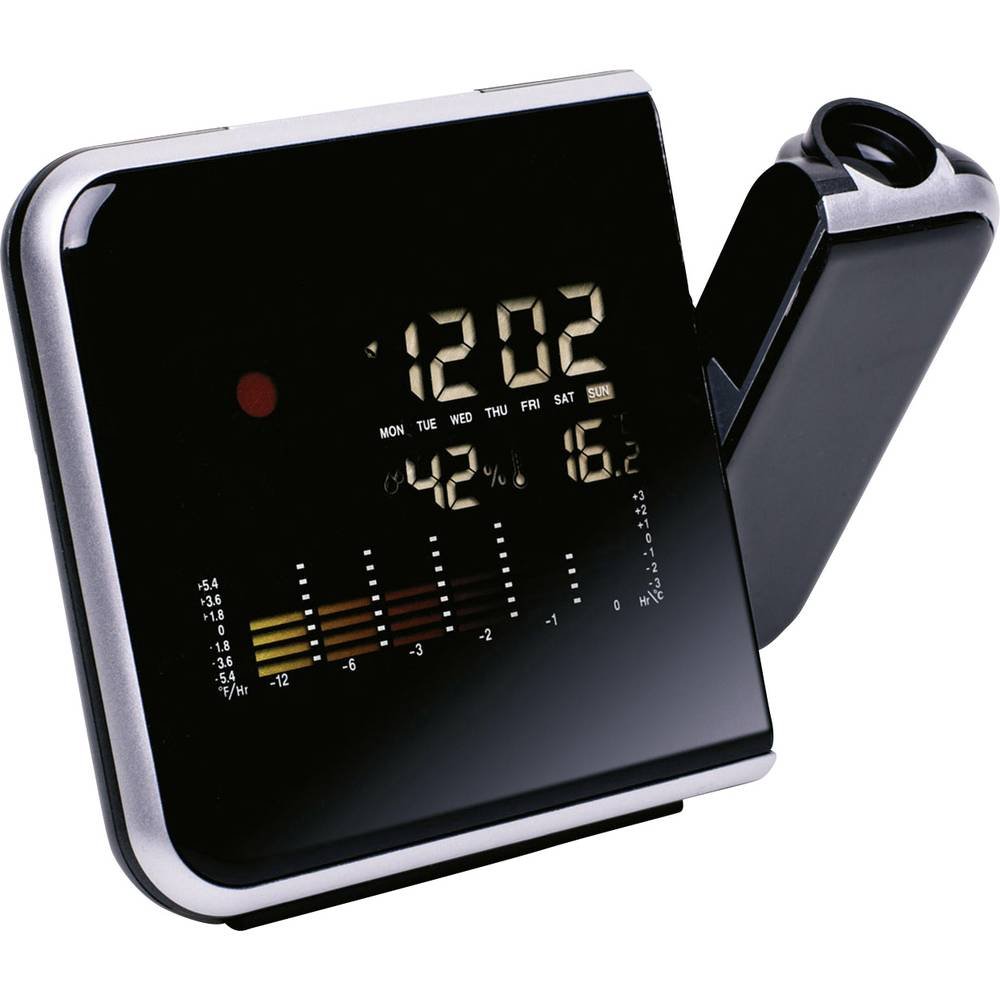
- Continuous time projection (requires AC adapter)
- Color display
- Indoor temperature display (Celsius/Fahrenheit selectable)
- Indoor humidity display
- Min/Max function for temperature and humidity readings
- Weather forecast with intuitive weather symbols
- Bar chart displaying temperature history for the last 12 hours
- Wellness indicator (Smiley icon)
- 12/24 hour time display format
- Alarm with snooze function
- Calendar display (month, day, day of the week)
- Backlight for enhanced visibility
Setup
Power Supply
The Mebus 40645 Projection Alarm Clock can be powered by either an AC adapter or batteries. For continuous time projection, the AC adapter must be used.
- AC Adapter: Connect the provided AC adapter to the clock's power input port and then plug it into a standard electrical outlet. This enables continuous display and projection.
- Batteries: For portable use or as a backup, insert the required batteries (not included) into the battery compartment located on the back of the unit. Ensure correct polarity (+/-) as indicated inside the compartment. Note that continuous projection is not available when operating solely on batteries.
Initial Configuration
Upon first power-up or after replacing batteries, the clock will typically display default settings. You will need to set the current time, date, and preferred temperature unit.
- Set Time: Press the 'MODE' button repeatedly until the time setting flashes. Use the 'UP' and 'DOWN' buttons to adjust the hours and minutes. Press 'MODE' again to confirm.
- Set Date: After setting the time, the date setting (year, month, day) will typically flash. Use 'UP' and 'DOWN' to adjust and 'MODE' to confirm each segment.
- Temperature Unit: Press the 'C/F' button (if available) to toggle between Celsius and Fahrenheit display for temperature.
Refer to the 'Operating Instructions' section for more detailed button functions.
Operating Instructions
Setting Time and Date
To enter the time/date setting mode, press and hold the 'MODE' button for a few seconds. The first adjustable value will flash. Use the 'UP' or 'DOWN' buttons to change the value. Press 'MODE' again to confirm and move to the next setting (e.g., hours, minutes, year, month, day).
Alarm Setting
Press the 'ALARM' button once to view the current alarm time. Press and hold 'ALARM' to enter alarm setting mode. The alarm time will flash. Use 'UP'/'DOWN' to adjust the hour and minute. Press 'ALARM' again to confirm. To activate or deactivate the alarm, press the 'ALARM' button briefly when not in setting mode.
Snooze Function: When the alarm sounds, press the 'SNOOZE/LIGHT' button to temporarily silence the alarm for a few minutes. The alarm will sound again after the snooze period.
Projection Function
When powered by the AC adapter, the clock continuously projects the time and temperature onto a wall or ceiling. You can adjust the projection angle by rotating the projection arm. Some models may also allow adjusting the focus of the projected image.
Display Modes and Information
- Time Display: Toggle between 12-hour and 24-hour format using a dedicated button or through the 'MODE' settings.
- Temperature/Humidity: The display shows current indoor temperature and humidity. Use the 'MIN/MAX' button to view the minimum and maximum recorded values.
- Weather Forecast: The clock analyzes atmospheric pressure trends to predict weather conditions, displayed via intuitive symbols (e.g., sunny, cloudy, rainy).
- Backlight: Press the 'SNOOZE/LIGHT' button to activate the backlight for a few seconds when operating on batteries. The backlight is continuously on when using the AC adapter.

Maintenance
- Cleaning: Clean the clock's surface and display with a soft, dry cloth. Do not use abrasive cleaners, solvents, or chemical sprays, as these can damage the finish and electronic components.
- Environment: Keep the device away from direct sunlight, extreme temperatures, and high humidity to prevent damage.
- Battery Replacement: If using batteries, replace them when the display dims or functions become unreliable. Always replace all batteries at the same time with new ones of the same type. Remove batteries if the device will not be used for an extended period to prevent leakage.
Troubleshooting
No Display / Dim Display
- Check if the AC adapter is securely connected to both the clock and the power outlet.
- If using batteries, ensure they are new and inserted with correct polarity. Replace old batteries.
Incorrect Time / Date
- Refer to the 'Setting Time and Date' section under 'Operating Instructions' to manually reset the time and date.
Projection Not Visible / Blurry
- Ensure the AC adapter is connected, as continuous projection requires external power.
- Adjust the projection arm to direct the image onto a suitable surface.
- If your model has a focus wheel, rotate it to sharpen the projected image.
- Projection is most visible in dark environments. Reduce ambient light for better clarity.
Inaccurate Temperature/Humidity Readings
- Ensure the clock is placed in a location away from direct heat sources, vents, or open windows that could affect readings.
- Allow some time for the sensors to stabilize after initial setup or relocation.
Specifications
| Brand | Mebus |
| Model Number | 40645 |
| Display Type | Digital with Projection |
| Special Features | Alarm, Projection Clock, Temperature Display, Backlit, Humidity Display, Weather Forecast |
| Power Source | Corded Electric, Battery |
| Batteries Required | Yes (for battery operation, not included) |
| Mounting Type | Tabletop |
| Case Color | Black |
| Dimensions (approx.) | 15.8 x 12.6 x 6.6 cm |
Warranty and Support
For warranty information, technical assistance, or customer support regarding your Mebus 40645 Projection Alarm Clock, please refer to the warranty card or documentation included with your original purchase. You may also visit the official Mebus website for contact details and frequently asked questions.
Please retain your proof of purchase for any warranty claims.