1. Product Overview
The Broil King Monarch 390 Natural Gas Grill is designed for outdoor cooking, offering a robust and efficient grilling experience. It features a 30,000 BTU main burner output, a 10,000 BTU stainless steel side burner, and a 12,000 BTU stainless steel rear rotisserie burner with a premium rotisserie kit. The primary cooking space is 350 sq. inches (2,258 sq. cm), with a total cooking space of 520 sq. inches including the porcelain warming rack.
Key components include heavy-duty cast iron cooking grids, three stainless steel Dual-Tube burners, a stainless steel Flav-R-Wave cooking system, and linear-flow infinitely adjustable burner valves. The grill is equipped with a Sure-Lite electronic ignition system and a deluxe Accu-Temp thermometer for precise temperature monitoring. The Therma-Cast aluminum cook box features a stainless steel lid insert, and the enclosed cabinet includes a metallic charcoal epoxy painted door and steel side shelves with integrated tool hooks.

Figure 1: Front view of the Broil King Monarch 390 Natural Gas Grill.
2. Safety Information
WARNING: For outdoor use only. Do not store or use gasoline or other flammable vapors and liquids in the vicinity of this or any other appliance. Always ensure proper ventilation.
- Read all instructions before assembling and using the grill.
- Keep children and pets away from the grill at all times.
- Never operate the grill unattended.
- Ensure the grill is placed on a level, stable surface away from combustible materials.
- Check for gas leaks before each use according to the instructions provided in the full manual.
- Always wear protective gloves when handling hot components.
- This product contains chemicals known to the State of California to cause cancer and birth defects or other reproductive harm (Proposition 65 warning).
3. Assembly
Assembly of the Broil King Monarch 390 Natural Gas Grill is required. It is recommended to carefully follow the manufacturer's detailed assembly instructions and diagrams provided with the product packaging. Ensure all parts are accounted for before beginning assembly. Some users have noted that the assembly instructions primarily consist of drawings; patience and careful attention to detail are advised.

Figure 2: Product dimensions for assembly planning.
4. Operating Instructions
4.1 Lighting the Main Burners
- Open the grill lid.
- Ensure all burner control knobs are in the 'OFF' position.
- Turn on the natural gas supply.
- Push and turn one main burner control knob to the 'HIGH' position.
- Immediately press the Sure-Lite electronic ignition button (Figure 3) and hold for 5 seconds. You should hear a clicking sound and see the burner ignite.
- If the burner does not ignite within 5 seconds, turn the control knob to 'OFF', wait 5 minutes for gas to dissipate, and repeat the lighting procedure.
- Once one burner is lit, you can ignite adjacent burners by turning their control knobs to 'HIGH'.
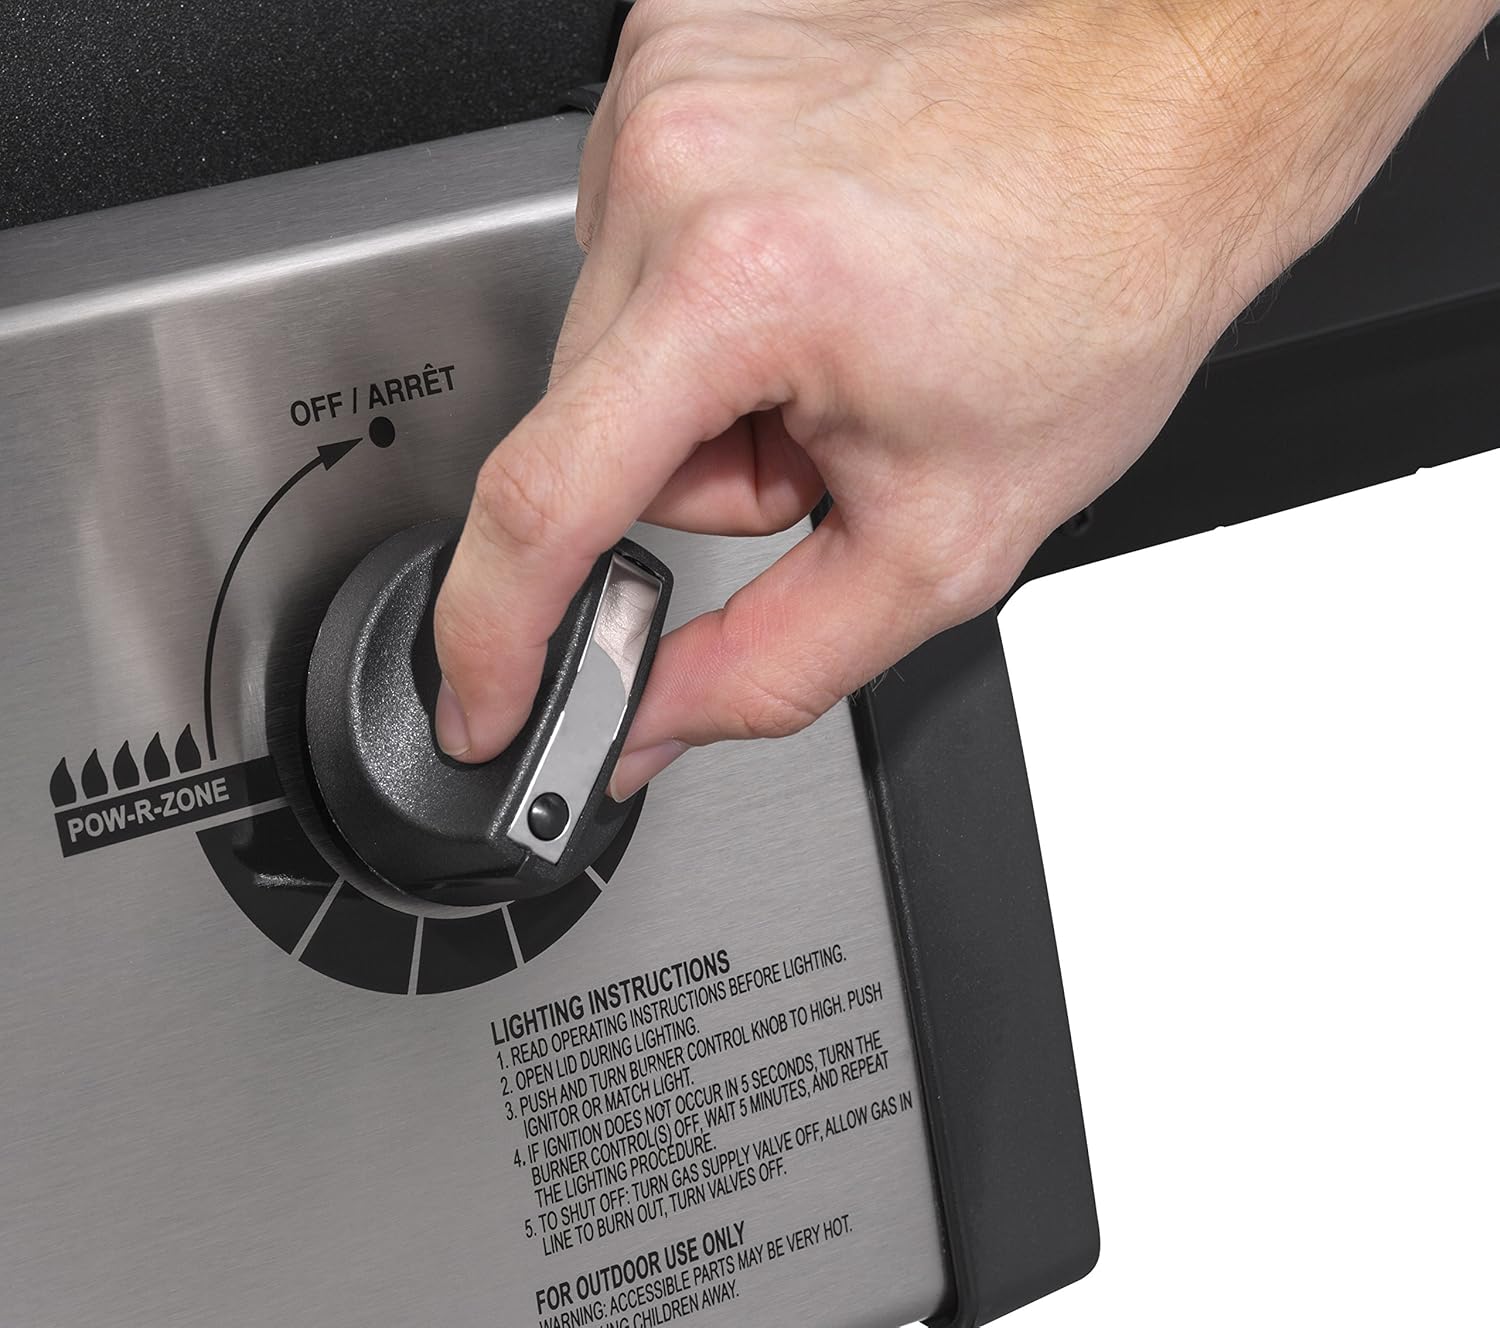
Figure 3: Turning a main burner control knob.

Figure 4: Pressing the Sure-Lite electronic ignition button.
4.2 Temperature Control and Cooking
The linear-flow infinitely adjustable burner valves allow for precise temperature control across the cooking surface. Use the deluxe Accu-Temp thermometer integrated into the lid to monitor the internal grill temperature. The stainless steel Flav-R-Wave cooking system and heavy-duty cast iron cooking grids ensure even heat distribution and vaporize drippings for enhanced flavor.
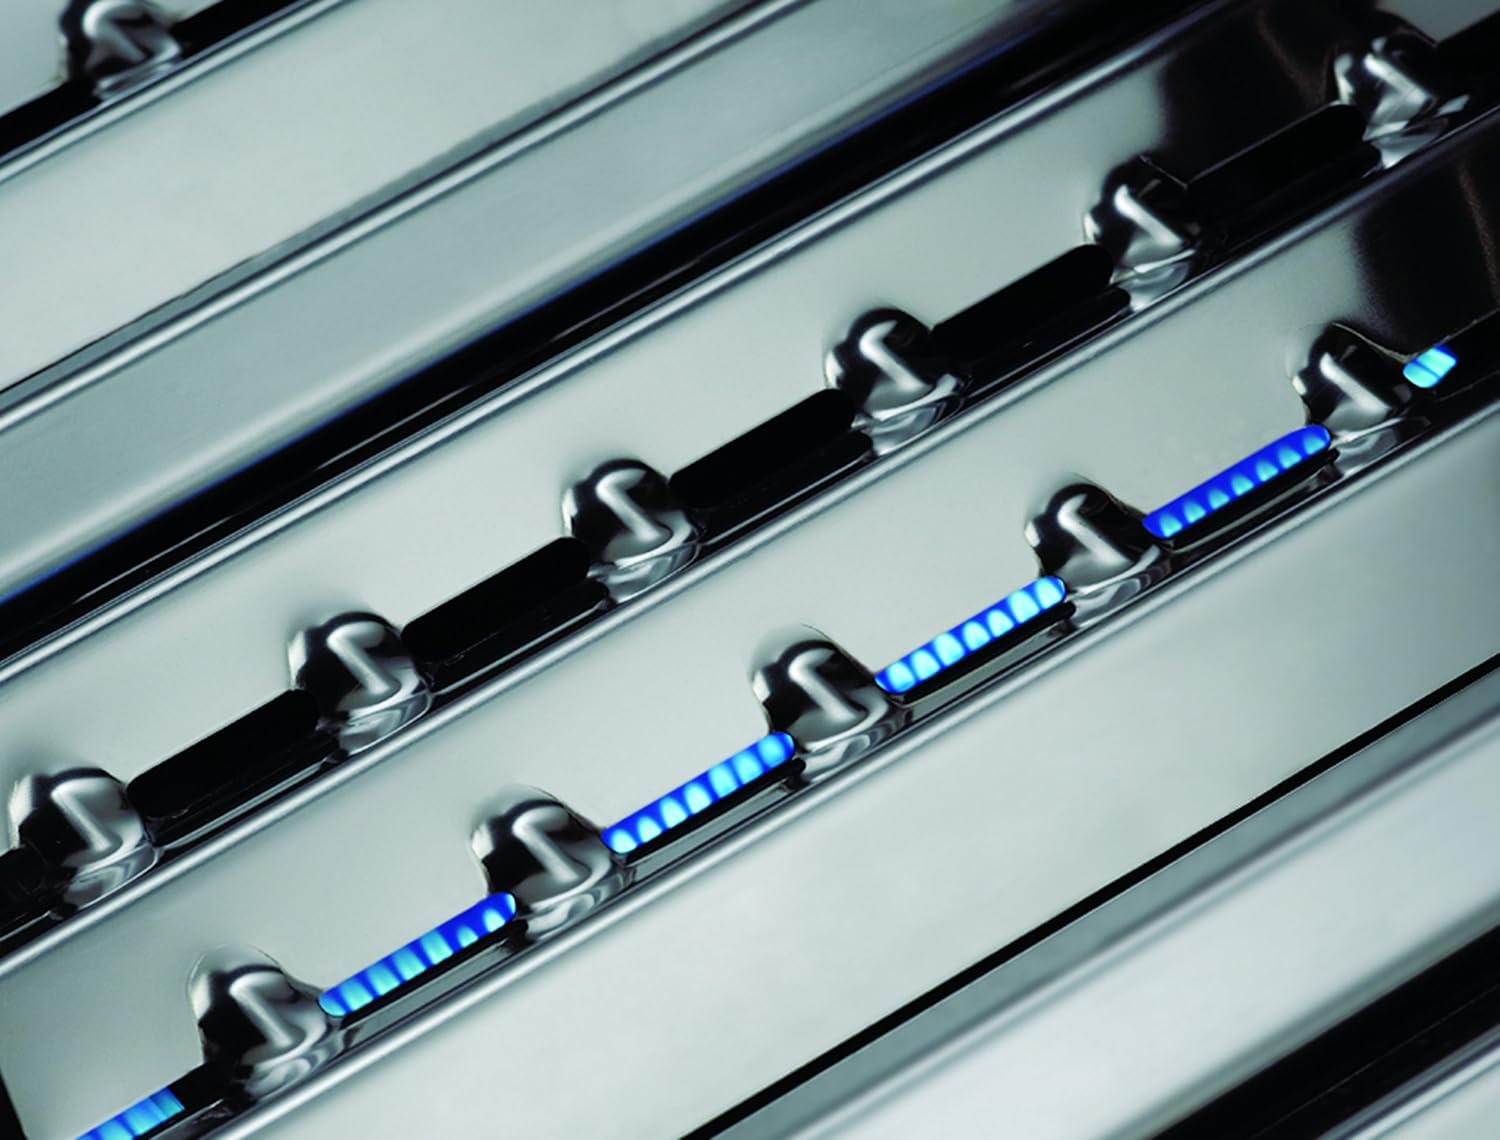
Figure 5: The Flav-R-Wave cooking system.
4.3 Side Burner Operation
The 10,000 BTU stainless steel side burner is ideal for preparing side dishes, sauces, or boiling water. To operate, open the side burner lid, turn the side burner control knob to 'HIGH', and press the ignition button. Adjust the flame as needed.
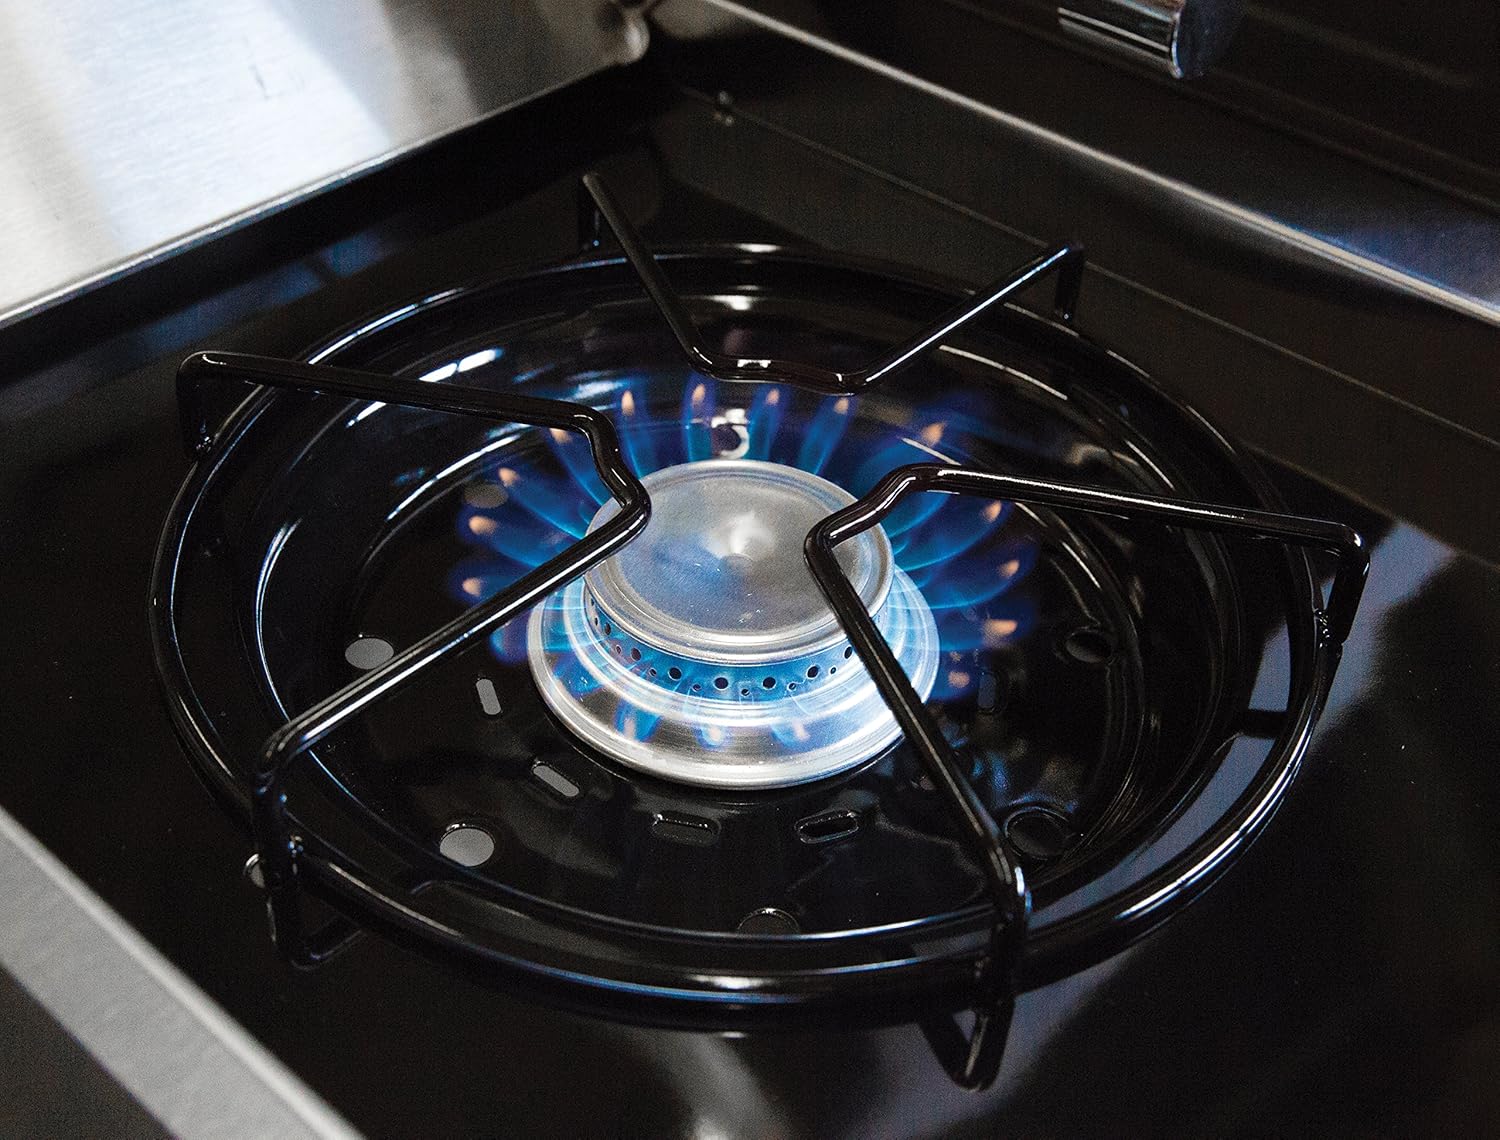
Figure 6: Side burner in use.
4.4 Rotisserie Burner and Kit
The 12,000 BTU stainless steel rear rotisserie burner and premium rotisserie kit allow for slow roasting. Install the rotisserie rod and motor according to the kit instructions. Ignite the rotisserie burner by turning its control knob to 'HIGH' and pressing the ignition button. Ensure the rotisserie burner is lit before placing food on the spit.

Figure 7: Rotisserie kit in operation with chickens.
5. Maintenance and Care
Regular cleaning and maintenance will extend the life and performance of your grill.
- Cooking Grids: Clean cast iron cooking grids after each use with a grill brush while still warm. For stubborn residue, use warm soapy water and a non-abrasive scrubber.
- Flav-R-Wave System: Periodically remove and clean the Flav-R-Wave plates. Scrape off any accumulated grease or food particles.
- Burners: Inspect burner ports for blockages (e.g., spider webs, food debris). Use a wire brush or paperclip to clear any obstructions.
- Cook Box: Scrape the inside of the cook box to remove grease and debris. Ensure the grease tray is regularly emptied and cleaned.
- Exterior: Clean stainless steel surfaces with a stainless steel cleaner. Painted surfaces can be cleaned with mild soap and water.
- Storage: When not in use for extended periods, cover the grill with a protective cover and store in a dry, sheltered area.
6. Troubleshooting
| Problem | Possible Cause | Solution |
|---|---|---|
| Burner does not light | No gas supply, clogged burner port, faulty igniter. | Check gas connection and supply. Clean burner ports. Check igniter electrode and wire connections. |
| Uneven heat distribution | Clogged burner ports, damaged Flav-R-Wave plates. | Clean burner ports. Inspect and replace damaged Flav-R-Wave plates if necessary. |
| Excessive flare-ups | Grease buildup, high heat setting. | Clean cooking grids and Flav-R-Wave system. Reduce heat setting. Trim excess fat from food. |
| Side burner not igniting | No gas, clogged burner, faulty igniter. | Ensure gas is on. Clean side burner ports. Check igniter. |
For more detailed troubleshooting or issues not listed, refer to the complete product manual or contact Broil King customer support.
7. Specifications
| Feature | Detail |
|---|---|
| Brand | Broil King |
| Model Name | Monarch 390 |
| Model Number | 834287 |
| Fuel Type | Natural Gas |
| Main Burner Output | 30,000 BTU |
| Side Burner Output | 10,000 BTU |
| Rear Rotisserie Burner Output | 12,000 BTU |
| Primary Cooking Space | 350 sq. inches (2,258 sq. cm) |
| Total Cooking Space | 520 sq. inches |
| Product Dimensions (D x W x H) | 22" x 51.8" x 48" |
| Item Weight | 122 Pounds |
| Material | Stainless Steel / Therma-Cast Aluminum |
| Assembly Required | Yes |
| Ignition System | Sure-Lite Electronic Ignition |
| Special Features | Rust Resistant, Warming Rack |
8. Warranty and Support
The Broil King Monarch 390 Natural Gas Grill comes with a comprehensive warranty:
- Limited Lifetime Warranty: On the cook box.
- 10 Year Warranty: On burners.
- 2 Year Warranty: On remaining parts and paint.
For warranty claims, technical assistance, or to purchase replacement parts, please contact Broil King customer support. Keep your proof of purchase and model number readily available when contacting support.


