
maXpeedingrods CR26@CO-HONCIV3-R-LC
maXpeedingrods Coilover Suspension Kit User Manual
Model: CR26@CO-HONCIV3-R-LC
Brand: maXpeedingrods
Introduction
This manual provides essential information for the proper installation, operation, and maintenance of your maXpeedingrods 24-level damper adjustable coilover suspension kit. Please read this manual thoroughly before installation and use to ensure optimal performance and safety.

Image: Overview of the maXpeedingrods Coilover Suspension Kit, including four coilovers, adjustment wrenches, and mounting hardware.
Compatibility
This coilover kit is designed for specific Honda and Acura models. Verify your vehicle's compatibility before proceeding with installation.
- For Honda Civic 1988-1991 (ED2, ED3, ED4, ED6, ED7, EC8, EE9)
- For Honda Civic 1992-1995 (EG1, EG2, EG3, EG4, EG5, EG6, EG8, EG9, EJ1, EJ2, EH2, EH3, EH9)
- For Honda Civic 1995-2000 (EK2, EK3, EK4, EJ6, EJ7, EJ8, EM1)
- For Honda CRX 1988-1991 (ED8, ED9, EE8)
- For Honda Delsol 1992-1995 (EG1)
- For Acura Integra 1990-1993 (DA, DB)
- For Acura Integra 1994-2001 (DC2, DC4) - Rear Fork Type Bracket Model Only
Key Features

24 Levels Rebound Damping Force
Allows precise adjustment of ride hardness to suit various road conditions and driving preferences. Levels 0-8 are suggested for street use, 9-16 for mountain or uneven terrain, and 17-24 for race tracks. This adjustability provides a more comfortable and controlled driving experience.
Image: Illustration showing the difference between adjustable and non-adjustable damping settings, highlighting the 24-way adjustable damper force.

Adjustable Height
The coilovers allow for 1-3 inches of height adjustment, enabling a more aggressive stance and improved steering feel and response. This design also helps to minimize turning noise.
Image: Diagram illustrating how to adjust the ride height and spring tension of the coilover.

High Tensile Spring
Equipped with durable high tensile springs. Front spring rate: 8 kg/mm (448 lbs/in) & 5 kg/mm (280 lbs/in) with spring preload: 7-10 mm. Spring length Front: 180mm & Spring length Rear: 180mm. These springs are tested for over 600,000 continuous cycles with less than 0.04% distortion.
Image: Close-up view of the high-tension spring, emphasizing its robust construction.

Forged T6061 Aluminum Top Mounts
Features forged T6061 aluminum top mounts with rubber components for enhanced durability and reduced weight. These mounts contribute to the overall strength and performance of the suspension system.
Image: Detailed view of the coilover's top mount, highlighting the adjustable damper, forged T6061 aluminum, and high-tension spring.

Dust Cover Design
Integrated dust covers protect the shock absorber seals from wear and foreign objects, extending the lifespan and maintaining the performance of the coilovers.
Image: Close-up of the coilover showing the dust cover design, explaining its function in protecting shock absorber seals.

Pillow Ball Design
The pillow ball design effectively prevents noise during tuning and operation, contributing to a smoother and quieter ride.
Image: Illustration of the pillow ball design, emphasizing its role in preventing noise.
Package Contents
Your maXpeedingrods Coilover Suspension Kit includes the following components:
- 4 x Coilovers (Front and Rear)
- 2 x C-Spanners for height adjustment
- 2 x Allen Keys for damping adjustment
- Mounting Hardware (as required for specific models)
- Instruction Manual (this document)
Safety Information
Always prioritize safety when working on your vehicle's suspension system. Improper installation or adjustment can lead to serious injury or vehicle damage.
- Professional Installation Recommended: Due to the complexity and safety-critical nature of suspension components, professional installation by a qualified mechanic is strongly recommended.
- Use Proper Tools: Ensure you have all necessary tools and equipment before beginning installation.
- Vehicle Support: Always use jack stands or a lift to securely support the vehicle. Never rely solely on a jack.
- Wear Protective Gear: Use safety glasses, gloves, and other appropriate personal protective equipment.
- Torque Specifications: Adhere strictly to manufacturer's torque specifications for all fasteners.
- Alignment: After installation, a professional wheel alignment is mandatory to ensure proper vehicle handling and tire wear.
Setup and Installation
This section provides a general overview of the installation process. Specific steps may vary depending on your vehicle model. Refer to a service manual for your specific vehicle for detailed instructions.
- Prepare Vehicle: Park the vehicle on a level surface. Engage the parking brake. Loosen lug nuts on the wheels.
- Lift Vehicle: Safely lift the vehicle using a jack and secure it with jack stands. Remove the wheels.
- Remove Old Suspension: Carefully disconnect and remove the existing shock absorbers/struts and springs. This may involve disconnecting brake lines, ABS sensors, and sway bar links.
- Assemble Coilovers (if necessary): Ensure all components of the new coilover are correctly assembled and tightened.
- Install New Coilovers: Mount the new coilovers into the vehicle's suspension points. Ensure all bolts are finger-tight before final tightening.
- Connect Components: Reconnect any disconnected brake lines, ABS sensors, and sway bar links.
- Initial Adjustments: Set the initial ride height and damping settings as desired (refer to the "Operating" section).
- Lower Vehicle: Carefully lower the vehicle.
- Final Tightening: With the vehicle's weight on the suspension, tighten all suspension bolts to the manufacturer's specified torque.
- Wheel Alignment: Immediately after installation, have a professional perform a wheel alignment.
Note: Some models may require additional steps or specialized tools. Consult a professional if you are unsure about any part of the installation process.
Operating and Adjustments
Adjusting Ride Height
The ride height can be adjusted using the provided C-spanners. To adjust, loosen the lower locking collar and rotate the main body of the coilover to raise or lower the vehicle. Once the desired height is achieved, tighten the locking collar securely.
Image: Diagram illustrating the process of adjusting the coilover's ride height by rotating the threaded body.
Adjusting Damping Force
The damping force is adjusted via a knob located at the top of the coilover (for front) or bottom (for rear, depending on design). Use the provided Allen key to turn the knob. There are 24 distinct clicks, ranging from soft (0) to firm (24).
- 0-8 Clicks: Softer settings, ideal for comfortable street driving.
- 9-16 Clicks: Medium settings, suitable for spirited driving or uneven roads.
- 17-24 Clicks: Firmer settings, recommended for track use or aggressive driving.
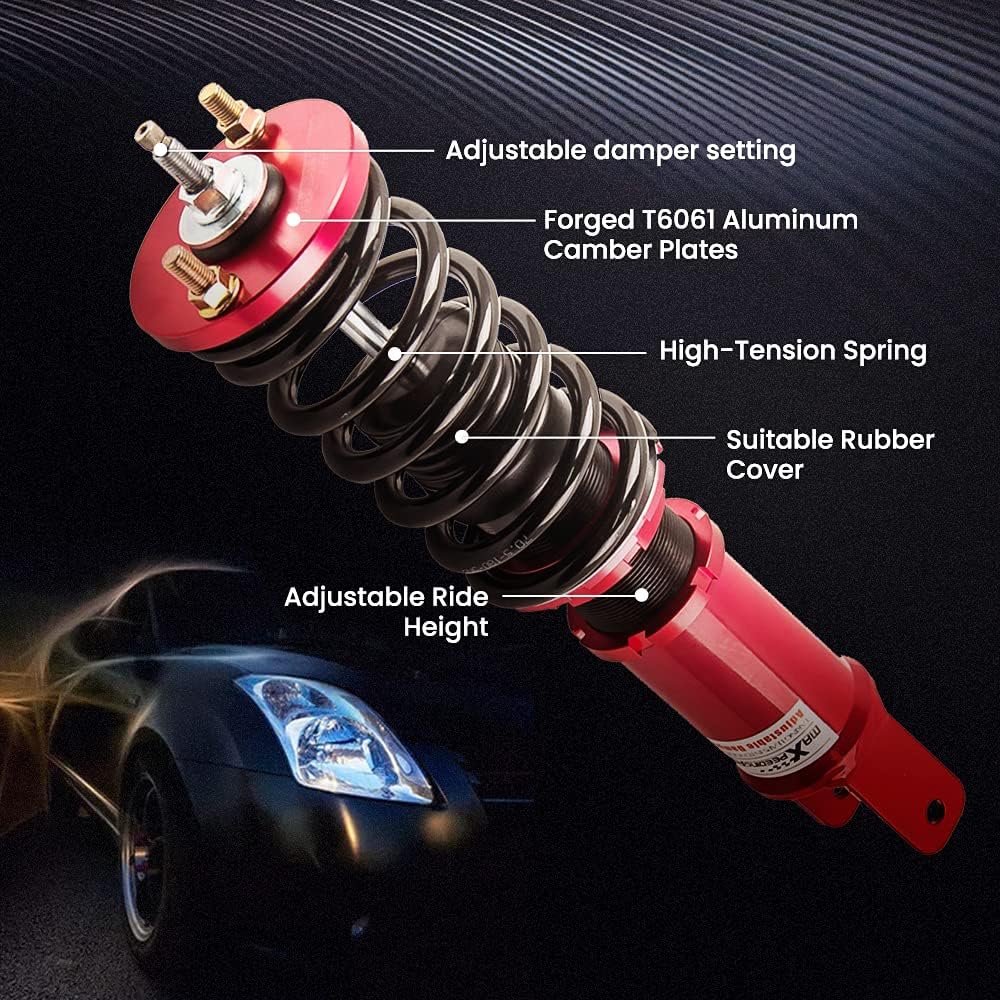
Image: Detailed view of the coilover's top, showing the adjustable damper setting knob.
Experiment with different settings to find the optimal balance between comfort and performance for your driving style and road conditions. Ensure all four coilovers are set to the same damping level for balanced handling.
Maintenance
Regular maintenance helps prolong the life and performance of your coilovers.
- Regular Cleaning: Periodically clean the coilovers, especially the threaded bodies and dust covers, to prevent dirt and debris buildup.
- Inspect for Damage: Regularly inspect for any signs of damage, leaks, or wear on the springs, shock bodies, and mounts.
- Check Torque: Periodically check the torque of all mounting bolts to ensure they remain securely fastened.
- Lubrication: Apply a thin layer of appropriate grease to the threaded sections if they become difficult to adjust.
- Avoid Harsh Chemicals: Do not use harsh chemicals or abrasive cleaners that could damage the finish or seals.
Troubleshooting
| Problem | Possible Cause | Solution |
|---|---|---|
| Excessive Noise (Clunking/Squeaking) | Loose mounting bolts, worn bushings, debris in threads, improper preload. | Check and tighten all mounting bolts. Inspect bushings for wear and replace if necessary. Clean threaded sections. Verify spring preload. |
| Uneven Ride Height | Incorrect height adjustment, uneven spring preload. | Re-adjust ride height on all four coilovers to ensure consistency. Check spring preload. |
| Poor Ride Quality (Too Stiff/Too Soft) | Incorrect damping setting, improper spring rate for application. | Adjust damping force (refer to "Operating" section). Ensure spring rates are appropriate for your vehicle and intended use. |
| Leaking Shock Absorber | Damaged seal, internal component failure. | A leaking shock absorber indicates a fault. Contact maXpeedingrods support for assistance or replacement. |
Specifications
| Attribute | Detail |
|---|---|
| Brand | maXpeedingrods |
| Model Number | CR26@CO-HONCIV3-R-LC |
| Auto Part Position | Front |
| Damping Levels | 24 Levels Rebound Damping Force |
| Adjustable Height Range | 1-3 inches (lowering) |
| Front Spring Rate | 8 kg/mm (448 lbs/in) |
| Rear Spring Rate | 5 kg/mm (280 lbs/in) |
| Spring Preload | 7-10 mm |
| Spring Length (Front & Rear) | 180mm |
| Material | Aluminum (Forged T6061/T6063) |
| Item Weight | 44.2 pounds |
| Product Dimensions | 24.8 x 20.08 x 8.27 inches |
Warranty and Support
maXpeedingrods products are designed for quality and performance. For specific warranty details, please refer to the warranty card included with your product or visit the official maXpeedingrods website. For technical support, troubleshooting assistance, or warranty claims, please contact maXpeedingrods customer service through their official channels.
Additional details: This product is Verified by Transparency, meaning each item has a unique code verified before shipping.
Ask a question about this manual
Ask about setup, troubleshooting, compatibility, parts, safety, or missing instructions. Manuals+ will review the question and use this page’s manual context to help answer it.