
Black Box LES1608A
Black Box LES1600 Series Console Server - Cisco Pinout, 8-Port User Manual
Model: LES1608A
Introduction
The Black Box LES1600 Series Console Server provides secure, remote out-of-band access to network devices such as routers, switches, PDUs, and firewalls. Designed for reliable 24/7 uptime, it offers dual Ethernet ports for redundancy, environmental monitoring, power management, and secure access to devices, facilitating remote management and fault recovery.
Key Features
- Highly affordable, secure, remote network management of eight devices.
- Dual Gigabit Ethernet ports with seamless auto-failover for built-in redundancy.
- Ideal for businesses with remote branches and limited IT staff, as well as co-location data centers.
- Federal Information Processing Standard (FIPS) 140-2 validated module for enhanced security.
- Simple, straight-through cable to Cisco-style serial consoles.
- Four USB 2.0 Ports for managed device OS transfers.
- Built-in digital I/O and high voltage I/O.
Product Overview

This image displays an angled view of the Black Box LES1600 Series Console Server, showcasing its compact design and the front panel with network ports.

A close-up view of the front panel, highlighting the two Gigabit Ethernet ports labeled NET1 and NET2, along with status indicator LEDs for power, activity, and I/O.

This image shows one side of the console server, featuring the 'ERASE' button for resetting configurations and a multi-pin connector for digital I/O (DC OUT, GND, OUT1, OUT2, IN1, IN2).
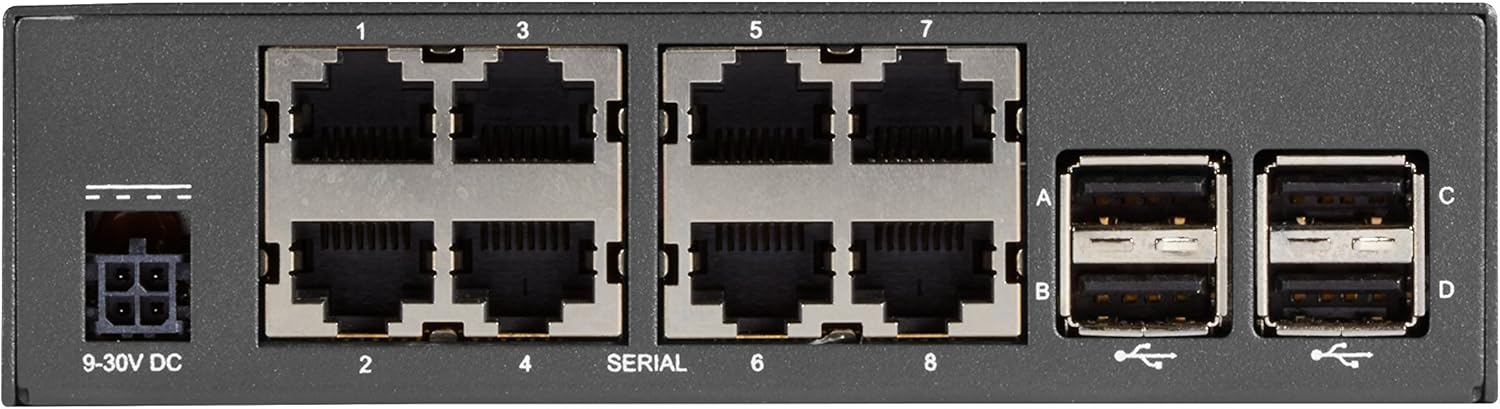
A detailed view of the rear panel, displaying the 9-30V DC power input, eight serial console ports (labeled 1-8), and four USB 2.0 ports (labeled A-D).
Setup
Follow these steps for initial setup of your console server:
- Power Connection: Connect the appropriate 9-30V DC power supply to the power input port on the rear panel (refer to Figure 4).
- Network Connection: Connect one or both Gigabit Ethernet ports (NET1, NET2) on the front panel to your network infrastructure using standard Ethernet cables (refer to Figure 2).
- Console Connections: Connect your network devices (routers, switches, etc.) to the serial console ports (1-8) on the rear panel using appropriate serial cables (refer to Figure 4). Ensure you use straight-through cables for Cisco-style consoles.
- USB Devices (Optional): If needed, connect USB devices for OS transfers or other functions to the USB 2.0 ports (A-D) on the rear panel (refer to Figure 4).
- Initial Configuration: Refer to the detailed configuration guide for initial network settings, IP address assignment, and security configurations.
Operating Instructions
Once the console server is powered on and connected to the network, you can begin remote management:
- Accessing Devices: Use a secure shell (SSH) client or a web browser to connect to the console server's IP address.
- Port Management: From the console server's interface, select the desired serial port to establish a connection with the attached network device.
- Monitoring: Utilize the console server's dashboard for status monitoring, proactive alerting, and environmental data if applicable.
- Power Management: If integrated with PDUs, use the console server's interface to manage power to connected devices.
Maintenance
Regular maintenance ensures optimal performance and longevity of your console server:
- Cleaning: Periodically clean the exterior of the device with a soft, dry cloth. Do not use liquid cleaners or aerosols.
- Firmware Updates: Check the manufacturer's website for the latest firmware updates to ensure security and feature enhancements. Follow update instructions carefully.
- Environmental Conditions: Ensure the device is operated within its specified temperature and humidity ranges to prevent overheating or damage.
- Cable Management: Keep all connected cables neatly organized and secured to prevent accidental disconnections or damage.
Troubleshooting
If you encounter issues, consider the following troubleshooting steps:
- No Power: Verify the power supply is correctly connected and the power outlet is functional. Check the power indicator LED on the front panel (Figure 2).
- Network Connectivity Issues: Ensure Ethernet cables are securely connected to NET1/NET2 ports and your network. Check network indicator LEDs. Verify IP configuration.
- Cannot Access Console Port: Confirm the serial cable is correctly connected to both the console server and the target device. Ensure the correct serial port settings (baud rate, data bits, parity, stop bits) are configured.
- Device Unresponsive: Try power cycling the console server. If issues persist, consider performing a factory reset using the 'ERASE' button (Figure 3), but be aware this will clear all configurations.
- Software Issues: If experiencing software-related problems, consult the detailed user manual or contact technical support.
Specifications
| Attribute | Value |
|---|---|
| Brand | Black Box |
| Series | LES1600 |
| Model Number | LES1608A |
| Item Weight | 2.2 pounds |
| Product Dimensions (LxWxH) | 1.5 x 2.75 x 6.75 inches |
| Color | Black |
| Number of Processors | 1 |
| Computer Memory Type | Unknown |
| Platform | Linux |
| Input Device | Gamepad (Note: This might be a generic specification, actual input is via network/serial) |
| Date First Available | December 24, 2017 |
Warranty and Support
For detailed warranty information, technical support, or to purchase extended protection plans, please refer to the official Black Box website or contact their customer service. Protection plans are available for 2-Year and 3-Year durations, as well as a monthly 'Complete Protect' option.
Manufacturer: Black Box
Related documentsLES1608A


Ask a question about this manual
Ask about setup, troubleshooting, compatibility, parts, safety, or missing instructions. Manuals+ will review the question and use this page’s manual context to help answer it.