
1. Introduction
This manual provides essential information for the safe and efficient operation, maintenance, and troubleshooting of your Scheppach HCP2600 Thermal Pressure Washer. Please read this manual thoroughly before operating the machine to ensure proper use and to prevent injury or damage.
The Scheppach HCP2600 is a powerful thermal pressure washer designed for universal use, capable of removing stubborn dirt from paths, surfaces, terraces, vehicles, boats, and patio furniture. It features a robust 173cc 4-stroke engine, delivering a maximum pressure of 200 bar and a flow rate of 522 liters per hour (8.7 liters per minute).
2. Safety Instructions
Always observe basic safety precautions to reduce the risk of fire, electric shock, and personal injury. Failure to follow these instructions may result in serious injury or property damage.
- Read the entire manual: Understand all operating instructions and warnings before use.
- Wear appropriate safety gear: Always wear eye protection, hearing protection, and protective footwear.
- Keep bystanders away: Do not allow children or untrained persons to operate or be near the pressure washer.
- Never point the spray gun at people or animals: High-pressure spray can cause severe injury.
- Fuel safety: Handle fuel with extreme care. Store fuel in an approved container in a well-ventilated area. Do not refuel while the engine is running or hot.
- Engine exhaust: Operate the pressure washer in a well-ventilated area to avoid carbon monoxide poisoning.
- Before maintenance: Always turn off the engine, disconnect the spark plug wire, and allow the engine to cool before performing any maintenance or adjustments.
- Water supply: Ensure a stable and adequate water supply to prevent pump damage. Do not run the pump dry.
3. Package Contents
Verify that all components are present and undamaged upon unpacking. If any parts are missing or damaged, contact your dealer immediately.
- Scheppach HCP2600 Thermal Pressure Washer Unit
- High-pressure hose (7.5 meters)
- Spray gun with cleaning lance
- 5 interchangeable nozzles (various spray patterns)
- Detergent feed system
- Wheel assembly components
- User Manual
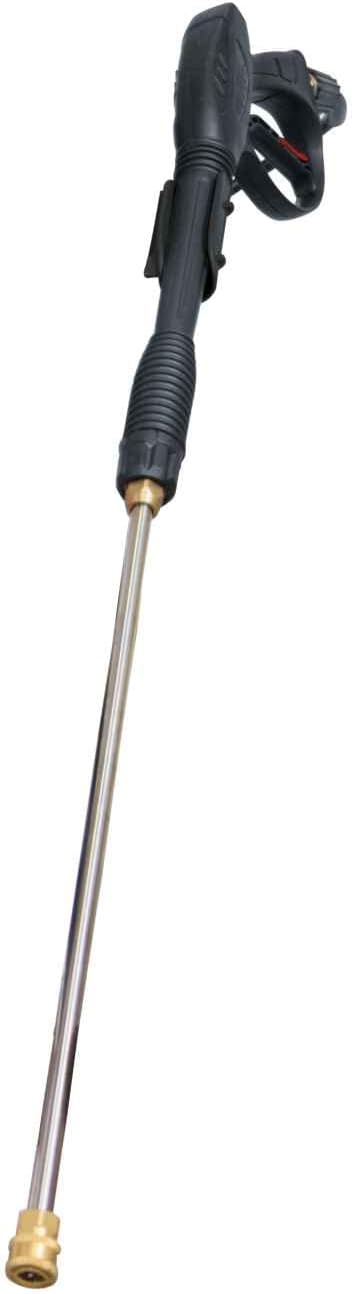
Figure 3.1: The included cleaning lance, ready for attachment to the spray gun.

Figure 3.2: The set of five interchangeable nozzles for various cleaning tasks.
4. Setup
Follow these steps to assemble and prepare your pressure washer for first use.
4.1 Assembly
- Attach Wheels: Securely attach the wheels to the main frame using the provided hardware.
- Install Handle: Mount the handle assembly to the main unit. Ensure it clicks into place or is bolted securely.
- Connect High-Pressure Hose: Connect one end of the 7.5m high-pressure hose to the pump outlet on the pressure washer and the other end to the spray gun. Ensure connections are tight to prevent leaks.
- Attach Cleaning Lance: Connect the cleaning lance to the spray gun.

Figure 4.1: Side view of the assembled pressure washer, showing hose and lance connections.

Figure 4.2: Integrated hose and nozzle storage for convenience.
4.2 Engine Preparation
- Add Engine Oil: Before first use, fill the engine with the recommended type and amount of engine oil. Refer to the engine manual for specific oil requirements and capacity. Do not overfill.
- Add Fuel: Fill the fuel tank with unleaded gasoline. Do not use E85 or other ethanol blends. Ensure the fuel cap is securely tightened.
4.3 Water Connection
- Connect Garden Hose: Attach a standard garden hose (minimum 1/2 inch diameter) to the water inlet on the pressure washer.
- Flush Hose: Turn on the water supply and allow water to flow through the garden hose for 30 seconds to flush out any debris.
- Connect to Pressure Washer: Connect the flushed garden hose to the pressure washer's water inlet.
- Purge Air: With the water supply on, squeeze the trigger on the spray gun to purge air from the system until a steady stream of water emerges. This prevents damage to the pump.
4.4 Detergent Tank (Optional)
If using detergent, fill the integrated detergent tank with a pressure washer-safe cleaning solution. Do not use harsh chemicals or solvents.
5. Operating Instructions
5.1 Starting the Engine
- Ensure the fuel valve is open and the engine switch is in the 'ON' position.
- If the engine is cold, set the choke lever to the 'CHOKE' position.
- Pull the recoil starter handle firmly until the engine starts.
- Once the engine starts, gradually move the choke lever to the 'RUN' position.
5.2 Using Nozzles
The HCP2600 comes with 5 color-coded quick-connect nozzles, each designed for specific tasks:
- Red (0°): Pin-point jet for intense cleaning of small, stubborn spots. Use with extreme caution.
- Yellow (15°): Narrow fan spray for intensive cleaning of smaller areas.
- Green (25°): Medium fan spray for general cleaning of most surfaces.
- White (40°): Wide fan spray for gentle cleaning of delicate surfaces.
- Black (Soap/Low Pressure): For applying detergent at low pressure.
To change nozzles, pull back the collar on the quick-connect fitting, insert the desired nozzle, and release the collar to lock it in place. Always turn off the engine and release pressure before changing nozzles.

Figure 5.1: The HCP2600 in operation, cleaning a paved area.

Figure 5.2: The pressure washer is suitable for various outdoor cleaning tasks.
5.3 Applying Detergent
To apply detergent, ensure the black (soap) nozzle is installed. The pressure washer will automatically draw detergent from the tank and mix it with the water at low pressure. After applying detergent, switch to a high-pressure nozzle (e.g., green or yellow) to rinse the surface thoroughly.
5.4 Shutting Down
- Turn off the engine switch.
- Turn off the water supply.
- Squeeze the spray gun trigger to release any remaining pressure in the system.
- Disconnect the garden hose and high-pressure hose.
6. Maintenance
Regular maintenance ensures optimal performance and extends the life of your pressure washer.
6.1 Engine Maintenance
- Oil Change: Change engine oil after the first 5 hours of operation, then every 25-50 hours or annually. Refer to the engine manual for detailed instructions.
- Air Filter: Check and clean the air filter regularly, especially in dusty conditions. Replace if damaged.
- Spark Plug: Inspect the spark plug annually. Clean or replace as needed.
6.2 Pump Maintenance
- Water Inlet Filter: Regularly check and clean the water inlet filter to prevent debris from entering the pump.
- Winterization: Before storing in freezing temperatures, drain all water from the pump and hoses. Consider using a pump protector solution.
6.3 Hose and Nozzle Care
- Inspect hoses for kinks, cuts, or leaks before each use. Replace damaged hoses immediately.
- Clean nozzles regularly to remove blockages. A small wire or nozzle cleaning tool can be used.
7. Troubleshooting
This section addresses common issues you might encounter with your pressure washer.
| Problem | Possible Cause | Solution |
|---|---|---|
| Engine won't start | No fuel; Engine switch OFF; Choke not set; Spark plug issue | Check fuel level; Turn engine switch ON; Adjust choke; Inspect/clean spark plug |
| No pressure or low pressure | Insufficient water supply; Air in pump; Clogged nozzle; Kinked hose | Ensure full water supply; Purge air from pump; Clean nozzle; Straighten hose |
| Pulsating spray | Air in pump; Clogged nozzle; Water inlet filter clogged | Purge air from pump; Clean nozzle; Clean water inlet filter |
| Water leaks | Loose connections; Damaged O-rings/seals; Cracked hose | Tighten connections; Replace O-rings/seals; Replace hose |
8. Specifications
Key technical specifications for the Scheppach HCP2600 Thermal Pressure Washer:
| Feature | Specification |
|---|---|
| Model Number | HCP2600 |
| Engine Type | 4-stroke, 173 cm³ |
| Maximum Pressure | 200 bar |
| Maximum Flow Rate | 522 L/h (8.7 Liters per minute) |
| Hose Length | 7.5 Meters |
| Weight | 26.58 Kilograms |
| Dimensions (L x W x H) | 65L x 49W x 100H Centimeters |
| Material | Plastic, Steel |
| Color | Black / Red |
| Power Source | Thermal (Gasoline Engine) |
| Spare Parts Availability | Information unavailable |

Figure 8.1: Dimensions of the Scheppach HCP2600 pressure washer.
9. Warranty and Support
For warranty information, please refer to the separate warranty document included with your purchase or contact your retailer. Scheppach products are designed for quality and functionality.
If you require technical assistance, spare parts, or have questions regarding the operation of your HCP2600 pressure washer, please contact Scheppach customer service or your authorized dealer. Please note that information regarding spare parts availability is currently unavailable.


