1. Introduction
This manual provides detailed instructions for the proper setup, operation, and maintenance of your Andonstar ADSM301 Digital Microscope. Please read this manual thoroughly before using the device to ensure optimal performance and longevity. The Andonstar ADSM301 is designed for various applications including PCB soldering and inspection, mobile phone repair, watch repair, and coin appreciation.
2. Product Overview
2.1 Key Features
- 5-inch integrated display screen
- 1080P Full HD video output via HDMI
- IR remote control for convenient operation
- Adjustable LED lights for optimal illumination
- Measurement software compatibility via USB
2.2 Components
The Andonstar ADSM301 Digital Microscope system includes the following main components:
- Microscope Host with 5-inch display
- Metal Stand with adjustable lifting bracket
- Two adjustable LED lights
- Wired light control remote
- IR Remote Control
- Power Adapter
- USB Cable
- HDMI Cable
- Instruction Manual

Figure 1: Included components of the Andonstar ADSM301 Digital Microscope.
2.3 Microscope Host Controls and Ports

Figure 2: Front view of the microscope host with labeled function buttons (Power, Menu, Up, Down, OK, Photo/Video).

Figure 3: Rear view of the microscope host showing HDMI-OUT, USB, SD card slot, and AV-OUT ports.
3. Setup
3.1 Assembly
- Attach the microscope host to the metal lifting bracket on the stand. Secure it using the provided screws or knobs.
- Connect the two adjustable LED lights to the base of the stand.
- Ensure all connections are firm.
3.2 Power Connection
Connect the power adapter to the microscope host and then plug it into a standard electrical outlet. The device is ready for use once powered on.
Video 1: This video demonstrates the assembly of the Andonstar ADSM301 Digital Microscope, highlighting its components and basic setup.
4. Operating Instructions
4.1 Power On/Off
Press the Power button on the microscope host or the wired light control remote to turn the device on or off.
4.2 Adjusting Focus and Magnification
Use the focusing wheel on the side of the microscope host to adjust the image clarity. The metal lifting bracket allows for vertical adjustment of the microscope, changing the working distance and thus the magnification. The focus range is typically between 5cm and 15cm.
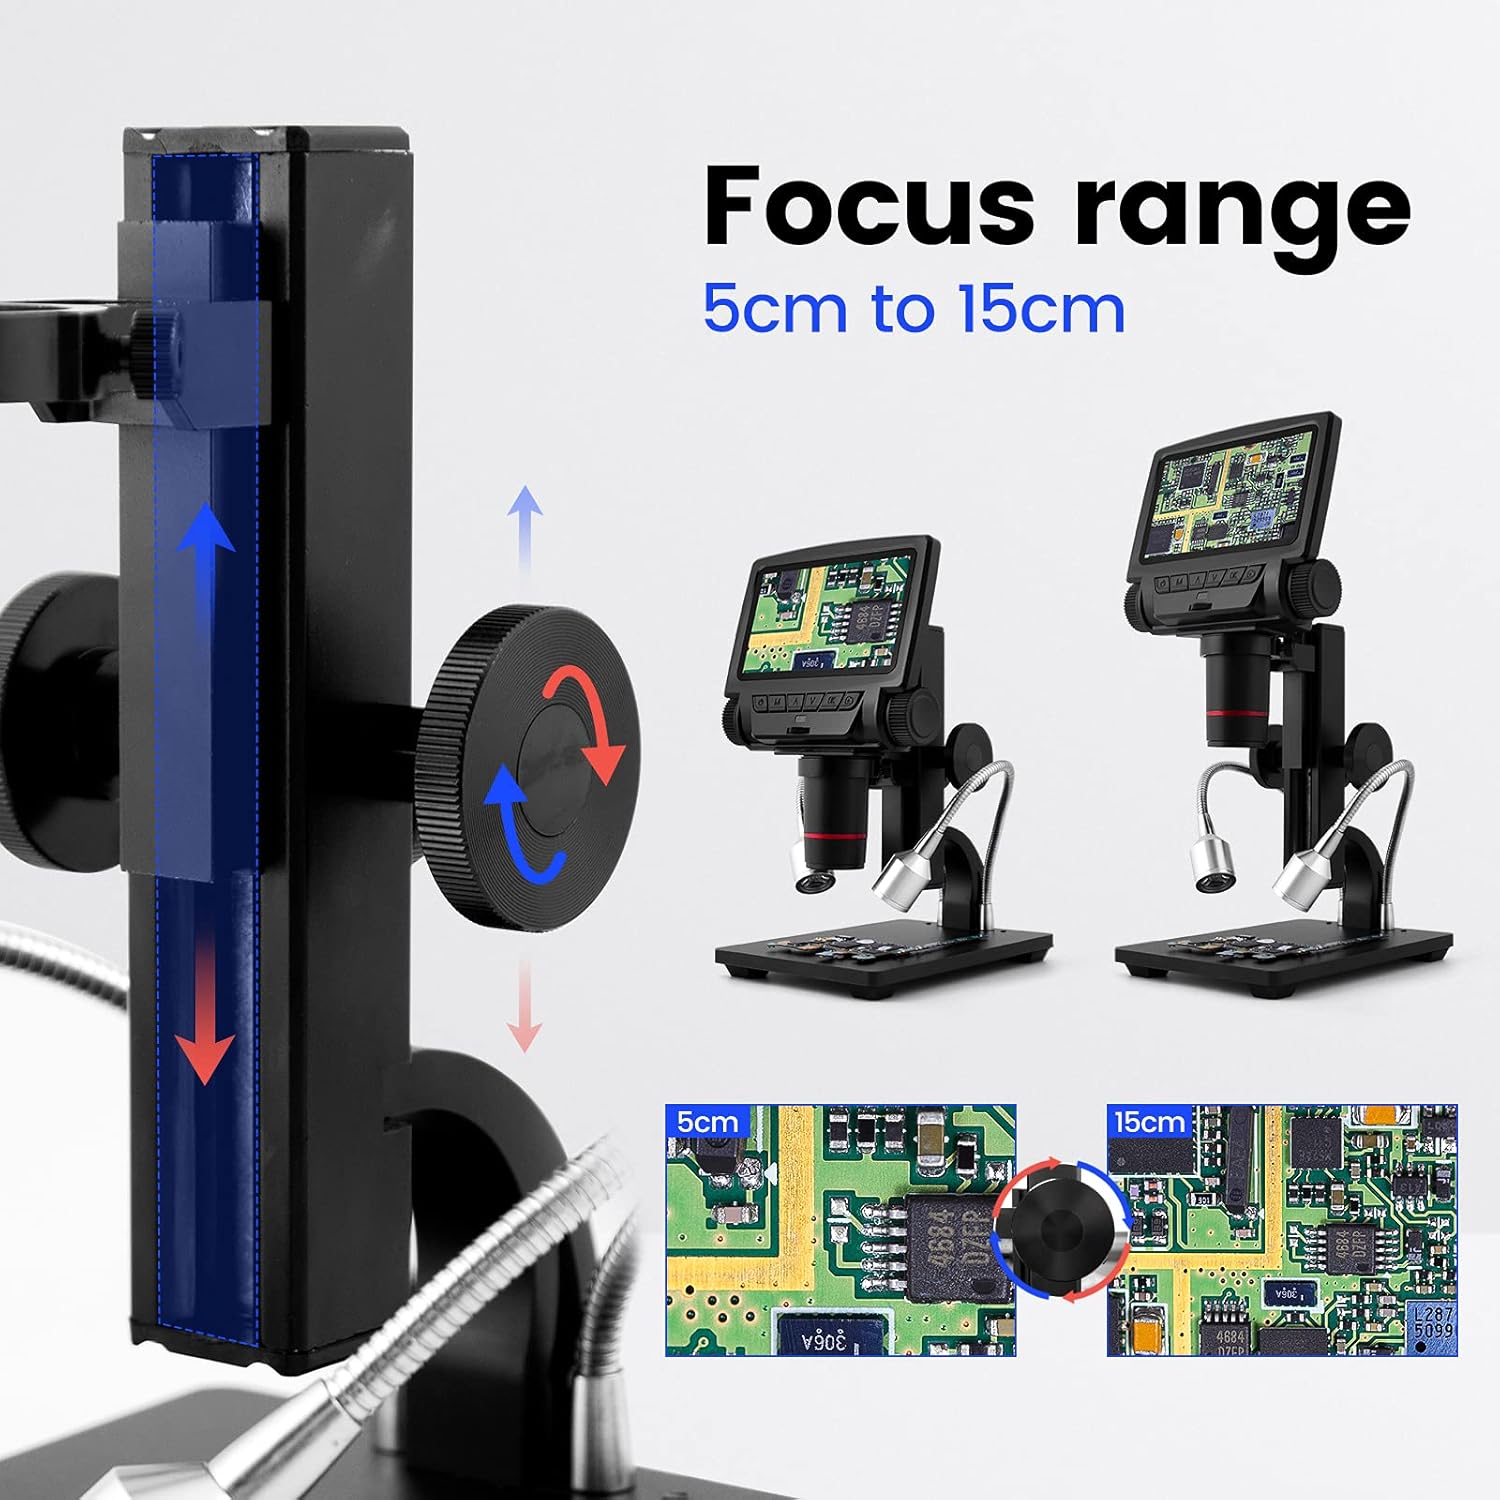
Figure 4: Illustration of the adjustable focus range from 5cm to 15cm.
4.3 Using LED Lights
The two adjustable LED lights provide illumination for your specimen. Use the wired light control remote to turn the lights on/off and adjust their brightness. Rotate the flexible arms to position the lights as needed.

Figure 5: Adjustable LED lights and their wired control for brightness adjustment.
4.4 Connecting to an External Display (HDMI)
To view the microscope's output on a larger screen, connect an HDMI cable from the HDMI-OUT port on the microscope host to an HDMI input on your monitor or TV. This provides a 1080P Full HD display.

Figure 6: Connecting the microscope to an external display via HDMI for a larger view.
4.5 Connecting to a Personal Computer (USB)
For advanced functions like measurement software, connect the microscope to your computer using the provided USB cable. The microscope will function as a USB camera, and compatible measurement software can be used to analyze images.

Figure 7: Using the microscope with a computer and measurement software via USB connection.
4.6 Capturing Photos and Videos
Insert a compatible SD card (up to 32GB, not included) into the SD card slot. Use the Photo/Video button on the microscope host or the IR remote control to capture images or record video footage of your observations.
5. Maintenance
5.1 Cleaning
- Lens: Use a soft, lint-free cloth specifically designed for optical lenses. For stubborn smudges, a small amount of lens cleaning solution can be applied to the cloth, not directly to the lens.
- Screen: Wipe the display screen with a soft, dry cloth. Avoid abrasive materials or harsh chemicals.
- Body: Clean the microscope body and stand with a slightly damp cloth. Ensure no liquid enters the electronic components.
5.2 Storage
When not in use, store the microscope in a clean, dry, and dust-free environment. Avoid extreme temperatures and direct sunlight. If storing for extended periods, remove any batteries from the IR remote control.
6. Troubleshooting
If you encounter issues with your Andonstar ADSM301 Digital Microscope, please refer to the following common problems and solutions:
- No Power: Ensure the power adapter is securely connected to both the microscope and a working electrical outlet. Check if the power button has been pressed.
- Blurry Image: Adjust the focusing wheel carefully. Also, ensure the working distance (height of the microscope from the object) is within the optimal range (5cm to 15cm) and adjust the lifting bracket if necessary.
- No Image on External Display (HDMI): Verify the HDMI cable is correctly connected to both the microscope's HDMI-OUT port and the external display's HDMI input. Ensure the external display is set to the correct HDMI source.
- No Image on PC (USB): Confirm the USB cable is properly connected. Ensure the correct driver is installed on your computer and that the measurement software recognizes the microscope as a USB camera.
- LED Lights Not Working: Check the connection of the wired light control remote. Ensure the power is on and try adjusting the brightness settings.
- IR Remote Not Responding: Check the battery in the IR remote control. Ensure there are no obstructions between the remote and the microscope's IR receiver.
If the problem persists after attempting these solutions, please contact customer support for further assistance.
7. Specifications
| Feature | Specification |
|---|---|
| Model Name | ADSM301 |
| Display Screen | 5 inch |
| Video Output | 1080P Full HD (HDMI/AV) |
| Magnification Maximum | 260x |
| Focus Range | 5cm to 15cm |
| Light Source Type | LED (Adjustable) |
| Connectivity | HDMI, USB, SD Card |
| Compatible Devices | Monitor, Personal Computer |
| Item Weight | 32 Grams (Microscope Host) / 1.13 ounces (Package) |
| Voltage | 5 Volts |
| Batteries | 1 Lithium Metal battery (included for remote) |
| Material | Metal |
| Manufacturer | ShenZhen Andonstar Technology Co., Ltd |
8. Warranty and Support
For warranty information or technical support, please refer to the documentation included with your product or contact the seller/manufacturer directly. Keep your purchase receipt for warranty claims.


