1. Introduction
This manual provides instructions for the installation, operation, and maintenance of your Aftermarket Replacement Super J Hose, Model 3600. This hose is specifically designed to fit older Electrolux canister vacuums that utilize "C" bags, including models such as 120S, SuperJ, Silverado, Olympia, Marquis, Diamond, and Jubilee. Please read this manual thoroughly before use to ensure proper function and longevity of your product.
2. Setup and Installation
Before installing the new hose, ensure your vacuum cleaner is unplugged from the power outlet.
2.1 Identify Your Current Hose Connection
It is crucial to identify the type of connection on your existing Electrolux vacuum hose. This replacement hose features an all-metal end designed to fit into the canister portion of the vacuum. Verify that your vacuum requires a hose with a metal end connection.
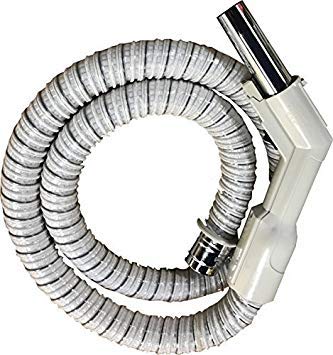
Figure 1: The Aftermarket Replacement Super J Hose, showing the metal end connection designed for Electrolux canister vacuums. This image illustrates the hose's overall appearance and the critical metal connector that inserts into the vacuum unit.
2.2 Removing the Old Hose
- Locate the connection point where your current hose attaches to the vacuum canister.
- Depending on your specific Electrolux model, there may be a release button or a twist-lock mechanism. Disengage this mechanism to detach the old hose.
- Carefully pull the old hose away from the vacuum.
2.3 Attaching the New Hose
- Align the metal end of the new Super J Hose with the intake port on your Electrolux vacuum canister.
- Gently push the metal end into the port until it clicks or locks securely into place. Ensure a snug fit to prevent loss of suction.
- Once attached, give the hose a gentle tug to confirm it is firmly seated and will not detach during use.
3. Operating Instructions
This replacement hose includes an integrated ON/OFF rocker switch on the handle for convenient control of your power nozzle.
3.1 Power Nozzle Control
- To activate the power nozzle (for carpets): Locate the rocker switch on the hose handle. Press the switch to the "ON" position. This will engage the rotating brush for effective carpet cleaning.
- To deactivate the power nozzle (for bare floors or delicate surfaces): Press the rocker switch to the "OFF" position. This will stop the rotating brush, allowing you to use suction only, which is ideal for hard floors, rugs, or when using non-powered attachments.
Always ensure the vacuum is powered on at the main unit before attempting to use the power nozzle switch on the hose handle.
4. Maintenance
Regular maintenance helps ensure optimal performance and extends the life of your replacement hose.
4.1 General Care
- Avoid kinking or sharply bending the hose during storage or use, as this can damage the internal wiring or hose structure.
- Store the hose in a manner that prevents it from being crushed or subjected to excessive weight.
- Wipe the exterior of the hose with a damp cloth as needed to remove dust and dirt. Do not immerse the hose in water.
4.2 Checking for Blockages
If you experience a sudden loss of suction, a blockage in the hose may be the cause.
- Unplug the vacuum cleaner from the power outlet.
- Detach the hose from both the vacuum canister and any attachments.
- Carefully inspect both ends of the hose for visible obstructions.
- If possible, gently flex the hose along its length to dislodge any internal blockages. You may also use a blunt object (like a broom handle, but be careful not to puncture the hose) to push through any stubborn clogs.
- Reconnect the hose and test suction.
5. Troubleshooting
5.1 Hose Does Not Attach Securely or Gets Stuck
- Issue: The hose does not click into place or is difficult to remove.
- Solution:
- Ensure the metal end of the hose is correctly aligned with the vacuum's intake port.
- Apply firm, even pressure when inserting. Do not force it.
- Verify that your vacuum model is compatible with a metal-end hose.
- If the hose is stuck, try twisting it gently while pulling. Avoid excessive force to prevent damage.
- If issues persist, contact customer support.
5.2 Power Nozzle Switch Not Working
- Issue: The ON/OFF rocker switch on the handle does not activate or deactivate the power nozzle.
- Solution:
- Ensure the vacuum cleaner itself is plugged in and turned on. The hose switch only controls the power nozzle, not the main vacuum unit.
- Check for any visible damage to the switch or the hose wiring.
- Confirm that your power nozzle attachment is correctly connected to the hose.
- If the issue continues, there may be an internal wiring problem. Contact customer support.
5.3 Loss of Suction
- Issue: The vacuum is running, but suction is weak or non-existent.
- Solution:
- Check for blockages within the hose (refer to Section 4.2).
- Ensure the hose is securely attached to both the vacuum and any attachments.
- Verify that the vacuum's dust bag is not full and that filters are clean.
- Inspect the vacuum's main intake port for obstructions.
6. Specifications
| Feature | Detail |
|---|---|
| Model Number | 3600 |
| Brand | Aftermarket Replacement |
| Compatibility | Electrolux Canister Vacuums (120S, SuperJ, Silverado, Olympia, Marquis, Diamond, Jubilee) using "C" bags, requiring a metal-end hose. |
| Material | Plastic |
| Color | Beige/Grey |
| Item Weight | 1 Pound (approximately 0.45 kg) |
| Item Length | 7 Feet (approximately 2.13 meters) |
| UPC | 837037000532 |
| Manufacturer | ENVIORCARE |
7. Warranty and Support
This product is an aftermarket replacement part. Specific warranty details may vary. For information regarding warranty coverage, returns, or technical support, please refer to the seller's policies or contact the seller directly through your purchase platform.
Always retain your proof of purchase for any warranty or support claims.


