
Introduction
This manual provides detailed instructions for the operation and maintenance of your Denver DAB18DW Retro DAB+/FM Radio with Bluetooth. Please read this manual thoroughly before using the device to ensure proper functionality and to maximize your listening experience.

Image: Front view of the Denver DAB18DW radio with its telescopic antenna extended, showcasing its retro design and controls.
Safety Information
- Do not expose the unit to rain or moisture.
- Do not disassemble the unit. Refer servicing to qualified personnel.
- Avoid extreme temperatures.
- Ensure proper ventilation around the unit.
Product Overview
Familiarize yourself with the main components and controls of your radio.

Image: Close-up of the radio's front panel, highlighting the display, control buttons (Power, Scan, Menu, Info, Alarm, DAB/FM/AUX/BT), and rotary knobs for Volume and Tune/Select.
- Volume Knob: Adjusts audio output level.
- Power Button: Turns the unit on or off.
- Scan Button: Initiates station scanning in DAB or FM mode.
- Menu Button: Accesses system settings and options.
- Info Button: Displays additional information about the current station or track.
- Alarm Button: Sets and manages alarms.
- DAB/FM/AUX/BT Button: Switches between DAB, FM, AUX, and Bluetooth modes.
- Tune/Select Knob: Navigates menus, tunes frequencies, and confirms selections.
- Display Screen: Shows station information, time, and menu options.
Setup
Powering the Radio
The Denver DAB18DW can be powered by either the included AC adapter or batteries.
- AC Power: Connect the supplied power adapter to the DC 5V input port on the back of the radio and plug the other end into a standard 230V wall outlet.
- Battery Power: Open the battery compartment on the back of the radio. Insert 4 x 'C' size batteries (not included), ensuring correct polarity. Close the battery compartment securely.

Image: Rear view of the radio, indicating the DC 5V power input port.

Image: Rear view of the radio with the battery compartment cover removed, showing the slots for 'C' size batteries.
Antenna Setup
For optimal reception, fully extend the telescopic antenna located on the top of the radio.
Operating Instructions
Turning On/Off
Press the Power button to turn the radio on or off.
Mode Selection
Press the DAB/FM/AUX/BT button repeatedly to cycle through DAB, FM, AUX, and Bluetooth modes.
DAB+ Radio Operation
- Switch to DAB mode using the DAB/FM/AUX/BT button.
- Upon first use, the radio will automatically perform a full scan for available DAB+ stations. To initiate a scan manually, press the Scan button.
- Once scanning is complete, use the Tune/Select knob to browse through the list of available stations. Press the Tune/Select knob to confirm your selection.
- Press the Info button to view details such as program type, signal strength, and bit rate.
FM Radio Operation
- Switch to FM mode using the DAB/FM/AUX/BT button.
- Press the Scan button to automatically scan for and store available FM stations.
- Alternatively, rotate the Tune/Select knob to manually tune to a specific frequency.
- The radio supports RDS (Radio Data System), which displays station information like station name and program details when available.
Bluetooth Connectivity
- Switch to Bluetooth mode using the DAB/FM/AUX/BT button. The display will show 'Bluetooth Pairing' or similar.
- Enable Bluetooth on your external device (e.g., smartphone, tablet).
- Search for 'DAB18DW' in your device's Bluetooth list and select it to pair.
- Once paired, you can stream audio from your device to the radio.
AUX Input Usage
- Switch to AUX mode using the DAB/FM/AUX/BT button.
- Connect an external audio device (e.g., MP3 player) to the AUX IN port on the back of the radio using a 3.5mm audio cable (not included).
- Audio from the external device will now play through the radio's speakers.
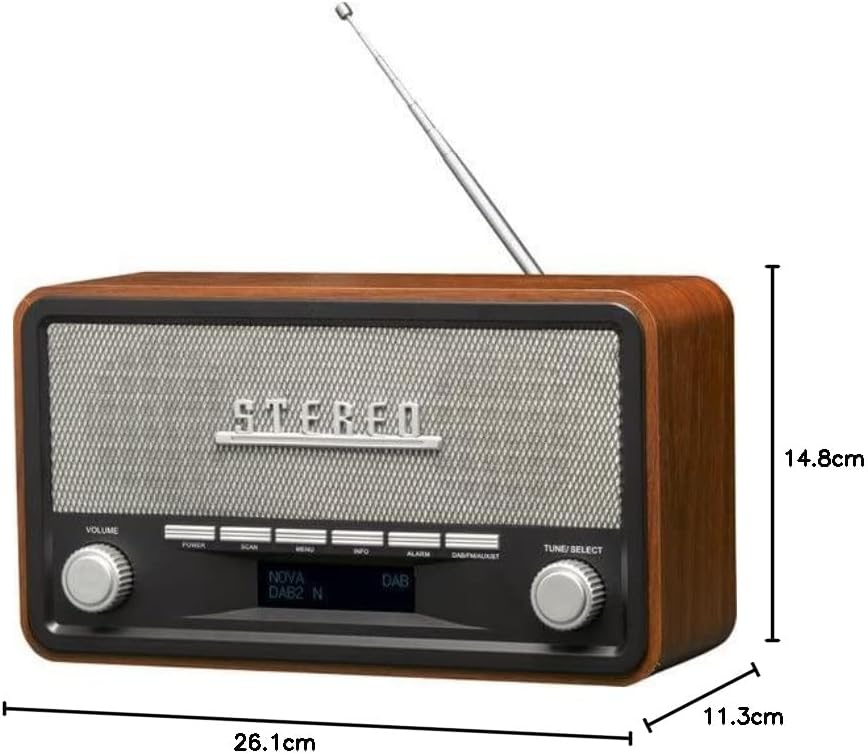
Image: Rear view of the radio, clearly showing the AUX IN port next to the DC 5V power input.
Setting Alarms
Press the Alarm button to access alarm settings. Follow the on-screen prompts and use the Tune/Select knob to set the time, alarm source (buzzer, DAB, or FM), and volume.
Display Dimming
The display brightness can be adjusted through the system settings. Press the Menu button, navigate to 'System Settings' or 'Display', and adjust the dimming level using the Tune/Select knob.
Maintenance
- Cleaning: Use a soft, dry cloth to clean the radio's surface. Do not use abrasive cleaners or solvents.
- Battery Replacement: If using batteries, replace all four 'C' size batteries simultaneously when the low battery indicator appears on the display or when performance degrades.
- Storage: If storing the radio for an extended period, remove the batteries to prevent leakage.
Troubleshooting
| Problem | Possible Solution |
|---|---|
| No power | Check AC adapter connection or replace batteries. |
| Poor radio reception | Fully extend the antenna. Reposition the radio for better signal. Perform a new station scan. |
| Bluetooth device cannot pair | Ensure the radio is in Bluetooth mode. Make sure the external device's Bluetooth is enabled and within range. Try restarting both devices. |
| No sound from AUX input | Ensure the radio is in AUX mode. Check the audio cable connection. Verify the external device's volume is up. |
Specifications
- Model: DAB-18
- Tuner Technology: DAB+, FM with RDS
- Connectivity: Bluetooth, AUX-in (3.5mm)
- Power Source: AC 230V (via adapter), 4 x 'C' size batteries (not included)
- Product Dimensions: 26.1 cm (L) x 11.3 cm (W) x 14.8 cm (H)
- Weight: 970 g
- Special Features: Dimming display, Alarm function

Image: Close-up of the radio's digital display, showing station information in DAB mode.
Warranty and Support
For warranty information and technical support, please refer to the documentation provided with your purchase or contact your local retailer. Keep your proof of purchase for any warranty claims.


