
1. Introduction
This manual provides detailed instructions for the installation, operation, and maintenance of your ANNKE 32-channel H.265+ 3K Lite AI Digital Video Recorder (DVR). This DVR is designed for home and business surveillance systems, offering advanced features such as AI-powered human and vehicle detection, efficient H.265+ video compression, and versatile 5-in-1 camera compatibility.

Image: ANNKE 32CH 3K Lite DVR with Next-Gen AI, providing 360° peace of mind for business and home.
2. What's in the Box
Carefully unpack the contents and ensure all items are present. If any items are missing or damaged, contact customer support.
- 1 x 32CH 3K Lite DVR (Model: DX31NB)
- 1 x DVR Power Adapter
- 1 x HDMI Cable
- 1 x Network Cable
- 1 x USB Mouse
- 1 x User Manual
- 1 x Wall Sticker
- HDD Installation Cables (if HDD is not pre-installed)
- Screw Bag (for HDD installation)

Image: Contents of the ANNKE 32CH 3K Lite DVR box.
Unboxing Video
Video: This video demonstrates the unboxing process of the ANNKE 32CH 3K Lite DVR, showing all included components.
3. Setup Instructions
3.1 DVR Overview and Connections
Familiarize yourself with the ports and indicators on your DVR unit before making connections.

Image: Diagram illustrating the front and rear panel connections of the DVR.
3.2 Initial Connection Steps
- Connect Cameras: Connect your surveillance cameras to the BNC video input ports on the rear of the DVR. This DVR supports 3K TVI, CVI, AHD, CVBS, and IP cameras.
- Connect Monitor: Use the provided HDMI cable to connect the DVR to a monitor or TV. Alternatively, use a VGA cable.
- Connect Mouse: Plug the USB mouse into one of the USB ports on the DVR.
- Connect Network: For remote access and network features, connect the DVR to your router using the provided Ethernet cable.
- Connect Power: Connect the DVR power adapter to the DVR and then to a power outlet. The DVR will power on automatically.
3.3 Hard Drive Installation (if not pre-installed)
If your DVR did not come with a hard drive pre-installed, follow these steps:
- Unscrew the top cover of the DVR.
- Connect the SATA data and power cables from the DVR to the hard drive.
- Secure the hard drive to the DVR chassis using the provided screws.
- Replace the top cover and secure it with screws.
4. Operating Instructions
4.1 Initial Setup Wizard
Upon first power-on, the DVR will guide you through an initial setup wizard to configure language, date/time, network settings, and create an administrator password. Follow the on-screen prompts.
4.2 Live View and Playback
After setup, you can view live camera feeds on the connected monitor. Use the USB mouse to navigate the interface. To review recorded footage, access the playback menu. The Smart Search feature allows for efficient retrieval of specific events.

Image: Smart Search interface for efficient event retrieval.
4.3 Remote Access
The ANNKE DVR supports remote access via the ANNKE Vision App (for phones, iPads, tablets) or through a web browser. This allows you to monitor your surveillance system from anywhere with an internet connection.

Image: Unlimited remote access from various devices.
4.4 AI Features and Configuration
The DVR features advanced AI capabilities for person and vehicle detection. These settings can be configured in the DVR's menu to customize alert triggers and detection zones.
Video: This video demonstrates the AI features of the ANNKE 32CH 3K Lite DVR, including person and vehicle detection and remote access capabilities.
5. Advanced Features
5.1 AI Person/Vehicle Detection
The optimized AI detection system accurately identifies human and vehicle intrusions, sending instant alerts via app pushes and emails. This reduces false alarms from irrelevant movements.

Image: AI-powered person and vehicle detection.
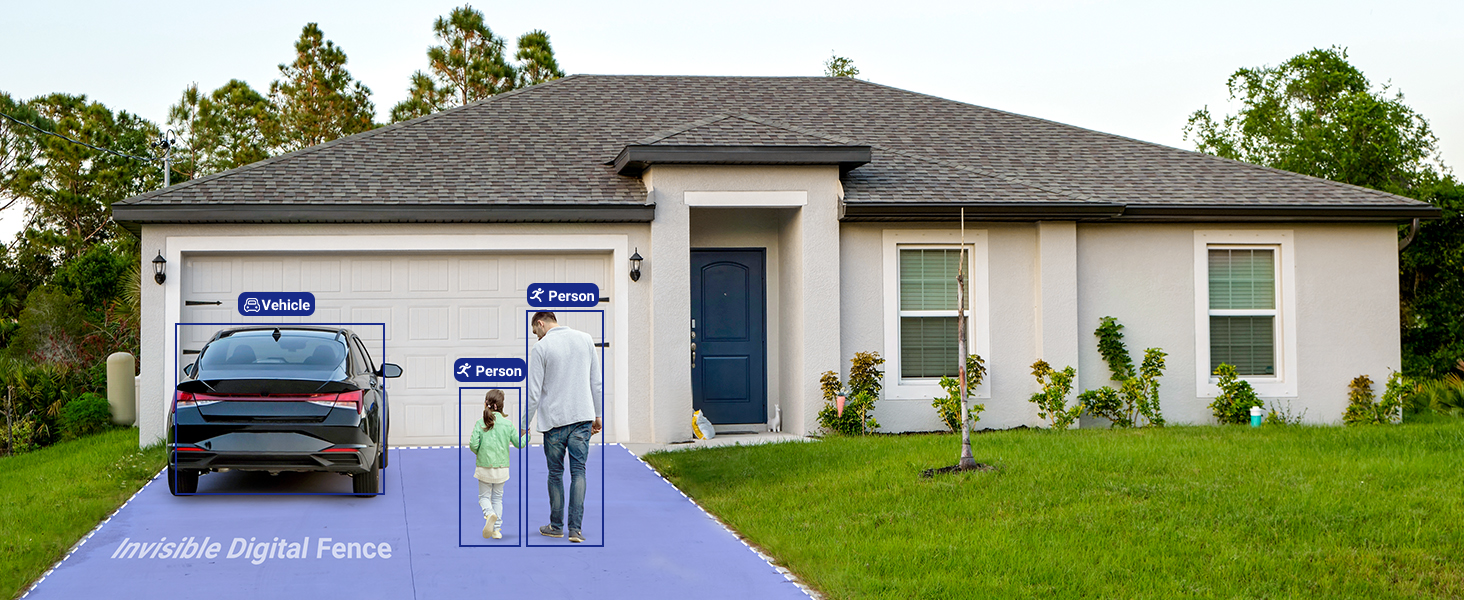
Image: Invisible Digital Fence for customized detection zones.
5.2 H.265+ Video Compression
The DVR utilizes H.265 Pro+ compression technology, which significantly reduces file sizes and bandwidth usage without compromising video quality. This allows for longer recording times on the same storage capacity.

Image: H.265+ compression efficiency comparison.

Image: Visual comparison of H.265+ and H.264 storage and bitrate.
5.3 5-in-1 Hybrid Compatibility
This DVR supports a wide range of camera types, including 3K TVI, CVI, AHD, CVBS, and IP cameras (up to 6MP). This flexibility allows for integration with existing systems or diverse camera setups.

Image: Powerful 5-in-1 DVR compatibility.

Image: One DVR fits all camera types.
6. Maintenance
6.1 Regular Cleaning
Keep the DVR unit clean and free from dust. Use a soft, dry cloth for cleaning. Ensure ventilation openings are not obstructed to prevent overheating.

Image: DVR designed for efficient heat dissipation.
6.2 Firmware Updates
Periodically check the ANNKE official website for firmware updates. Keeping your DVR's firmware up-to-date ensures optimal performance, security, and access to new features.
6.3 Hard Drive Management
Regularly check the status of your hard drive through the DVR's menu. Ensure there is sufficient storage space and that the drive is functioning correctly for continuous recording.
7. Troubleshooting
7.1 No Video Output
- Check HDMI/VGA cable connections to the monitor and DVR.
- Ensure the monitor is set to the correct input source.
- Verify the DVR is powered on (power indicator light should be active).
7.2 No Remote Access
- Confirm the DVR is connected to the internet via the Ethernet cable.
- Check your router and internet connection.
- Ensure the ANNKE Vision App is updated to the latest version.
- Verify network settings on the DVR are correctly configured (DHCP enabled or static IP set).

Image: DVR connectivity options.
7.3 AI Detection Not Working
- Ensure AI detection is enabled in the DVR's menu for the specific channels.
- Verify detection zones are correctly drawn and sensitivity is adjusted.
- Check camera placement and lighting conditions.
8. Specifications
| Feature | Specification |
|---|---|
| Brand | ANNKE |
| Model Number | DX31NB |
| Number of Channels | 32 |
| Video Compression | H.265+ / H.265 / H.264+ / H.264 |
| Video Input | 32-ch BNC (supports TVI/AHD/CVI/CVBS) + 2-ch IP (up to 6MP) |
| Video Output | HDMI, VGA |
| Audio Input | RCA |
| Total USB Ports | 2 |
| Storage | Supports up to 2 x 10TB HDD (Hard Drive Not Included) |
| AI Features | Human/Vehicle Detection, Line Crossing, Intrusion Detection |
| Connectivity Technology | VGA, HDMI, USB, BNC, Ethernet |
| Item Weight | 5 Pounds |
| UPC | 702534888696 |
9. Warranty and Support
Your ANNKE DVR is backed by comprehensive certifications (UL, CE, HDMI) and robust security protocols, including 128-bit AES encryption, HTTPS, and private protocols, ensuring data privacy and system integrity.

Image: Data security and encryption features.
For warranty information, technical support, or to register your product, please visit the official ANNKE website or contact their customer service directly. Details can typically be found in the included user manual or on the product packaging.