ROGER TECHNOLOGY R30-1204
ROGER TECHNOLOGY R30/1204 Automatic Sliding Gate Motor User Manual
Model: R30-1204
1. Introduction
This manual provides essential instructions for the installation, operation, and maintenance of the ROGER TECHNOLOGY R30/1204 Automatic Sliding Gate Motor. This electromechanical gear motor is designed for sliding gates weighing up to 1200 kg. It features an integrated H70 series control unit, an optical encoder, and a magnetic limit switch for precise and reliable operation. Please read this manual thoroughly before installation and use to ensure safe and correct operation.
2. Safety Instructions
Important: Failure to follow these safety instructions may result in serious injury or damage to property.
- Installation must be performed by qualified personnel in compliance with local electrical and safety regulations.
- Ensure the power supply is disconnected before performing any installation, maintenance, or repair work.
- Do not allow children to play with or near the gate motor or its controls.
- Keep hands and loose clothing clear of moving parts of the gate and motor.
- Regularly inspect the gate and motor for signs of wear, damage, or misalignment.
- Do not attempt to repair the motor yourself. Contact qualified service personnel.
3. Product Overview
The ROGER TECHNOLOGY R30/1204 is a robust motor designed for automating sliding gates. Its compact design houses a powerful 230V AC motor, an integrated control unit, and advanced safety features.

Figure 3.1: Exterior view of the R30/1204 motor unit.
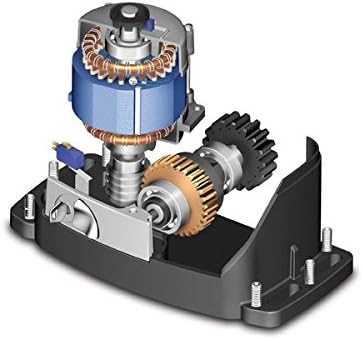
Figure 3.2: Internal components, highlighting the motor and gear mechanism.
Key Features:
- Electromechanical gear motor for sliding gates.
- Suitable for gates up to 1200 kg.
- Integrated H70 series control unit.
- Optical encoder for precise gate positioning.
- Magnetic limit switches for accurate stop points.
- Irreversible gearbox for secure gate locking.
4. Specifications
| Parameter | Value |
|---|---|
| Model Number | R30-1204 |
| Brand | ROGER TECHNOLOGY |
| Max Gate Weight | 1200 kg |
| Line Power Supply | 230 V AC - 50 Hz |
| Motor Power Supply | 230 V AC |
| Rated Power | 420 W |
| Duty Cycle | 50% |
| Thrust | 800 N |
| Operating Temperature | -20 to +55 °C |
| Motor Protection Temperature | 150 °C |
| Gate Speed | 9.5 m/min (0.16 m/s) |
| Gearbox Type | Irreversible |
| Limit Switch Type | Magnetic |
| Control Unit | Integrated H70/104AC |
| Encoder Type | Optical |
| Max Product Dimensions (L x W x H) | 325 x 162 x 295 mm |
| Material | Metal |
5. Setup and Installation
Installation of the R30/1204 motor requires technical expertise and should only be performed by qualified professionals. This section provides a general overview; refer to the detailed installation manual provided with the product for specific wiring diagrams and mounting instructions.
- Site Preparation: Ensure the gate track is clean, level, and free of obstructions. Prepare a stable concrete base for the motor unit.
- Mounting the Motor: Securely fasten the motor unit to the prepared base using appropriate anchor bolts. Ensure correct alignment with the gate rack.
- Installing the Rack: Attach the gate rack to the sliding gate, ensuring proper meshing with the motor's pinion gear. Maintain a small clearance between the rack and the pinion.
- Electrical Connections: Connect the motor to the 230V AC power supply. Wire the control unit (H70 series) according to the provided diagrams, including connections for safety photocells, remote controls, and other accessories.
- Limit Switch Adjustment: Install and adjust the magnetic limit switches at the desired open and closed positions of the gate. These switches signal the motor to stop.
- Initial Programming: Power on the system and perform the initial programming steps for the control unit, which typically involves learning the gate's travel limits and setting operational parameters.
- Safety Device Testing: Thoroughly test all safety devices, such as photocells and emergency stop buttons, to ensure they function correctly.
6. Operating Instructions
Once installed and programmed, the R30/1204 motor provides automated control of your sliding gate.
- Remote Control: Press the designated button on your remote control to open, close, or stop the gate.
- Manual Release: In case of power failure or malfunction, the motor can be manually disengaged. Locate the manual release mechanism (usually a key-operated lever) on the motor unit, unlock it, and manually slide the gate. Remember to re-engage the motor after restoring power or resolving the issue.
- Safety Features: The optical encoder and safety photocells are designed to detect obstacles. If an obstacle is detected during closing, the gate will reverse. If detected during opening, the gate will stop.
7. Maintenance
Regular maintenance ensures the longevity and reliable operation of your gate motor.
- Monthly:
- Inspect the gate track and wheels for debris and clear any obstructions.
- Check the gate rack for wear or damage.
- Verify the proper functioning of safety photocells and limit switches.
- Every Six Months:
- Lubricate moving parts of the gate (wheels, bearings) as recommended by the gate manufacturer.
- Check all electrical connections for tightness and signs of corrosion.
- Inspect the motor housing for any damage or water ingress.
- Annual Professional Check: It is recommended to have a qualified technician perform an annual inspection and service of the entire gate automation system.
8. Troubleshooting
This section addresses common issues you might encounter. For more complex problems, consult a qualified technician.
| Problem | Possible Cause | Solution |
|---|---|---|
| Motor does not respond to remote. | No power; remote battery dead; remote not programmed; safety device triggered. | Check power supply; replace remote battery; reprogram remote; check photocells for obstructions. |
| Gate stops unexpectedly. | Obstruction detected by photocells or encoder; limit switch faulty; motor overheating. | Clear obstructions; check limit switch connections; allow motor to cool down. |
| Gate opens/closes partially. | Limit switches incorrectly set or faulty; gate obstruction. | Re-adjust limit switches; clear any physical obstructions. |
| Motor makes unusual noises. | Lack of lubrication; worn gears; foreign object in mechanism. | Lubricate moving parts; inspect gears for wear; remove any foreign objects. If noise persists, contact support. |
9. Warranty and Support
Information regarding the specific warranty period and terms for the ROGER TECHNOLOGY R30/1204 motor is typically provided with the product documentation at the time of purchase. Please refer to your purchase receipt or contact your dealer for warranty details.
For technical support, spare parts, or service, please contact your authorized ROGER TECHNOLOGY dealer or installer.
- Spare Parts Availability: Information unavailable.
- Software Updates: Information not available.
Ask a question about this manual
Ask about setup, troubleshooting, compatibility, parts, safety, or missing instructions. Manuals+ will review the question and use this page’s manual context to help answer it.