
Whirlpool MW 20 BC
Whirlpool 20 L Convection Microwave Oven User Manual
Model: MW 20 BC | Brand: Whirlpool
1. Introduction
Thank you for choosing the Whirlpool 20 L Convection Microwave Oven. This manual provides essential information for the safe and efficient operation, maintenance, and troubleshooting of your new appliance. Please read it thoroughly before using the oven and keep it for future reference.
This convection microwave oven is designed for residential use, offering versatile cooking options including microwave, grill, convection, and combination modes, along with a wide range of auto-cook menus.
2. Important Safety Instructions
WARNING: To reduce the risk of fire, electric shock, injury to persons, or exposure to excessive microwave energy, observe the following basic precautions:
- Read all instructions before using the appliance.
- Do not operate the oven if the door is bent, warped, or otherwise damaged.
- Do not tamper with the door safety interlocks.
- Do not remove the outer cover of the oven. High voltage is present inside.
- Maintenance should only be carried out by qualified service personnel.
- Always unplug the oven from the power outlet before cleaning or performing any maintenance.
- Ensure proper ventilation around the oven. Do not block any ventilation openings.
- Do not use corrosive chemicals or vapors in this appliance.
- Do not heat liquids or other foods in sealed containers as they are liable to explode.
- Do not use metal utensils or foil in microwave mode, as this can cause arcing.
- Supervise children closely when the oven is in use.
- Only use utensils that are suitable for use in microwave ovens.
3. Parts and Features
Familiarize yourself with the components of your Whirlpool Convection Microwave Oven.

Figure 3.1: Front view of the Whirlpool 20 L Convection Microwave Oven, showing the door, handle, control panel, and display.

Figure 3.2: Side view of the microwave oven, highlighting the ventilation grilles on the left side.
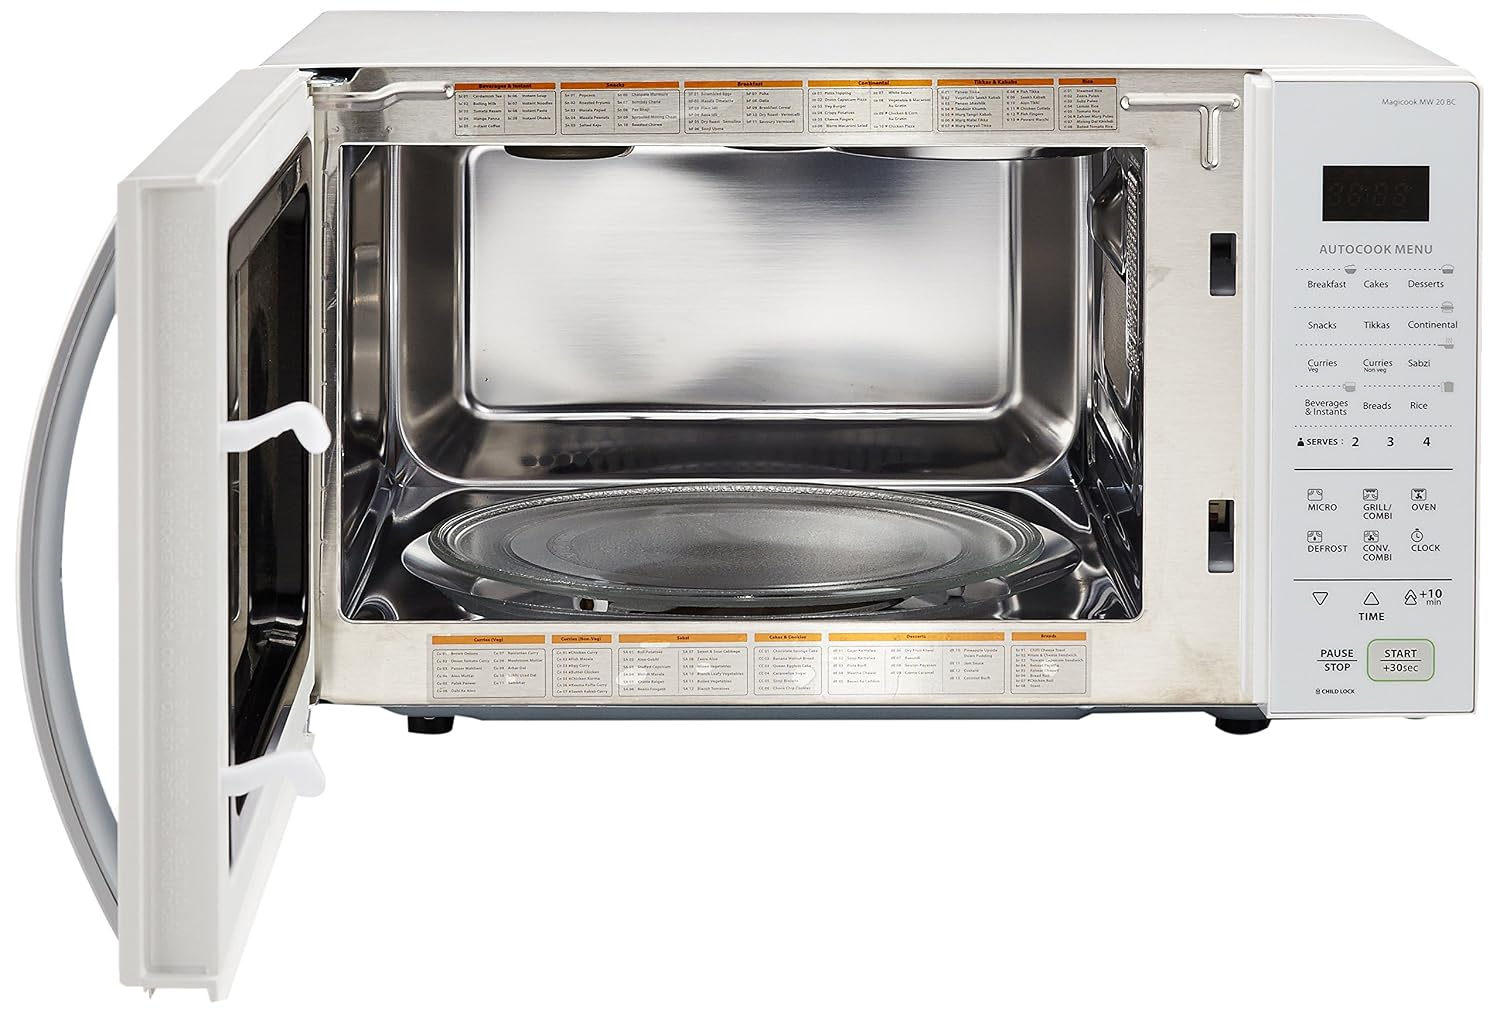
Figure 3.3: Interior view of the oven with the door open, showing the stainless steel cavity, glass turntable, and turntable support.

Figure 3.4: The oven interior with a microwave-safe pot placed on the turntable, demonstrating typical usage.

Figure 3.5: Detailed view of the feather touch control panel, showing the digital display, auto-cook menu categories, and function buttons (Micro, Grill/Combi, Oven, Defrost, Conv. Combi, Clock, Time, Start, Pause/Stop).

Figure 3.6: Rear view of the oven, displaying the power cord, ventilation openings, and the product specification label with important warnings.

Figure 3.7: Diagram illustrating the approximate dimensions of the microwave oven: 45 cm (1 ft 4 in) width and 26 cm (8 in) height.
Included Accessories:
- Glass Turntable: For even cooking.
- Turntable Support: To hold the glass turntable.
- Grill Rack: For grilling and convection cooking.
- Baking Plate: For baking functions.
- Starter Kit: Includes one cook & serve container, one serving spoon, one big bowl, and one medium bowl (all microwave safe).
4. Setup and Installation
4.1 Unpacking
Carefully remove the microwave oven and all packing materials from the carton. Check for any damage during transit. Do not operate the oven if it appears damaged.
4.2 Placement
- Place the oven on a flat, stable surface that can support its weight and the heaviest food item likely to be cooked in it.
- Ensure adequate ventilation. Leave a minimum of 10 cm (4 inches) clearance at the back, 20 cm (8 inches) at the top, and 5 cm (2 inches) on each side for proper airflow.
- Do not place the oven near heat sources such as gas or electric ranges, or over a sink.
- Keep the oven away from radio and TV sets, as its operation may cause interference.
4.3 Electrical Connection
- Plug the oven into a dedicated 230V, 50Hz AC power outlet. Do not use extension cords or multi-plugs.
- Ensure the electrical circuit is adequately rated for the oven's power consumption (800W microwave output, 1300W convection power).
4.4 Turntable Assembly
- Place the turntable support ring in the center of the oven cavity.
- Place the glass turntable on top of the support ring, ensuring it sits securely in the center hub.
- Always ensure the turntable and support are correctly in place before operating the oven.
5. Operating Instructions
5.1 Control Panel Overview
The oven features a feather touch membrane control panel for easy operation. Refer to Figure 3.5 for button layout.
- Display: Shows time, cooking settings, and indicators.
- AUTOCOOK MENU: Categories for pre-programmed recipes.
- MICRO: For microwave cooking.
- GRILL/COMBI: For grilling or combination cooking with grill.
- OVEN: For convection cooking.
- DEFROST: For defrosting food by weight or time.
- CONV. COMBI: For combination cooking with convection.
- CLOCK: To set the current time.
- TIME (Up/Down Arrows): To adjust cooking time or settings.
- +10 min: Quick start or add 10 minutes to cooking time.
- PAUSE/STOP: To pause or cancel cooking.
- START/+30sec: To start cooking or add 30 seconds to cooking time.
- CHILD LOCK: To lock the control panel.
5.2 Setting the Clock
- Press the CLOCK button.
- Use the TIME arrows to set the hour.
- Press CLOCK again.
- Use the TIME arrows to set the minutes.
- Press CLOCK to confirm.
5.3 Microwave Cooking
- Place food in a microwave-safe container on the turntable. Close the door.
- Press the MICRO button. The display will show the default power level (e.g., P100 for 100%). Press MICRO repeatedly to cycle through power levels (P100, P80, P50, P30, P10).
- Use the TIME arrows to set the desired cooking time.
- Press START/+30sec to begin cooking.
Quick Start: Press START/+30sec repeatedly to cook at 100% microwave power for 30-second intervals.
5.4 Convection Cooking (OVEN Mode)
Use the baking plate and grill rack for convection cooking.
- Place food on the grill rack or baking plate. Close the door.
- Press the OVEN button. The display will show the default temperature (e.g., 180°C). Use the TIME arrows to adjust the temperature (range typically 110°C to 200°C).
- Press OVEN again to confirm temperature.
- Use the TIME arrows to set the desired cooking time.
- Press START/+30sec to begin cooking. The oven will preheat to the set temperature before cooking starts.
5.5 Grill Cooking
Use the grill rack for grilling.
- Place food on the grill rack. Close the door.
- Press the GRILL/COMBI button once for grill mode.
- Use the TIME arrows to set the desired grilling time.
- Press START/+30sec to begin grilling.
5.6 Combination Cooking
This oven offers two combination modes:
- Grill + Microwave (GRILL/COMBI): Press GRILL/COMBI twice.
- Convection + Microwave (CONV. COMBI): Press CONV. COMBI.
Follow the on-screen prompts to set power levels and cooking time for combination modes, similar to microwave cooking.
5.7 Defrosting
The oven supports defrosting by time or weight.
- Place frozen food in the oven. Close the door.
- Press the DEFROST button.
- Use the TIME arrows to select defrost time or weight (refer to the internal label for weight-based defrost categories).
- Press START/+30sec to begin defrosting.
5.8 Auto-Cook Menu (118 Indian Auto-Cook Menus)
The oven features 118 pre-programmed auto-cook menus for various Indian dishes and common preparations. These are categorized on the control panel (Breakfast, Cakes, Desserts, Snacks, Tikkas, Continental, Curries Veg, Curries Non-veg, Sabzi, Beverages & Instants, Breads, Rice).
- Open the oven door to view the detailed auto-cook menu chart inside the door frame.
- Press the relevant auto-cook category button on the control panel (e.g., "Breakfast").
- Use the TIME arrows to select the specific menu number.
- Adjust the number of servings (2, 3, or 4) if applicable, using the dedicated buttons.
- Press START/+30sec to begin cooking.
The "2 Minute Recipes" feature allows for quick preparation of certain dishes as indicated in the auto-cook menu.
The "Zero Oil Cooking" feature is integrated into specific auto-cook menus, allowing for healthier preparations without added oil.
5.9 Child Lock
To prevent accidental operation, especially by children:
- To Activate: Press and hold the PAUSE/STOP button for 3 seconds. A lock indicator will appear on the display.
- To Deactivate: Press and hold the PAUSE/STOP button for 3 seconds again. The lock indicator will disappear.
6. Care and Maintenance
Regular cleaning and proper maintenance will ensure the longevity and optimal performance of your microwave oven.
- Before Cleaning: Always unplug the oven from the power outlet.
- Oven Interior: Wipe the interior cavity after each use with a damp cloth and mild detergent. For stubborn stains, boil a cup of water with a few slices of lemon inside the oven for 5-10 minutes to loosen food particles, then wipe clean.
- Oven Exterior: Clean the exterior surface with a soft, damp cloth. Do not use abrasive cleaners or harsh chemicals.
- Door and Door Seal: Clean the door, door seals, and control panel carefully with a soft, damp cloth to ensure proper closure and operation.
- Turntable and Support: The glass turntable and turntable support can be washed in warm, soapy water or in a dishwasher. Ensure they are completely dry before placing them back in the oven.
- Accessories: Clean the grill rack and baking plate with warm, soapy water.
- Odor Removal: To remove odors, combine a cup of water with a few tablespoons of lemon juice or vinegar in a microwave-safe bowl and microwave on high for 5-7 minutes.
7. Troubleshooting
If you encounter issues with your oven, consult the following table before contacting customer service.
| Problem | Possible Cause | Solution |
|---|---|---|
| Oven does not start. | Power cord not plugged in; Door not closed properly; Child lock activated; Fuse blown or circuit breaker tripped. | Ensure plug is firmly in outlet; Close door securely; Deactivate child lock (hold PAUSE/STOP for 3 sec); Check household fuse/circuit breaker. |
| No heat during microwave cooking. | Incorrect power level selected; Door not closed properly. | Ensure correct power level is set; Close door securely. |
| Turntable does not rotate. | Turntable or support not correctly placed; Food too large or heavy. | Re-position turntable and support; Use a smaller dish or divide food. |
| Food is unevenly cooked. | Food not stirred or rotated; Incorrect cooking time/power. | Stir or turn food halfway through cooking; Adjust time/power as needed. |
| Steam accumulating on oven door. | Normal condensation during cooking. | Wipe with a dry cloth after cooking. |
8. Product Specifications
| Feature | Specification |
|---|---|
| Brand | Whirlpool |
| Model | MW 20 BC (Magicook 20BC) |
| Capacity | 20 Litres |
| Oven Cooking Mode | Convection |
| Microwave Power Output | 800 Watts |
| Convection Power | 1300 Watts |
| Voltage | 230 Volts |
| Fuel Type | Electric |
| Installation Type | Freestanding |
| Colour | White |
| Material | Stainless Steel (Inner Material) |
| Defrost System | Defrost |
| Door Orientation | Left |
| Item Weight | 14 kg 400 g |
| Item Dimensions (LxWxH) | 32.5 x 31.5 x 19.5 Centimeters |
| Included Components | 1 Grill Rack, 1 Baking Tray, Starter Kit (cook & serve container, serving spoon, big bowl, medium bowl) |
9. Warranty Information
Your Whirlpool 20 L Convection Microwave Oven comes with the following warranty:
- 1 year comprehensive warranty on the product from the date of purchase.
- 5 years warranty on the Magnetron from the date of purchase.
Please retain your purchase receipt for warranty claims. The warranty covers manufacturing defects under normal household use. It does not cover damage due to misuse, accidents, unauthorized repairs, or normal wear and tear.
10. Customer Support
For any service, repair, or technical assistance, please contact Whirlpool customer service. Ensure you have your product model number (MW 20 BC) and purchase details ready when you call.
For the most up-to-date contact information, please refer to the Whirlpool India website or your product's warranty card.
Related documentsMW 20 BC


Ask a question about this manual
Ask about setup, troubleshooting, compatibility, parts, safety, or missing instructions. Manuals+ will review the question and use this page’s manual context to help answer it.