1. Product Overview
The VANGUARD VGRBG-0752-0754SS Double Layer Rear Bumper Guard is designed to provide enhanced rear-end protection for compatible vehicles. Constructed from durable T-304 stainless steel with a polished finish, this bumper guard offers a robust barrier against minor impacts and contributes to the vehicle's aesthetic.
This product features a double-layer design for increased strength and includes all necessary assembly and mounting hardware for installation.
2. Compatibility
This rear bumper guard is compatible with the following vehicle models:
- Lexus GX460: 2010 - 2024 models
- Lexus GX470: 2003 - 2009 models
- Toyota 4Runner: 2003 - 2024 models
Exclusion: This bumper guard is not compatible with TRD models of the Toyota 4Runner.
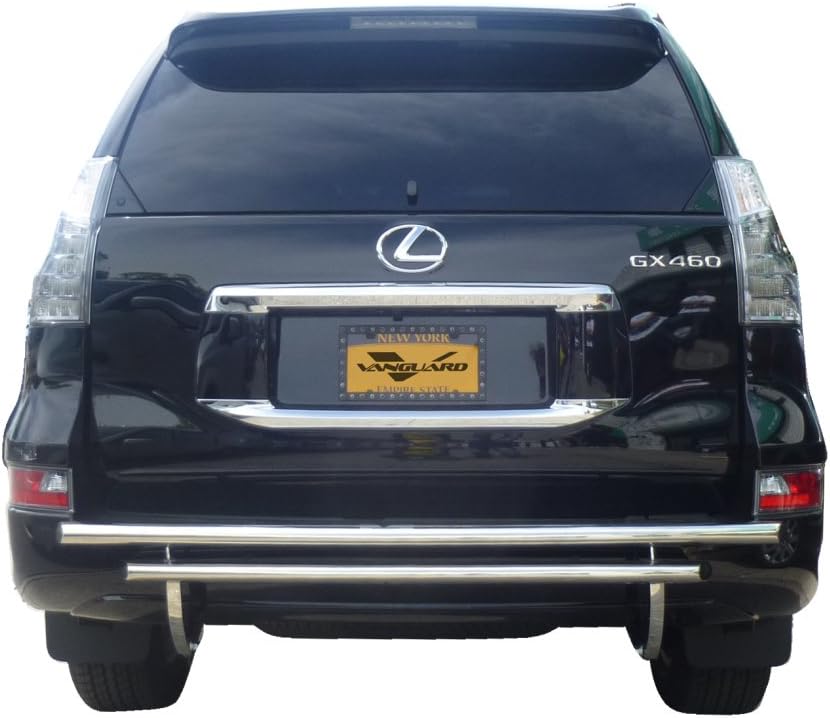
Image: Rear view of a Lexus GX460 with the VANGUARD Double Layer Rear Bumper Guard installed.

Image: A white Toyota 4Runner equipped with the VANGUARD Double Layer Rear Bumper Guard, highlighting its design.
3. Setup and Installation
Installation of the VANGUARD VGRBG-0752-0754SS Rear Bumper Guard requires mechanical aptitude and basic tools. It is recommended that installation be performed by a qualified professional to ensure proper fitment and safety. All necessary mounting hardware is included with the product.
General Installation Steps (Consult a professional for specific vehicle instructions):
- Preparation: Park the vehicle on a level surface and engage the parking brake. Ensure the vehicle is cool to the touch.
- Identify Mounting Points: Locate the designated mounting points on the vehicle's frame or bumper structure. These are typically pre-drilled holes or existing attachment points.
- Assemble Brackets: Attach any necessary mounting brackets to the bumper guard assembly, ensuring correct orientation. Refer to any diagrams provided with the hardware.
- Position Bumper Guard: Carefully lift and position the bumper guard assembly against the vehicle's rear, aligning the brackets with the identified mounting points. Assistance from another person is recommended due to the weight and size of the guard.
- Secure Hardware: Insert bolts, washers, and nuts through the mounting points and brackets. Hand-tighten all hardware initially.
- Adjust and Align: Adjust the bumper guard for proper alignment and clearance. Ensure it is level and does not interfere with other vehicle components.
- Final Tightening: Once aligned, securely tighten all mounting hardware using appropriate tools. Do not overtighten.
- Post-Installation Check: Verify that the bumper guard is firmly attached and stable. Check for any interference with parking sensors, exhaust, or other rear-end components.

Image: Detailed view of the bumper guard's attachment to the vehicle frame.
4. Operating the Bumper Guard
The VANGUARD Double Layer Rear Bumper Guard operates passively by providing a physical barrier at the rear of your vehicle. Its primary function is to absorb and distribute impact forces from minor collisions, protecting the vehicle's original bumper and bodywork. No active operation is required from the user.
5. Maintenance
To maintain the appearance and integrity of your stainless steel bumper guard, follow these guidelines:
- Regular Cleaning: Wash the bumper guard regularly with mild automotive soap and water. Use a soft cloth or sponge to prevent scratching the polished finish.
- Rinse Thoroughly: Rinse off all soap residue completely to prevent water spots or streaks.
- Drying: Dry the bumper guard with a clean, soft towel to prevent water spots, especially in hard water areas.
- Polishing (Optional): For a high-gloss finish, a non-abrasive stainless steel polish can be applied periodically. Follow the polish manufacturer's instructions.
- Avoid Harsh Chemicals: Do not use abrasive cleaners, steel wool, or harsh chemical solvents, as these can damage the stainless steel finish.
- Inspect Hardware: Periodically check all mounting hardware for tightness. Re-tighten if any bolts or nuts have loosened over time due to vehicle vibration or road conditions.
6. Troubleshooting
Issue: Parking Sensors Malfunctioning or Obstructed
Some vehicles, particularly those with factory-installed parking sensors, may experience interference or obstruction of these sensors after the bumper guard is installed. This can lead to false alarms or non-functional sensors.

Image: Illustration of parking sensor range, which may be affected by bumper guard installation.
Possible Solutions:
- Adjust Bumper Guard: If possible, slightly adjust the position of the bumper guard to provide more clearance for the sensors. This may involve loosening mounting hardware, repositioning, and re-tightening.
- Sensor Relocation/Disabling: In some cases, it may be necessary to relocate the parking sensors (if feasible) or, as a last resort, disable them if their functionality is severely compromised. Consult a professional automotive technician for these modifications.
- Professional Consultation: If the issue persists, consult with an automotive specialist or the bumper guard manufacturer for further guidance.
7. Specifications
| Feature | Detail |
|---|---|
| Model Number | VGRBG-0752-0754SS |
| Brand | VANGUARD |
| Material | T-304 Stainless Steel |
| Finish | Polished |
| Item Weight | Approximately 25 pounds |
| Package Dimensions | Approximately 69 x 22 x 12 inches |
| Position | Rear |
| Fit Type | Vehicle Specific Fit |
8. Warranty and Support
For information regarding the product warranty, including terms, conditions, and duration, please contact VANGUARD directly or refer to the warranty documentation included with your purchase. Support for installation, troubleshooting, or parts can be obtained by contacting VANGUARD customer service through their official website or the retailer from whom the product was purchased.
Please have your model number (VGRBG-0752-0754SS) and purchase details ready when contacting support.


