
1. Introduction
The GODOX QS1200II Studio Strobe Flash Light is a professional-grade monolight designed for various photography applications, including wedding, advertisement, portrait, and fashion photography. This high-speed flash unit offers advanced features, precise power control, and reliable performance. This manual provides detailed instructions for the safe and effective use of your QS1200II strobe.
2. Safety Information
Please read all safety instructions carefully before using this product.
- Do not expose the unit to rain or moisture to avoid fire or electric shock.
- Do not disassemble the unit. If repairs are needed, contact authorized service personnel.
- Keep out of reach of children.
- Ensure the unit is properly grounded.
- Avoid direct eye exposure to the flash light, as it can cause temporary vision impairment.
- The flash tube and modeling lamp can become very hot during operation. Allow sufficient time for cooling before handling or replacing.
- Use only the specified power voltage (AC200-240V/50Hz).
3. Package Contents
Verify that all items are present in your package:
- Godox QSII Series QS1200II 1200Ws Strobe Flash Modeling Light
- Power Cable
- Standard Reflector (may be pre-attached or separate)
- Glass Protection Cover (may be pre-attached)
4. Product Overview
The GODOX QS1200II Studio Strobe is designed for robust performance and ease of use. Familiarize yourself with its main components.
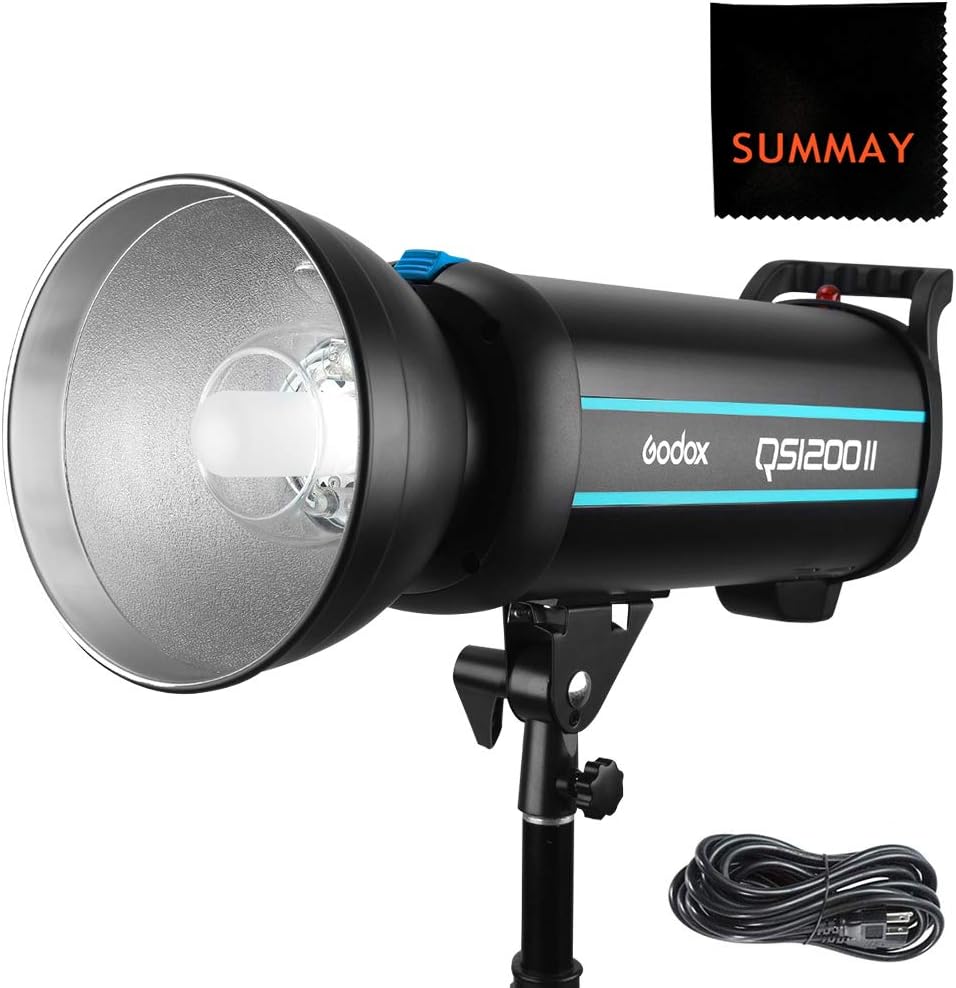
This image displays the GODOX QS1200II Studio Strobe Flash Light, featuring its main body, a standard reflector dish, and the included power cable. The unit is mounted on a light stand adapter.

This composite image provides four different perspectives of the GODOX QS1200II Studio Strobe. It highlights the flash tube, modeling lamp, control panel, and mounting bracket from various angles, illustrating its compact design.
4.1 Control Panel
The control panel provides access to all essential functions of the strobe.

A detailed close-up of the GODOX QS1200II control panel, showing the LCD display, channel/group buttons, S1/S2 mode button, buzzer, modeling lamp control, test button, and power switch. This panel allows for precise control over the strobe's functions.
- LCD Display: Shows current settings (power, channel, group, mode).
- GR/CH Button: Adjusts group and channel settings for wireless control.
- S1/S2 Button: Selects slave trigger modes.
- BUZZ Button: Toggles the audible flash ready indicator.
- MOD/OFF Button: Controls the modeling lamp (on/off/proportional).
- TEST Button: Fires a test flash.
- SET Dial: Adjusts flash power, modeling lamp brightness, and navigates menu options.
- Power Switch: Turns the unit on or off.
5. Setup
5.1 Mounting the Strobe
- Attach the strobe to a sturdy light stand using the integrated mounting bracket.
- Adjust the tilt angle of the strobe as needed and secure it with the locking knob.
5.2 Connecting Power
- Ensure the power switch on the strobe is in the 'OFF' position.
- Connect the power cable to the power input socket on the strobe.
- Plug the other end of the power cable into a suitable AC power outlet (AC200-240V/50Hz).
5.3 Attaching Accessories
The QS1200II uses a Bowens mount for accessories. To attach a reflector or softbox:
- Align the accessory's mounting tabs with the slots on the strobe's front.
- Insert the accessory and rotate it clockwise until it locks into place.
- To remove, press the release button (if present) and rotate counter-clockwise.
6. Operating Instructions
6.1 Power On/Off
Flip the power switch located on the control panel to the 'ON' position to power on the strobe. Flip it to 'OFF' to power down.
6.2 Flash Power Adjustment
The QS1200II offers precise power adjustment in 50 steps, from 1/32 to 1/1 (full power).
- Turn the SET dial to increase or decrease the flash output.
- The current power setting will be displayed on the LCD panel.

This image shows the LCD display of the GODOX QS1200II, illustrating the precise power adjustment capabilities. The left screen shows a flash power setting of 1/32, while the right screen shows a full power setting of 1/1, along with the modeling lamp intensity at 100%.
6.3 Modeling Lamp Control
The 150W modeling lamp is steplessly adjustable from 5% to 100% brightness.
- Press the MOD/OFF button to cycle through modeling lamp modes: ON, OFF, and Proportional.
- When in ON or Proportional mode, turn the SET dial to adjust the brightness.
6.4 Slave Trigger Modes (S1/S2)
The QS1200II features S1 and S2 slave trigger modes, allowing it to synchronize with cameras that have a pre-flash firing system.
- Press the S1/S2 button to select between OFF, S1, or S2 mode.
- S1 Mode: The strobe will fire in response to the first flash from another unit. Suitable for manual flash or TTL flash without pre-flash.
- S2 Mode: The strobe will ignore the first pre-flash from a TTL system and fire on the main flash.

This image focuses on the LCD display of the GODOX QS1200II, demonstrating the selection of slave trigger modes. The left screen indicates S1 mode, and the right screen indicates S2 mode, allowing synchronization with cameras that have a pre-flash system.
6.5 Wireless Control (Godox 2.4G Wireless X System)
The built-in Godox 2.4G Wireless X System allows for remote control of the strobe's power output, modeling lamp, buzzer, and other functions using compatible Godox X System triggers (e.g., X1, XT16, FT16).
- Ensure your wireless trigger is set to the same channel and group as the QS1200II strobe.
- Use the GR/CH button on the strobe to adjust its group and channel settings.
- Refer to your wireless trigger's manual for specific instructions on remote operation.

This image illustrates the GODOX QS1200II strobe's built-in 2.4G Wireless X System. It shows the strobe's control panel alongside a camera equipped with a wireless flash trigger (like the X1), demonstrating how the system enables remote control of flash output and other functions.
6.6 LCD Panel and Settings Memory
The LCD panel provides a clear display of all current settings. The unit features automatic memory and recovery for settings, ensuring your last used configuration is restored upon power-up.

This image highlights the user-friendly control panel of the GODOX QS1200II, featuring clearly labeled buttons and an LCD screen for easy operation. It also shows the flash tube protected by a glass cover, emphasizing the unit's safety features.
7. Maintenance
7.1 Cleaning
- Always disconnect the power cable before cleaning.
- Use a soft, dry cloth to clean the exterior of the strobe.
- For the flash tube and modeling lamp, use a clean, lint-free cloth, possibly dampened with a small amount of isopropyl alcohol, to remove fingerprints or dust. Ensure they are completely dry before use.
- Do not use harsh chemicals or abrasive cleaners.
7.2 Flash Tube and Modeling Lamp Replacement
The flash tube and modeling lamp are user-replaceable components. Refer to the specific instructions provided with replacement parts or consult a qualified technician if unsure.
- Ensure the unit is powered off and unplugged, and has cooled down completely.
- Carefully remove the glass protection cover.
- Gently pull out the old flash tube or unscrew the modeling lamp.
- Install the new component, ensuring proper alignment and connection.
- Replace the glass protection cover.
8. Troubleshooting
- Strobe not firing: Check power connection, ensure the unit is turned on, verify trigger connection (sync cable or wireless), and check if the flash ready indicator is lit.
- Chemical smell during rapid firing: If a chemical smell is detected during rapid firing, ensure adequate ventilation in your studio space. Continuous rapid firing may lead to overheating. If the unit stops functioning, discontinue use and contact support.
- Inconsistent flash output: Check power settings, ensure stable power supply, and verify that the flash tube is securely installed.
- Modeling lamp not working: Check if the modeling lamp is switched on via the MOD/OFF button. If it's on but not lighting, the bulb may need replacement.
9. Specifications
| Feature | Specification |
|---|---|
| Product Dimensions | 23 x 11 x 8.75 inches |
| Item Weight | 10.85 pounds |
| Item Model Number | QS1200II Studio Light |
| Manufacturer | GODOX |
| Brand | GODOX |
| Compatible Mountings | Canon, Canon E-TTL, Canon E-TTL II, EOS Camera, Fujifilm X, Nikon, Nikon SB 5000 AF, Nikon SB-900, Nikon SB-910, Sony, Sony A7R, Sony A7RII, Sony A7RIII, Sony Alpha |
| Battery Life | 1 years (for internal components, not external battery) |
| Camera Flash Type | Slave |
| Flash Sync Speed | Up to 1/2000s |
| Recycling Time | 0.3 to 1.5s |
| Flash Duration | 1/2000 to 1/800s |
| Color Temperature | 5600±200K |
| Modeling Lamp Power | 150W |
10. Warranty and Support
For warranty information and technical support, please refer to the warranty card included with your product or visit the official GODOX website. Keep your purchase receipt as proof of purchase for warranty claims.