Introduction
Thank you for choosing the NEMESIS Audio NA-3.5KD Monoblock Car Amplifier. This manual provides essential information for the proper installation, operation, and maintenance of your amplifier. Please read this manual thoroughly before attempting installation or operation to ensure optimal performance and safety.
Important Safety Information
- Always disconnect the vehicle's battery negative terminal before starting any installation.
- Ensure all wiring is properly routed and secured to prevent damage or short circuits.
- Use appropriate gauge wiring for power, ground, and speaker connections as specified.
- Avoid mounting the amplifier in areas exposed to direct sunlight, excessive heat, moisture, or dust.
- If you are unsure about any part of the installation process, consult a professional car audio installer.
Product Overview
The NEMESIS Audio NA-3.5KD is a high-power monoblock amplifier designed for driving subwoofers. It features robust construction and a range of controls for fine-tuning your audio system.

Figure 1: Top view of the NEMESIS Audio NA-3.5KD amplifier, showing the model number, brand logo, and "3500W MAX" power rating.
Control Panel and Connections
Familiarize yourself with the various connections and controls on your amplifier before installation.

Figure 2: View of the power and speaker terminal side of the NA-3.5KD amplifier. This side includes terminals for BATT+ (12V), REM (Remote Turn-On), GND (Ground), and speaker outputs with a 1Ω minimum impedance rating.
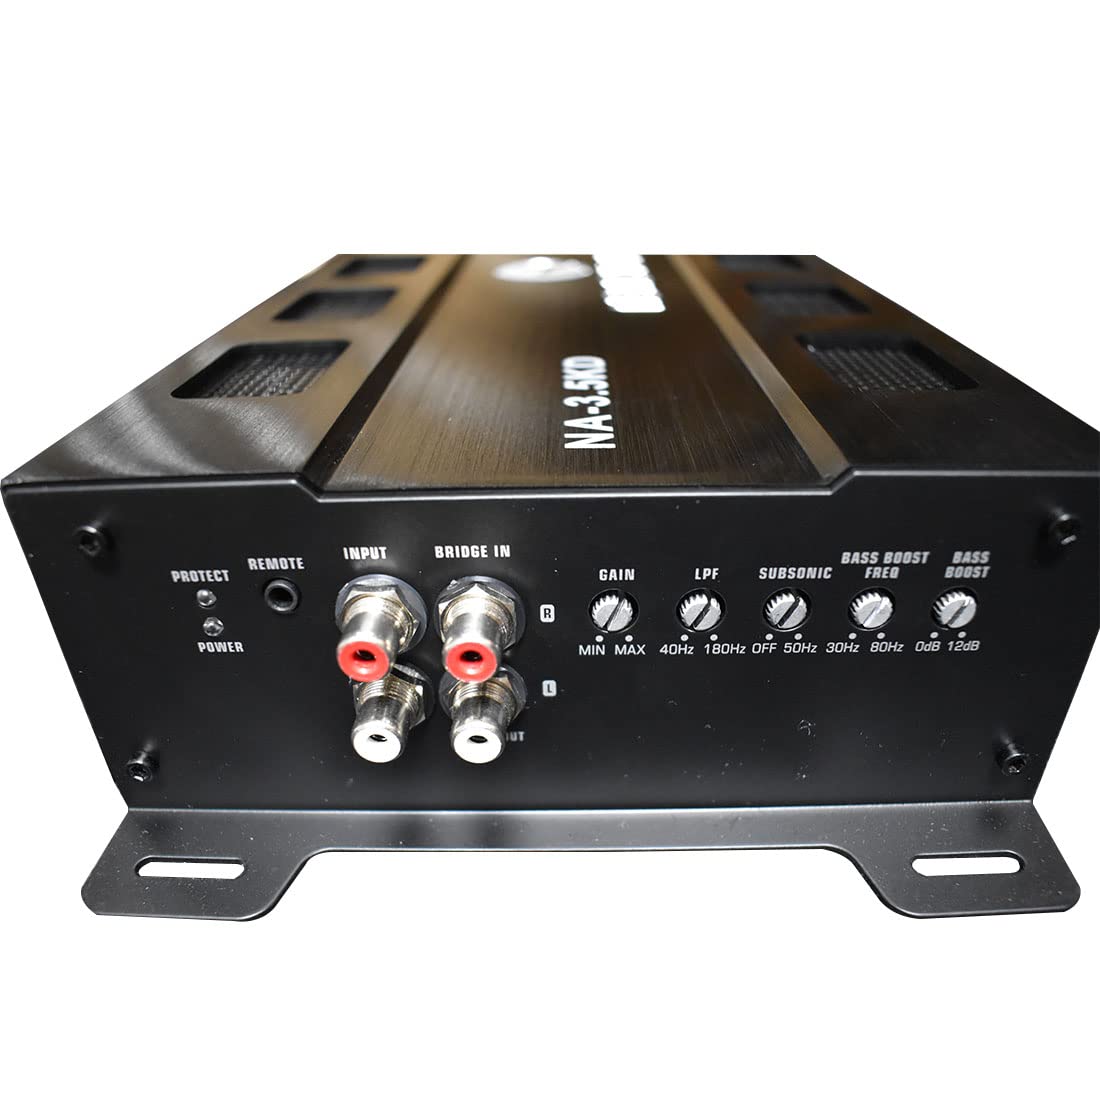
Figure 3: View of the input and control panel side of the NA-3.5KD amplifier. Features include PROTECT and POWER indicator LEDs, REMOTE port, RCA INPUTs, BRIDGE IN, GAIN control, LPF (Low Pass Filter) control, SUBSONIC filter control, BASS BOOST FREQ, and BASS BOOST level controls.
Key Components:
- Power/Ground/Remote Terminals: For connecting the amplifier to the vehicle's electrical system.
- Speaker Terminals: For connecting subwoofers.
- RCA Input: For connecting the audio signal from your head unit or pre-amplifier.
- Gain Control: Adjusts the input sensitivity of the amplifier.
- LPF (Low Pass Filter): Filters out high frequencies, allowing only low frequencies to pass to the subwoofer.
- Subsonic Filter: Filters out extremely low frequencies below the audible range, protecting the subwoofer.
- Bass Boost: Enhances bass output at a selectable frequency.
- LED Indicators: Power (green) and Protect (red) LEDs indicate amplifier status.
Setup and Installation
Proper installation is crucial for the performance and longevity of your amplifier. If you are not confident in your ability to install this unit, please seek professional assistance.
Mounting the Amplifier
- Choose a mounting location that is dry, well-ventilated, and protected from direct sunlight and excessive heat.
- Ensure there is sufficient airflow around the amplifier's heatsink for proper cooling.
- Mount the amplifier securely to a solid surface using appropriate hardware. The NA-3.5KD is designed for surface mounting.
- Avoid mounting the amplifier upside down, as this can hinder heat dissipation.
Wiring Connections
Before making any connections, ensure the vehicle's battery negative terminal is disconnected.
1. Power (BATT+) Connection:
- Run a heavy gauge power cable (e.g., 4 AWG or larger, depending on total system power) directly from the positive terminal of the vehicle's battery to the BATT+ terminal on the amplifier.
- Install an inline fuse holder with a fuse (rated appropriately for the amplifier's power draw) within 18 inches (45 cm) of the battery.
2. Ground (GND) Connection:
- Run a heavy gauge ground cable (same gauge as power cable) from the GND terminal on the amplifier to a clean, unpainted metal surface on the vehicle's chassis.
- Ensure the ground point is free of paint, rust, or dirt for a good electrical connection. A short ground cable (less than 3 feet / 1 meter) is recommended.
3. Remote (REM) Turn-On Connection:
- Connect a smaller gauge wire (e.g., 18 AWG) from the REM terminal on the amplifier to the remote turn-on output of your head unit.
- This connection turns the amplifier on and off with your head unit.
4. RCA Input Connection:
- Connect RCA cables from the subwoofer output (or full-range output if using the amplifier's LPF) of your head unit to the RCA INPUTs on the amplifier.
- If your head unit has only one set of RCA outputs, you may need a Y-adapter.
5. Speaker Connections:
- Connect your subwoofer(s) to the speaker terminals on the amplifier.
- Ensure the total impedance of your connected subwoofers is not below 1 Ohm, as indicated by the "1Ω MIN" marking. Connecting below this impedance can damage the amplifier.
- Pay close attention to speaker polarity (+ to + and - to -) for optimal sound quality.
Operating Instructions
Once all connections are made and verified, reconnect the vehicle's battery negative terminal. Turn on your head unit to power up the amplifier.
Initial Setup and Adjustments
- Gain Control (MIN-MAX):
Start with the Gain control set to minimum (fully counter-clockwise). Play a familiar piece of music with a strong bass line at a moderate volume on your head unit. Slowly increase the Gain control on the amplifier until you hear distortion, then back it off slightly. The Gain control is not a volume knob; it matches the amplifier's input sensitivity to the head unit's output voltage.
- LPF (Low Pass Filter) (40Hz-180Hz):
Adjust the LPF to filter out frequencies above your desired subwoofer crossover point. A common starting point is between 80Hz and 100Hz. This ensures the subwoofer only reproduces low frequencies, improving overall sound clarity.
- Subsonic Filter (OFF-50Hz):
The subsonic filter protects your subwoofer from playing frequencies too low for its design, which can cause damage. Set this control to a frequency slightly below your LPF setting, typically between 20Hz and 30Hz, or based on your subwoofer's enclosure tuning frequency. If your subwoofer is in a sealed enclosure, you might set it to OFF or a very low frequency.
- Bass Boost Freq (30Hz-80Hz) & Bass Boost (0dB-12dB):
These controls allow you to enhance bass output at a specific frequency. Start with Bass Boost at 0dB (off). If you desire more bass, slowly increase the Bass Boost level and adjust the Bass Boost Freq to find the most pleasing enhancement. Use sparingly to avoid distortion and potential damage to your subwoofer.
LED Indicators
- POWER LED (Green): Illuminates when the amplifier is powered on and operating normally.
- PROTECT LED (Red): Illuminates when the amplifier detects a fault condition (e.g., short circuit, overheating, low voltage). The amplifier will shut down to protect itself. Refer to the Troubleshooting section.
Maintenance
The NEMESIS Audio NA-3.5KD amplifier requires minimal maintenance to ensure long-term performance.
- Cleaning: Periodically wipe the amplifier's exterior with a soft, dry cloth. Do not use harsh chemicals or abrasive cleaners.
- Connections: Regularly check all power, ground, remote, RCA, and speaker connections to ensure they are secure and free from corrosion. Loose connections can lead to poor performance or damage.
- Ventilation: Ensure that the amplifier's heatsink fins are free from dust and debris to maintain proper cooling.
Troubleshooting
If you experience problems with your amplifier, consult the following troubleshooting guide before contacting support.
| Problem | Possible Cause | Solution |
|---|---|---|
| No Power (POWER LED off) |
|
|
| PROTECT LED is on |
|
|
| No Sound Output |
|
|
| Distorted Sound |
|
|
Specifications
The following are the technical specifications for the NEMESIS Audio NA-3.5KD Monoblock Amplifier:
- Model: NA-3.5KD
- Brand: Nemesis
- Maximum Power: 3500 Watts (as indicated on product)
- Product Dimensions (L x W x H): 13.84 x 6.61 x 2.36 inches
- Minimum Supply Voltage: 12 Volts
- Mounting Type: Surface Mount
- Minimum Speaker Impedance: 1 Ohm
- LPF Range: 40Hz - 180Hz
- Subsonic Filter Range: OFF - 50Hz
- Bass Boost Frequency: 30Hz - 80Hz
- Bass Boost Level: 0dB - 12dB
Warranty Information
NEMESIS Audio products are designed and manufactured to the highest quality standards. For specific warranty terms and conditions, please refer to the warranty card included with your product or visit the official Nemesis Audio website. Keep your proof of purchase for warranty claims.
Customer Support
If you have any questions, require technical assistance, or need to report an issue that cannot be resolved using the troubleshooting guide, please contact NEMESIS Audio customer support. Contact details can typically be found on the official Nemesis Audio website or on your product packaging.


