1. Important Safety Instructions
Read all safety warnings, instructions, illustrations, and specifications provided with this power tool. Failure to follow all instructions listed below may result in electric shock, fire, and/or serious injury.
- Work Area Safety: Keep work area clean and well lit. Do not operate power tools in explosive atmospheres, such as in the presence of flammable liquids, gases, or dust.
- Electrical Safety: Power tool plugs must match the outlet. Never modify the plug in any way. Do not abuse the cord. Keep cord away from heat, oil, sharp edges, or moving parts.
- Personal Safety: Always wear eye protection, hearing protection, and a dust mask. Dress properly; avoid loose clothing or jewelry. Secure workpiece before operating.
- Power Tool Use and Care: Do not force the power tool. Use the correct power tool for your application. Disconnect the plug from the power source before making any adjustments, changing accessories, or storing power tools.
- Planer Specific Safety:
- Wait for the cutter to stop before setting the tool down.
- Never reach into the chip ejection port while the tool is running.
- Ensure the workpiece is free of nails, screws, or other foreign objects before planing.
- Always hold the planer firmly with both hands during operation.
2. Product Overview
The Einhell BT-PL 750 Electric Planer is designed for planing wood surfaces. Familiarize yourself with its components before operation.
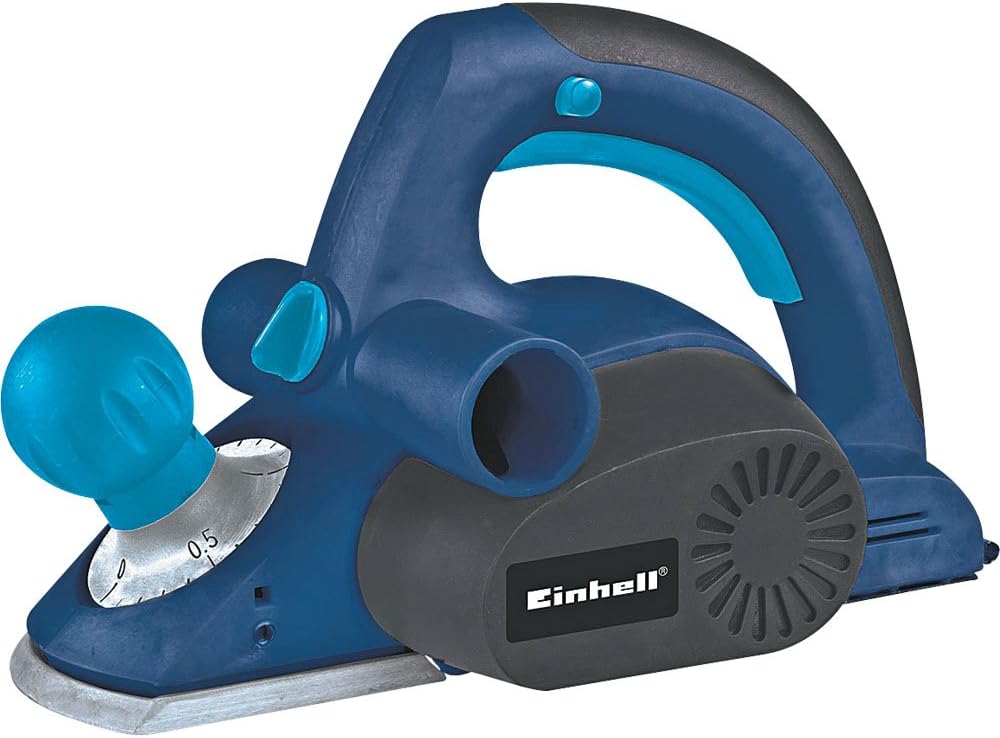
Figure 2.1: Overall view of the Einhell BT-PL 750 Electric Planer. This image shows the main body, handles, and base plate of the tool.
- Front Handle/Depth Adjustment Knob: Used for guiding the tool and setting the planing depth.
- Rear Handle/Switch: Main grip for operation, contains the power switch.
- Base Plate: The flat surface that rests on the workpiece.
- Cutter Drum: Houses the planing blades.
- Chip Ejection Port: Where wood chips are expelled.
- Dust Bag/Vacuum Connection: For connecting a dust collection system.

Figure 2.2: Detail of the front handle and depth adjustment knob, showing the scale for setting planing depth.

Figure 2.3: Close-up view of the chip ejection port and the Einhell brand logo on the motor housing.
3. Setup
3.1 Unpacking
Carefully remove the planer and all accessories from the packaging. Inspect the tool for any damage that may have occurred during transit. Do not operate a damaged tool.
3.2 Blade Installation/Adjustment (if applicable)
The planer blades are factory-installed. If replacement is necessary, refer to the Maintenance section. Ensure blades are sharp and correctly seated before use.
3.3 Dust Collection
For a cleaner work environment and improved visibility, connect a dust bag or a suitable vacuum cleaner to the chip ejection port. Ensure the connection is secure to prevent dust leakage.
3.4 Power Connection
Ensure the power switch is in the "OFF" position before plugging the tool into a 127V power outlet. Verify that the voltage of your power supply matches the tool's requirements.
4. Operating Instructions
4.1 Setting Planing Depth
Rotate the front handle/depth adjustment knob to select the desired planing depth. Start with a shallow depth for initial passes and increase gradually if needed. Refer to Figure 2.2 for knob location.
4.2 Securing the Workpiece
Always secure the workpiece firmly with clamps or a vise to prevent movement during planing. Unsecured workpieces can lead to injury or damage to the tool and material.
4.3 Planing Technique
- Place the front part of the planer's base plate flat on the workpiece, ensuring the blades are not touching the surface.
- Start the motor by pressing the power switch. Allow the motor to reach full speed before engaging the blades with the wood.
- Apply even pressure and move the planer smoothly and consistently across the workpiece. Maintain a steady feed rate.
- At the end of the pass, ensure the entire base plate is supported by the workpiece before lifting the tool.
- For best results, plane with the grain of the wood.
4.4 Safety During Operation
Never attempt to clear chips from the ejection port while the tool is running. Always disconnect the power before clearing any blockages or making adjustments.
5. Maintenance
Regular maintenance ensures the longevity and safe operation of your Einhell BT-PL 750 Electric Planer. Always disconnect the tool from the power supply before performing any maintenance.
5.1 Cleaning
After each use, clean the tool thoroughly. Remove wood chips and dust from the base plate, chip ejection port, and motor vents using a brush or compressed air. Do not use solvents or abrasive cleaners.
5.2 Blade Replacement/Sharpening
Dull or damaged blades will affect planing quality and can strain the motor. Replace blades when they become dull. Refer to your tool's specific instructions for blade replacement procedures. Always use genuine Einhell replacement blades.
5.3 Carbon Brush Inspection
Periodically inspect the carbon brushes for wear. Worn carbon brushes can lead to reduced performance or motor failure. Replace both brushes simultaneously if one is worn down to its limit mark. This procedure should ideally be performed by a qualified technician.
5.4 Storage
Store the planer in a dry, secure location, out of reach of children. Protect the blades from damage during storage.
6. Troubleshooting
This section addresses common issues you might encounter with your electric planer. For problems not listed here, contact customer support.
| Problem | Possible Cause | Solution |
|---|---|---|
| Planer does not start. | No power supply; faulty switch; worn carbon brushes. | Check power connection and outlet. Ensure switch is fully engaged. Inspect and replace carbon brushes if necessary. |
| Poor planing finish (rough surface, chatter marks). | Dull or damaged blades; incorrect planing depth; uneven feed rate. | Replace or sharpen blades. Reduce planing depth. Maintain a consistent, smooth feed rate. |
| Excessive vibration or noise. | Unbalanced blades; loose components; worn bearings. | Check blades for damage or improper installation. Tighten any loose screws. If problem persists, seek professional service. |
| Chips not ejecting properly. | Clogged chip ejection port; full dust bag. | Disconnect power, then clear the chip ejection port. Empty the dust bag or vacuum container. |
7. Specifications
Technical data for the Einhell BT-PL 750 Electric Planer.
| Feature | Value |
|---|---|
| Model Number | BT-PL 750 |
| Brand | Einhell |
| Power Input | 750 Watts |
| Voltage | 127V |
| Product Weight | 2430 Grams (approx. 5.36 lbs) |
| Manufacturer | Einhell Germany |
8. Warranty and Support
Einhell products are manufactured to high-quality standards and undergo strict quality controls. This product is covered by a manufacturer's warranty in accordance with country-specific regulations.
Please retain your proof of purchase for warranty claims. For service, repairs, or technical support, please contact your local Einhell service center or authorized dealer. Do not attempt to repair the tool yourself, as this may void the warranty and pose safety risks.

Figure 8.1: Einhell Germany quality seal, indicating tested and inspected quality.


