1. Introduction
This manual provides comprehensive instructions for the installation, operation, and maintenance of your AUTO-VOX Dash Cam Hardwire Kit (LVP-Micro). This kit is designed to provide a continuous power supply to your micro USB dash camera, enabling features like 24-hour parking surveillance and neat wire routing by connecting directly to your vehicle's fuse box.
2. Product Overview
The AUTO-VOX Hardwire Kit ensures your dash camera receives constant power directly from your vehicle's battery, bypassing the cigarette lighter socket. This allows for uninterrupted recording, especially for parking mode functions, and keeps your vehicle's interior tidy by concealing wires. The kit includes a low voltage protection feature to prevent excessive draining of your car battery.
Key Features:
- Continuous Power Supply: Provides 24-hour power for parking surveillance modes.
- Neat Wire Routing: Connects directly to the fuse box, eliminating visible cables from the cigarette lighter.
- Low Voltage Protection: Automatically cuts off power to the dash cam if the vehicle battery voltage drops below 11.6V, safeguarding your car battery.
- Wide Compatibility: Designed for micro USB port dash cameras and other compatible devices.
3. Setup and Installation
Proper installation is crucial for the functionality and safety of your hardwire kit. It is recommended to consult a professional if you are unsure about any steps.
3.1 Compatibility Check
Ensure your dash camera or device uses a Micro USB port. This kit is not compatible with Mini USB or other USB types.

Image: Visual comparison of Mini USB (incompatible) and Micro USB (compatible) connectors. Confirm your device uses a Micro USB port.
3.2 Components of the Hardwire Kit

Image: The hardwire kit components, showing the Micro USB output, the 'Car DVR Exclusive Power Box' (voltage converter), and the fuse tap with ground wire.
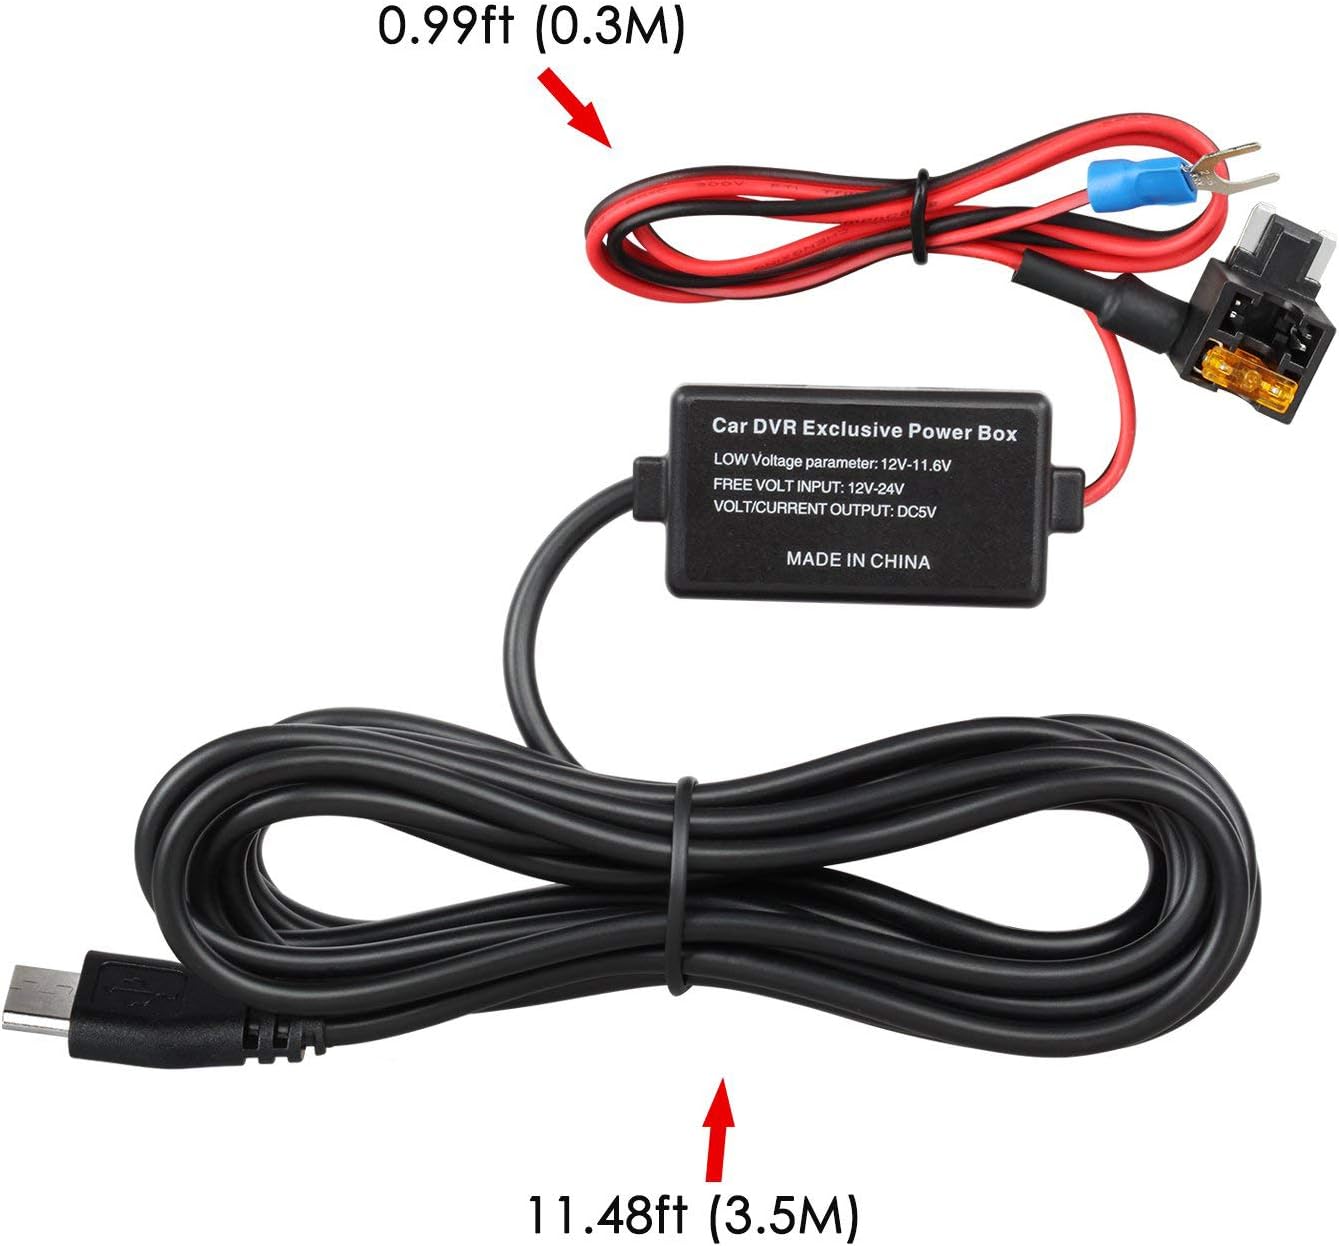
Image: The complete hardwire kit cable, illustrating the Micro USB connector, the power box, and the fuse tap with its ground terminal. The total length is approximately 12.47 feet (3.8 meters).
3.3 Installation Steps
- Locate Your Vehicle's Fuse Box: Refer to your vehicle's owner's manual to find the fuse box location, typically under the dashboard, in the glove compartment, or under the hood.
- Identify a Suitable Fuse Slot: You will need to identify a fuse slot that provides constant power (always on, even when the ignition is off) for parking mode functionality. You may also need an accessory fuse (power only when ignition is on) depending on your dash cam's requirements. Use a circuit tester to confirm constant power.
- Determine Fuse Type: The AUTO-VOX Hardwire Kit comes with a MINI type fuse adapter. Verify that your vehicle uses MINI fuses. If your vehicle uses a different fuse type (e.g., ATM, Micro2, ATO), you will need to acquire the correct fuse tap adapter separately.
- Install the Fuse Tap:
- Carefully remove the existing fuse from the chosen constant power slot.
- Insert the removed fuse into the lower slot of the fuse tap.
- Insert a new fuse (e.g., 5A for the dash cam) into the upper slot of the fuse tap.
- Plug the fuse tap into the empty fuse slot in your vehicle's fuse box. Ensure the fuse tap is oriented correctly (the 'LOAD' side should be towards the device, and the 'DRAW' side towards the power source).
- Connect the Ground Wire: Locate a metal bolt or screw on the vehicle's chassis near the fuse box. Loosen the bolt, slide the U-shaped terminal of the hardwire kit's black ground wire under it, and tighten the bolt securely. Ensure a good metal-to-metal connection.
- Route the Cable: Carefully route the long Micro USB cable from the fuse box to your dash camera's mounting location. Tuck the cable neatly along the vehicle's trim, headliner, or A-pillar to conceal it.
- Connect to Dash Cam: Plug the Micro USB connector into your dash camera's power input port.
- Test the Connection: Turn on your vehicle's ignition and check if the dash cam powers on. Then, turn off the ignition and remove the key. The dash cam should remain powered on (if configured for parking mode) or enter parking mode, indicating a successful constant power connection.
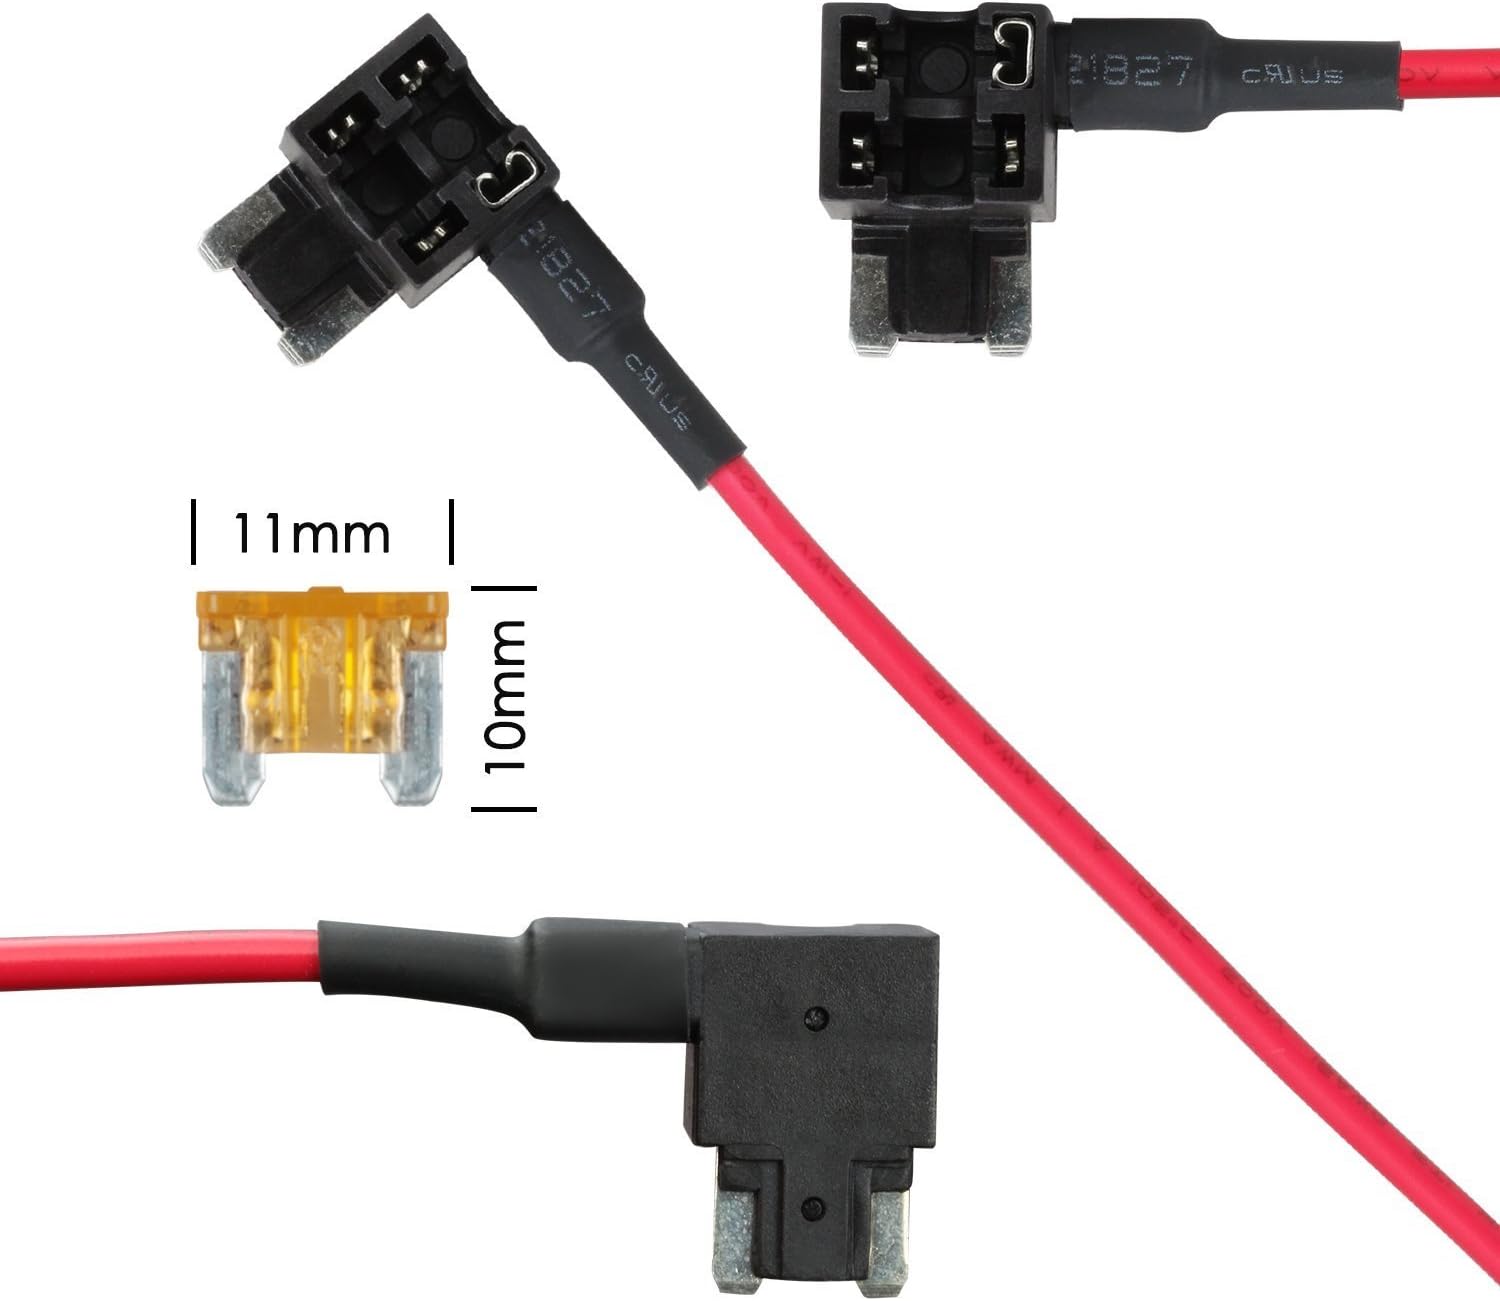
Image: Detailed view of the included MINI type fuse adapter, showing its dimensions (11mm width, 10mm height for the fuse blade section).
4. Operating Instructions
Once installed, the AUTO-VOX Hardwire Kit operates automatically to provide power to your dash camera.
4.1 Parking Mode Functionality
With the hardwire kit, your micro USB dash camera can utilize its parking mode feature, providing 24-hour surveillance. The kit ensures continuous power even when your vehicle's ignition is off.

Image: A car being monitored, symbolizing the 24-hour power supply for parking mode surveillance provided by the hardwire kit.
4.2 Low Voltage Protection
The integrated low voltage protection circuit monitors your vehicle's battery voltage. If the voltage drops to 11.6V (or lower, depending on specific vehicle conditions), the hardwire kit will automatically cut off power to the dash camera. This prevents your car battery from draining completely, ensuring you can start your vehicle.

Image: A visual representation of the low voltage protection feature, showing a car battery at a low charge level and a car, indicating that the system will automatically turn off power to the dash cam when the battery reaches 11.4V (or 11.6V as per specifications) to prevent full discharge.
5. Maintenance
The AUTO-VOX Hardwire Kit requires minimal maintenance.
- Regular Checks: Periodically inspect the visible parts of the cable and connections for any signs of wear, damage, or loose connections.
- Fuse Integrity: If your dash cam stops receiving power, check the fuse in the fuse tap. Replace it with a fuse of the same amperage if it is blown.
- Cleanliness: Keep the area around the fuse box and cable free from excessive dust or debris.
6. Troubleshooting
If you encounter issues with your hardwire kit, refer to the following troubleshooting guide:
| Problem | Possible Cause | Solution |
|---|---|---|
| Dash cam does not power on after installation. |
|
|
| Dash cam turns off when vehicle ignition is off, despite hardwire kit. |
|
|
| Car battery drains quickly. |
|
|
| Fuse tap does not fit into the fuse box slot. | Incorrect fuse type for the vehicle. | The kit includes a MINI type fuse adapter. If your vehicle uses a different fuse type (e.g., ATM, Micro2, ATO), you will need to purchase the correct fuse tap adapter separately. |
7. Specifications
| Feature | Specification |
|---|---|
| Input Voltage | DC 12-24V |
| Output Voltage/Current | DC 5V / 1.5A |
| Low Voltage Protection Cut-off | 11.6V |
| Cable Length | Approximately 12.47 ft (3.8 meters) |
| Connector Type | Micro USB |
| Included Fuse Adapter Type | MINI type |
| Item Model Number | LVP-Micro |
| Item Weight | 3.03 ounces |
| Package Dimensions | 4.96 x 2.6 x 1.61 inches |
8. Warranty and Support
For warranty information or technical support, please contact AUTO-VOX customer service. You can find contact details and additional resources by visiting the official AUTO-VOX store or website.


