1. Introduction
This manual provides comprehensive instructions for the installation, operation, maintenance, and troubleshooting of the Huanyang HY03D023B Variable Frequency Drive (VFD). This VFD is designed to convert single-phase or three-phase 220V AC input into three-phase output, enabling precise speed control for 3-phase motors and spindles up to 3kW (4HP).
Please read this manual thoroughly before attempting any installation or operation to ensure safe and efficient use of the device.
2. Safety Information
WARNING: Improper installation or operation can lead to serious injury or equipment damage. Always follow safety guidelines.
- Electrical Hazard: Ensure all power is disconnected before performing any wiring or maintenance. Only qualified personnel should perform electrical work.
- Grounding: The VFD and connected motor must be properly grounded to prevent electric shock.
- Environment: Install the VFD in a clean, dry, and well-ventilated area, free from dust, corrosive gases, and direct sunlight.
- Motor Compatibility: Ensure the VFD's voltage and power rating match or exceed the motor's specifications. This VFD is suitable for motors up to 3kW (4HP).
- Output Connection: The VFD output terminals (U, V, W) must only be connected to a 3-phase motor. Do not connect to any other load or power source.
- Non-Flammable Design: The unit is designed to be non-flammable, but proper installation and operation are still critical.

Figure 2.1: Important Notice Regarding VFD Usage and Compatibility.
3. Product Overview
3.1 Key Features
- Supports 200-230V AC single-phase or three-phase input for 3-phase motor operation.
- Easy motor connection and user-friendly interface.
- Compact size and lightweight design.
- Supports Mach3 function and RS-485 communication for advanced control.
- Remote potentiometer speed control and remote switch start/stop capabilities.
- Low failure rate and non-flammable design.
- CE listed for safety and quality assurance.
- Features low noise and low electromagnetic interference.
3.2 Components and Control Panel
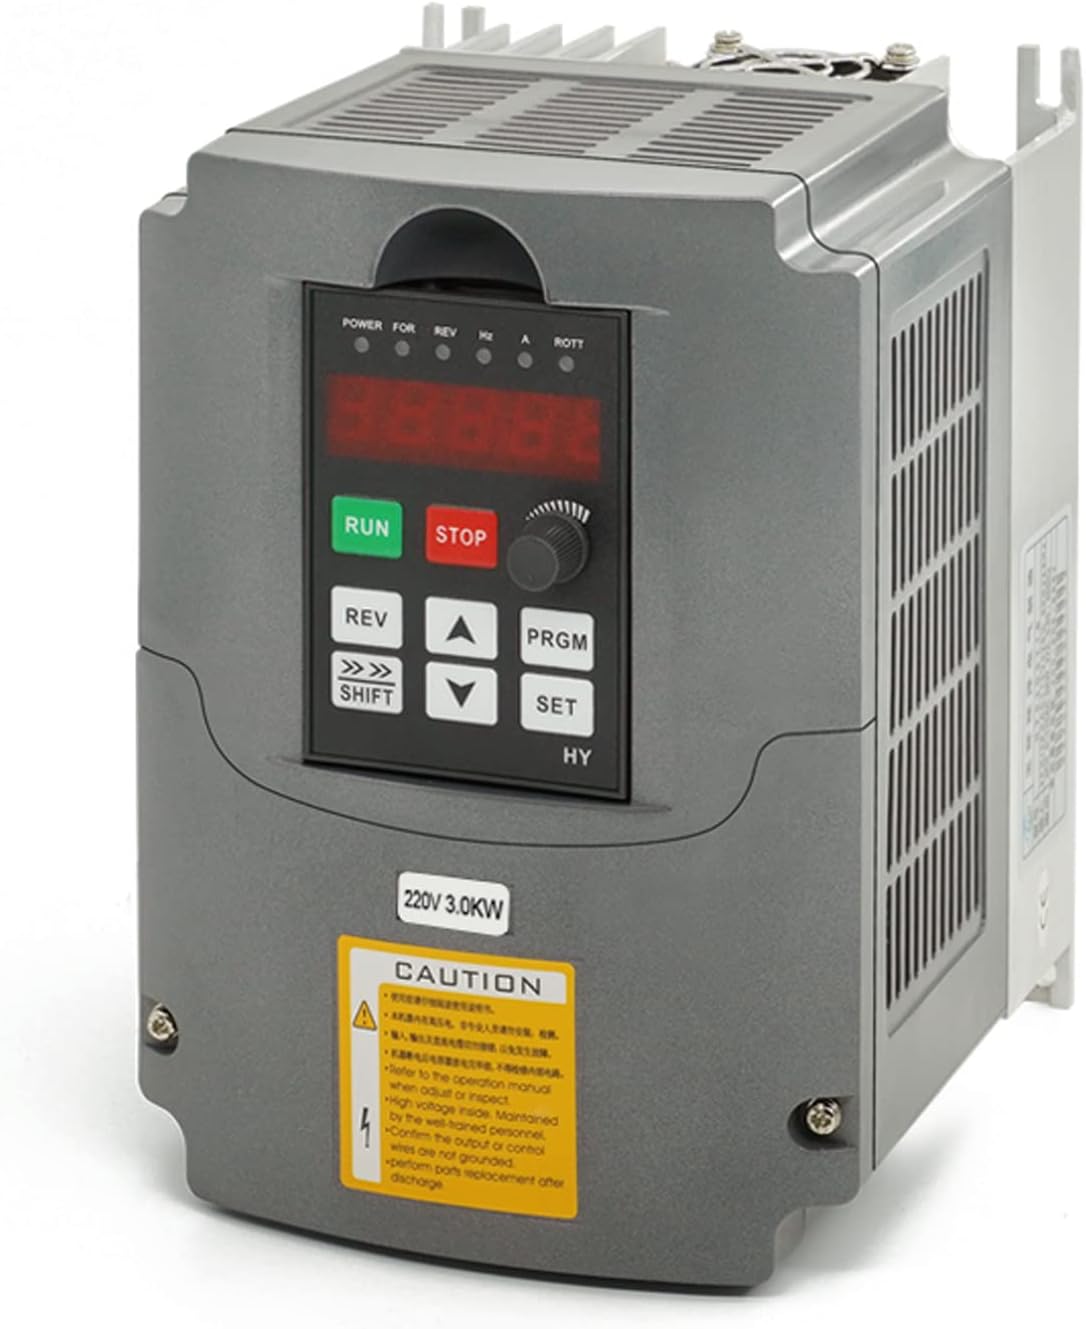
Figure 3.1: Front view of the Huanyang VFD.
The VFD features a clear digital display and intuitive control buttons for operation and programming.

Figure 3.2: VFD Control Panel Layout.
- 5-digit display: Shows frequency, speed, current, and parameter values.
- RUN key: Starts the motor.
- STOP/RESET key: Stops the motor or resets errors.
- REV key: Reverses motor direction.
- SHIFT key: Used to shift digits during parameter editing.
- UP/DOWN arrows: Adjust values or navigate parameters.
- PRGM key: Enters/exits programming mode.
- SET key: Confirms parameter settings.
- Speed controller (Potentiometer): Adjusts motor speed directly.
4. Setup and Wiring
Before wiring, ensure the VFD is securely mounted in a suitable location as described in the Safety Information section. Disconnect all power sources before proceeding.
4.1 Terminal Block Overview

Figure 4.1: VFD Terminal Block.
The VFD features clearly labeled terminals for input power, motor output, and control signals. Refer to the detailed wiring diagram for specific connections.
4.2 Power Input Wiring (220V AC)
The Huanyang VFD supports both single-phase and three-phase 220V AC input.
Single-Phase Input:
Connect the single-phase 220V AC input to the 'R' and 'S' terminals of the VFD. The 'T' terminal remains unused for single-phase input.

Figure 4.2: Single-Phase Input Wiring to VFD.
Three-Phase Input:
Connect the three-phase 220V AC input to the 'R', 'S', and 'T' terminals of the VFD.

Figure 4.3: Three-Phase Input Wiring to VFD.
4.3 Motor Output Wiring
Connect the three-phase motor to the 'U', 'V', and 'W' output terminals of the VFD. Ensure correct phase rotation for your application. If the motor rotates in the wrong direction, swap any two of the U, V, W wires.
4.4 Control Wiring (Optional)
The VFD supports external control options such as remote potentiometers for speed control and external switches for start/stop functions, as well as RS-485 communication.

Figure 4.4: Basic Connection Diagram with Control Options.
For detailed control wiring, refer to the specific parameters (e.g., PD001, PD002, PD070) in the programming section.
5. Operating Instructions
After completing the wiring and ensuring all safety precautions are met, you can power on the VFD and begin operation.
5.1 Initial Power-On and Basic Operation
- Power On: Apply power to the VFD. The digital display should illuminate.
- Start Motor: Press the RUN button on the control panel. The motor should start and accelerate to the set frequency.
- Adjust Speed: Rotate the speed controller knob on the control panel to adjust the motor's operating frequency (speed).
- Stop Motor: Press the STOP/RESET button to stop the motor.
- Reverse Direction: Press the REV button to change the motor's rotation direction while running or before starting.
5.2 Parameter Programming
The VFD's behavior can be customized through various parameters. The unit is factory-set to 400Hz. If your motor is rated at 400Hz, direct connection is possible. Otherwise, adjust parameters according to your motor's specifications.
General Programming Steps:
- Press the PRGM button to enter programming mode.
- Use the UP or DOWN arrow keys to navigate to the desired parameter (e.g., PD001).
- Press the SET button to select the parameter for editing.
- Use the UP or DOWN arrow keys to change the parameter value. Use the SHIFT button to move the cursor for digit selection.
- Press the SET button to save the new value.
- Press PRGM again to exit programming mode.
Commonly Adjusted Parameters:
| Parameter | Description | Typical Value / Notes |
|---|---|---|
| PD000 | Parameter Lock | 0 = Allows adjustment, 1 = Prevents adjustment. Ensure it's 0 for programming. |
| PD001 | Source of Run Command | 0 = Control panel buttons, 1 = External switch, 2 = Communication port. |
| PD002 | Source of Frequency Command | 0 = Control panel knob, 1 = External potentiometer (VI/VR), 2 = Communication port. |
| PD004 | Base Frequency | Rated frequency of your motor (e.g., 50Hz or 60Hz). |
| PD005 | Maximum Operating Frequency | Set to your motor's maximum desired frequency (e.g., 60Hz, 400Hz). |
| PD008 | Rated Motor Voltage | Rated voltage of your motor (e.g., 220V). |
| PD014 | Acceleration Time | Time in seconds for motor to reach full speed. |
| PD015 | Deceleration Time | Time in seconds for motor to stop from full speed. |
| PD141 | Motor Rated Voltage | Same as PD008. |
| PD142 | Motor Rated Current (FLA) | Full Load Amperage (FLA) from motor nameplate. |
| PD143 | Motor Pole Number | Number of poles of your motor. Can be calculated as 120 * Frequency / RPM. |
| PD144 | Motor Rated RPM | Rated RPM from motor nameplate. |
Note: This table provides common parameters. Always refer to the full parameter list in the manufacturer's detailed manual for complete information and advanced settings.
6. Maintenance
Regular maintenance ensures the longevity and reliable operation of your VFD.
- Keep Dust-Free: Periodically clean the VFD, especially the cooling fins and fan, using compressed air. Dust accumulation can lead to overheating and premature failure.
- Environmental Control: Ensure the operating environment remains within specified temperature and humidity ranges.
- Fan Inspection: Check the cooling fan for proper operation and obstructions. A constantly running fan is normal, but ensure it's not excessively noisy or vibrating.
- Terminal Connections: Periodically check all wiring connections for tightness. Loose connections can cause arcing and damage.

Figure 6.1: VFD Cooling Fan for Heat Dissipation.
7. Troubleshooting
This section provides guidance for common issues. For complex problems or error codes not listed, contact technical support.
| Problem | Possible Cause | Solution |
|---|---|---|
| VFD does not power on. | No input power, faulty wiring, internal fuse blown. | Check power supply and input wiring. Consult a qualified electrician. |
| Motor does not run (0 output voltage). | Incorrect parameter settings (e.g., PD000 locked), motor not connected, VFD in fault state. | Verify PD000 is set to 0. Check motor wiring. Reset VFD (PD013=8). Review all motor parameters (PD004, PD008, PD141-144). |
| Motor runs in wrong direction. | Incorrect motor phase connection. | Swap any two of the U, V, W output wires to the motor. |
| VFD displays an error code. | Overcurrent, overvoltage, undervoltage, overheating, etc. | Note the error code and consult the detailed manual for specific meanings. Contact support if unable to resolve. |
| Control panel buttons unresponsive. | Parameter lock (PD000), external control enabled (PD001, PD002). | Ensure PD000 is 0. Check PD001 and PD002 settings to confirm control is from the panel. |
8. Specifications
| Feature | Detail |
|---|---|
| Model Name | HY03D023B |
| Input Voltage | 220V-230V AC (Single or Three Phase) |
| Output Voltage | 220V AC Three Phase |
| Rated Power (Wattage) | 3 KW (4 HP) |
| Rated Output Current | 13A |
| Frequency Range | 0.50Hz - 400.0Hz |
| Product Dimensions | 7.9 x 8.1 x 6.7 inches |
| Item Weight | 3.6 pounds |
| Manufacturer | Huanyang Electrical |
| Recommended Uses | Workshop, Industrial (Motor/Spindle Speed Control) |
| Certifications | CE listed |
9. Warranty and Support
This Huanyang VFD comes with a 1-year replacement warranty from the date of purchase. This warranty covers manufacturing defects and ensures product functionality under normal operating conditions.
For any technical assistance, questions regarding error codes, or warranty claims, please contact the seller or Huanyang Electrical customer support. Provide your product model number (HY03D023B) and purchase details for efficient service.
Note: The warranty does not cover damage caused by improper installation, misuse, unauthorized modifications, or environmental factors.


