
Introduction
This instruction manual provides essential information for the proper installation, operation, and maintenance of your Joystar Replacement Blender Blade Assembly. This assembly is designed to replace worn or damaged blade units in compatible Cuisinart blender models, ensuring continued optimal performance for blending, crushing, grinding, and pureeing tasks.
Product Overview
The Joystar Replacement Blender Blade Assembly consists of a stainless steel cutter blade integrated into a durable base, accompanied by a silicone sealing gasket. This design ensures efficient blending and a secure, leak-proof fit with your blender jar.

Image 1: The Joystar Replacement Blender Blade Assembly, featuring stainless steel blades and a black base, with a gray silicone gasket visible around the edge.
Compatibility
This replacement blade assembly is compatible with the following Cuisinart blender models:
- SmartPower Premier 600 Watt Blender: CBT-500, CBT-500FP, CBT-500BW, CBT-600
- Cuisinart SMARTPOWER DUET: FPB-5, FPB-5C, FPB-5CHBPC, FPB-5CHPC, FPB-5PC
- Supreme Super 600 60oz Stainless Steel Blender: SB-5600
- PowerBlend 600 Blender: SPB-10, SPB-10CH, SPB-3, SPB-5
- SmartPower Classic Blender 500 Watt: SPB-6, SPB-6BK, SPB-6BKSS
- SmartPower 7 Speed Electronic Blender: SPB-7, SPB-7BCH, SPB-7CH, SPB-7BC
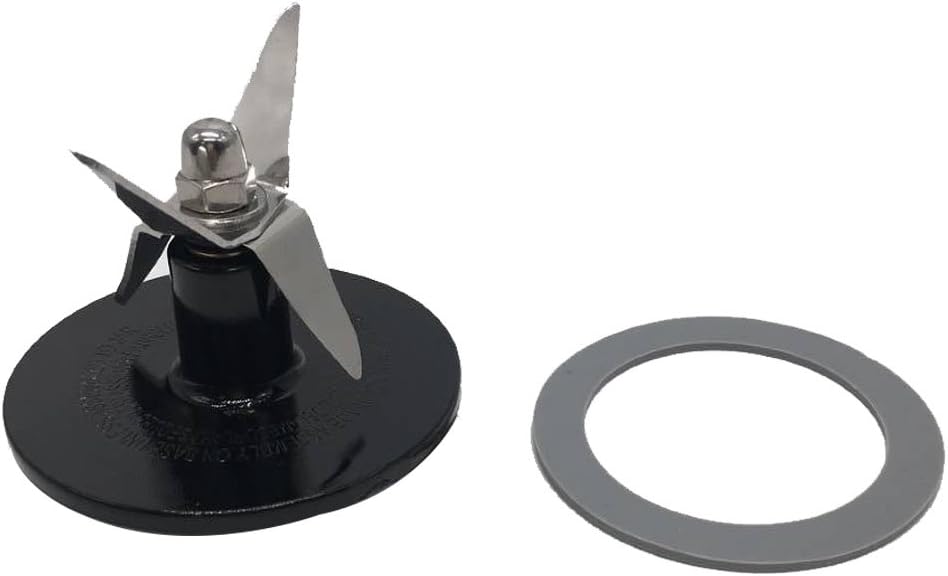
Image 2: The blade assembly shown next to its separate silicone gasket, highlighting the two main components included in the package.
Setup and Installation
Follow these steps to safely replace your blender blade assembly:
- Ensure Safety: Before beginning, always unplug your blender from the power outlet to prevent accidental operation.
- Remove Old Blade: Carefully unscrew and remove the existing blade assembly from the bottom of your blender jar. Dispose of the old blade and gasket responsibly.
- Inspect Gasket: Ensure the new silicone gasket is properly seated around the rim of the new blade assembly. The gasket is crucial for a leak-proof seal.
- Install New Blade: Place the new Joystar blade assembly onto the bottom of the blender jar, aligning the threads.
- Securely Fasten: Twist the blade assembly clockwise until it is tightly secured to the blender jar. Do not overtighten, but ensure it is firm to prevent leaks during operation.
- Test for Leaks: Before adding ingredients, fill the blender jar with a small amount of water and attach it to the blender base. Run the blender briefly on a low setting to check for any leaks. If leaks occur, re-tighten the blade assembly.

Image 3: An underside view of the blade assembly, showing the drive coupling and the securely fitted gasket.
Operating with the New Blade
Once the new blade assembly is installed, your blender is ready for use. This stainless steel cutter blade is designed for efficient processing of various ingredients:
- Blending: Ideal for smoothies, sauces, and purees.
- Crushing: Effectively crushes ice for beverages.
- Grinding: Suitable for grinding nuts or coffee beans (check your blender's specific capabilities).
Always refer to your specific Cuisinart blender's instruction manual for detailed operating procedures, safety guidelines, and recommended settings for different tasks.
Maintenance and Care
Proper maintenance extends the life of your blade assembly and ensures hygienic use:
- Immediate Cleaning: Clean the blade assembly immediately after each use to prevent food residue from drying and hardening.
- Disassembly for Cleaning: For thorough cleaning, carefully unscrew the blade assembly from the blender jar.
- Hand Washing: Wash the blade assembly and gasket with warm, soapy water. Use a brush to clean around the blades, exercising extreme caution as blades are sharp.
- Dishwasher Safety: Check your blender jar's manual for dishwasher compatibility. If safe, the blade assembly may be placed on the top rack.
- Drying: Allow all parts to air dry completely before reassembling or storing to prevent mold or mildew growth.
- Gasket Inspection: Periodically inspect the silicone gasket for any signs of wear, cracks, or damage. A damaged gasket can lead to leaks. Replace if necessary.

Image 4: A top-down view of the blade assembly, showing the four-pronged stainless steel blade design.
Troubleshooting
If you encounter issues after installing your new blade assembly, consider the following:
- Leaking from Jar Base:
- Ensure the blade assembly is securely tightened to the blender jar.
- Check that the silicone gasket is correctly seated and free from damage. Replace the gasket if it appears worn or cracked.
- Blender Not Activating:
- Verify that the blender jar with the blade assembly is correctly seated on the blender base. Many blenders have safety interlocks that prevent operation if not properly assembled.
- Confirm the blender is plugged into a working power outlet.
- Poor Blending Performance:
- Ensure ingredients are not overfilling the blender jar.
- Add sufficient liquid to facilitate blending, especially for thicker mixtures.
- Use the pulse function to break down larger or harder ingredients initially.
Specifications
- Brand: Joystar
- Model Number: 8541989567
- Material: Stainless Steel (Blade), Plastic (Base), Silicone (Gasket)
- Color: Black (Base), Gray (Gasket)
- Product Dimensions: Approximately 2"D x 2"W x 2"H
- Item Weight: 2.24 ounces
- UPC: 615068356459
- Recommended Uses: Blending, Crushing, Grinding, Pureeing
Warranty and Support
This Joystar Replacement Blender Blade Assembly is provided with No Warranty as per product specifications.
For any questions regarding product compatibility or installation, please refer to the Joystar brand store on Amazon or contact their customer service for assistance. Always ensure you are using the correct replacement part for your specific blender model.
Thank you for choosing Joystar.