1. Product Overview
The Milagrow AguaBot 7.0 is an advanced robotic floor cleaner designed for both wet mopping and dry vacuuming. It features intelligent navigation, multiple cleaning modes, and a large water tank for efficient cleaning of various hard indoor surfaces.

Image 1.1: Top view of the Milagrow AguaBot 7.0 robotic floor cleaner, showcasing its design.
2. Components and Parts Identification
Familiarize yourself with the various components of your AguaBot 7.0 for proper operation and maintenance.
2.1 Top View Components
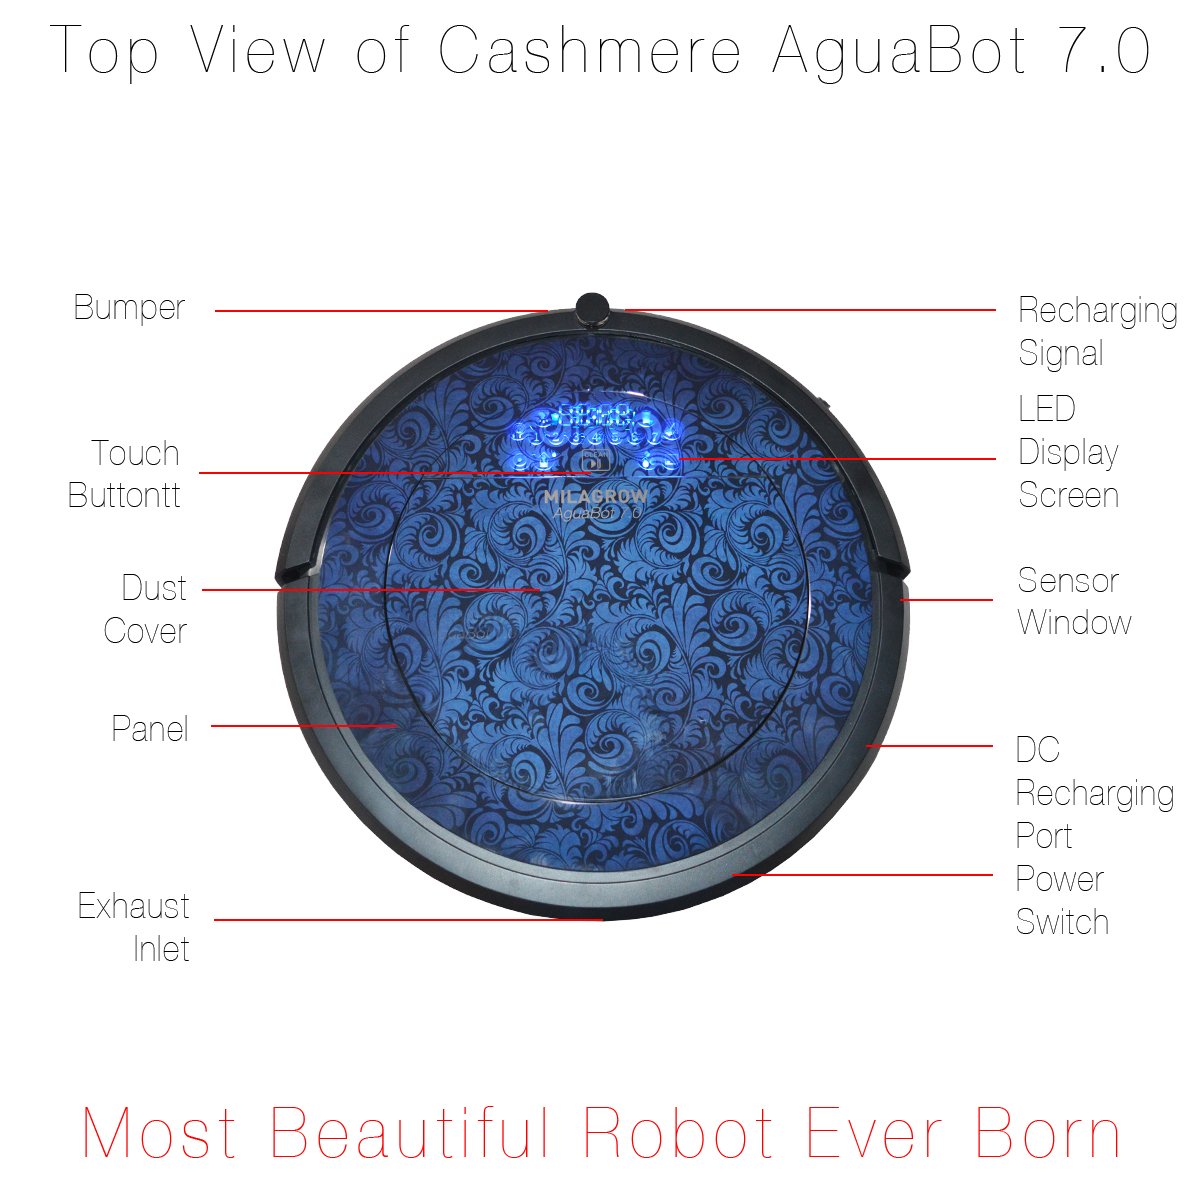
Image 2.1: Top view of the robot with key components labeled.
- Bumper: Detects obstacles and prevents collisions.
- Touch Button: For manual control and interaction.
- Dust Cover: Protects the internal dustbin compartment.
- Panel: Top surface of the robot.
- Exhaust Inlet: Air intake for the vacuum system.
- Recharging Signal: Indicator for charging status.
- LED Display Screen: Shows operational status and indicators.
- Sensor Window: Houses various navigation sensors.
- DC Recharging Port: Connection point for the power adapter.
- Power Switch: Turns the robot on or off.
2.2 Bottom View Components

Image 2.2: Bottom view of the robot with key components labeled.
- Universal Wheel: Provides omnidirectional movement.
- Cliff Detector: Prevents the robot from falling down stairs or ledges.
- Side Brush: Sweeps debris from edges and corners into the cleaning path.
- Rolling Brush: Main brush for agitating and lifting dirt.
- 3D UV Sterilizing Lamp: For sterilization during cleaning.
- Trailing Bar/Big Mop: Attachment point for the wet mop.
- Recharging Pole Piece: Connects with the charging dock for power.
- Wheel: Main drive wheels for movement.
2.3 Display Panel Indicators

Image 2.3: Detailed view of the robot's display panel and its indicators.
- UV Sterilization Indicator: Lights up when UV sterilization is active.
- Schedule Indicator: Shows if a cleaning schedule is set.
- Spot Cleaning Indicator: Indicates spot cleaning mode.
- Docking Indicator: Shows when the robot is returning to its charging dock.
- Auto Cleaning Button: Initiates or pauses automatic cleaning.
- Display of FULL GO: Indicates full cleaning cycle completion.
- Display of Wall Follow Cleaning: Indicates wall-following cleaning mode.
- Water Seeping Speed Intelligent Water Tank: Indicates water dispensing status.
- Dustbin Indicator: Alerts when the dustbin needs emptying.
3. Setup
3.1 Unboxing and Included Components
Carefully unpack all items from the box. Ensure all components are present.

Image 3.1: All accessories included with the AguaBot 7.0.
The package should contain:
- Robot Main Unit
- Charging Station
- Water Tank
- Smart Mop
- Mop Mount
- HEPA Filter
- Adaptor
- Remote Control
- Side Brushes (set)
- Cleaning Brush
- Virtual Wall Unit
3.2 Charging the Robot
- Place the charging dock against a wall in an open area, ensuring there are no obstacles within 1 meter on either side and 2 meters in front.
- Connect the power adapter to the charging dock and plug it into a wall outlet.
- Place the robot onto the charging dock. Ensure the charging pole pieces on the robot align with those on the dock. The LED display will indicate charging status.
- Allow the robot to fully charge before its first use.
3.3 Setting up the Virtual Wall
The 2-way virtual wall unit can block the robot from entering unwanted areas.

Image 3.2: The unique two-way virtual wall unit with a toggle switch.
- Insert batteries into the virtual wall unit.
- Place the virtual wall unit on the floor at the boundary you wish the robot to avoid.
- Use the toggle switch to select between 2-way blocking (90-degree angle) or unidirectional operation.
4. Operating Instructions
4.1 Dry Vacuuming
- Ensure the dustbin is properly installed and empty.
- Turn on the robot using the power switch.
- Press the 'CLEAN' button on the robot or remote control to start automatic cleaning.
- The robot will navigate and clean using its various sensors and cleaning modes.
4.2 Wet Mopping
The AguaBot 7.0 features a programmable wet cleaning system with a 650 ml water tank.

Image 4.1: Components of the water tank and smart mop system.
- Fill the water tank with clean water. Do not use cleaning solutions that may clog the system.
- Attach the smart mop to the mop mount and then attach the assembly to the robot's trailing bar.
- Install the filled water tank into the robot.
- Start the cleaning cycle. The robot's AI control will manage water dispensing, stopping when the water finishes or when the robot stops moving.
4.3 Cleaning Modes
The AguaBot 7.0 offers 6 AI Cleaning Modes:
- Auto: General cleaning for entire areas.
- Spiral: Concentrated cleaning in a specific area.
- Wall to Wall: Cleans along edges and walls.
- XXL: Designed for larger areas.
- Turbo: Increased suction power for deeper cleaning.
- Spot: Focuses on a small, heavily soiled area.
4.4 Interchangeable Cleaning System
The robot features an interchangeable cover dual cleaning system, allowing you to clean with or without the main brush depending on the surface type. A separate attachment is provided for this configuration.
5. Maintenance
Regular maintenance ensures optimal performance and extends the lifespan of your AguaBot 7.0.
5.1 Emptying and Cleaning the Dustbin

Image 5.1: The dustbin with its double-layered primary filter and Hygrade HEPA filter.
- Press the dust cover to open the compartment.
- Remove the dustbin.
- Open the dustbin and empty its contents.
- Remove the primary filter and HEPA filter. Tap them gently to remove dust. Do not wash the HEPA filter with water.
- Rinse the dustbin and primary filter with water. Allow them to air dry completely before reassembling.
5.2 Cleaning Brushes
- Side Brushes: Regularly check for tangled hair or debris. Remove and clean them using the provided cleaning brush. Replace if worn.
- Rolling Brush: Remove the rolling brush cover and lift out the brush. Use the cleaning tool to cut and remove any tangled hair or fibers.
5.3 Cleaning Sensors and Wheels
- Wipe the cliff sensors (located on the bottom of the robot) and the sensor window (on top) with a clean, dry cloth.
- Clean the universal wheel and drive wheels to ensure smooth movement.
5.4 Water Tank and Mop Pad Maintenance
- After each wet cleaning cycle, empty any remaining water from the tank.
- Rinse the water tank thoroughly and allow it to air dry.
- Wash the smart mop pad with water and mild detergent. Allow it to air dry completely before reuse.
6. Troubleshooting
If your AguaBot 7.0 encounters an issue, refer to the following common problems and solutions:
- Robot not turning on: Ensure the power switch is in the 'ON' position and the battery is charged.
- Robot not charging: Verify the charging dock is powered and the robot is correctly aligned with the charging contacts. Clean the charging contacts if necessary.
- Robot getting stuck frequently: Clear obstacles from the cleaning path. Clean cliff sensors and wheels.
- Poor cleaning performance: Empty the dustbin, clean or replace filters, clean main and side brushes. Ensure the water tank is filled for wet cleaning.
- Water not dispensing during mopping: Check if the water tank is properly installed and filled. Ensure the water outlet is not clogged.
For persistent issues, please contact customer support.
7. Specifications
| Feature | Specification |
|---|---|
| Brand | MILAGROW |
| Model Number | Aguabot 7.0 Cashmere Wet & Dry |
| Special Feature | Bagless, HEPA Filtration, Pet Hair |
| Colour | Blue and Grey Cashmere |
| Included Components | Charging Dock, Virtual Wall Unit, Remote Control, Side Brush |
| Water Tank Capacity | 650 Milliliters |
| Power Source | Battery Powered |
| Control Method | Voice, Remote Control, Touch Button |
| Form Factor | Robotic |
| Product Dimensions (LxWxH) | 34 x 34 x 10.5 cm |
| Item Weight | 2.9 kg |
8. Warranty and Support
8.1 Warranty Information
The Milagrow AguaBot 7.0 comes with a 1 Year Warranty from the date of purchase. Please retain your purchase receipt for warranty claims.
8.2 Customer Support
For any queries, technical assistance, or service requests, please contact Milagrow customer support:
- Phone: +91-124-4309570 / 9910009920 / 9953476189
8.3 Legal Disclaimer
Specifications are subject to change without prior notice for product improvement. Please contact customer support to verify any feature or specification before purchase.


