
1. Introduction
This manual provides essential instructions for the installation, operation, and maintenance of your DuraWater 48k 5600 SXT 48000 Grains Water Softener. Please read this manual thoroughly before beginning installation or operation to ensure proper function and longevity of your system.
The DuraWater 48k 5600 SXT system is designed to reduce hardness minerals from your water supply, providing softened water for your home. This model includes a Quick Connect Installation Kit for simplified setup and comes with resin pre-loaded in the mineral tank.
2. Safety Information
Always observe basic safety precautions when installing, operating, or maintaining this product to reduce the risk of fire, electric shock, and personal injury.
- Electrical Safety: Ensure the control valve is properly grounded. Do not operate the system with a damaged power cord. Disconnect power before servicing.
- Water Pressure: Ensure water pressure is within the recommended range (typically 20-125 psi). Install a pressure regulator if necessary.
- Water Temperature: Do not install the softener where water temperatures exceed 100°F (38°C) or fall below 34°F (1°C).
- Chemical Handling: Use caution when handling salt for the brine tank. Avoid contact with eyes and skin.
- Lifting: The mineral tank with pre-loaded resin can be heavy. Use proper lifting techniques or seek assistance to prevent injury.
3. Package Contents
Your DuraWater 48k 5600 SXT Water Softener package includes the following main components:
- Mineral Tank (with pre-loaded resin)
- 5600 SXT Control Valve Head
- Brine Tank with Safety Float Assembly
- Quick Connect Installation Kit (John Guest fittings)
- Bypass Valve
- Power Supply

Figure 1: DuraWater 48k 5600 SXT Water Softener complete system.
4. Setup and Installation
Proper installation is crucial for the performance of your water softener. It is recommended to have a qualified plumber perform the installation.
4.1 Pre-Installation Checklist
- Location: Choose a dry, level area near the main water supply, a drain, and an electrical outlet. Avoid direct sunlight and freezing temperatures.
- Water Supply: Ensure you have a shut-off valve on the main water line before the softener.
- Drain: A floor drain or utility sink is required for the backwash discharge.
- Power: A standard 120V electrical outlet is needed for the control valve.
4.2 Installation Steps
- Position the Tanks: Place the mineral tank and brine tank in their desired locations. The mineral tank comes with resin pre-loaded.
- Install Control Valve: Carefully thread the 5600 SXT control valve onto the top of the mineral tank. Ensure the O-ring is properly seated and tighten securely by hand, then a quarter turn with a wrench.
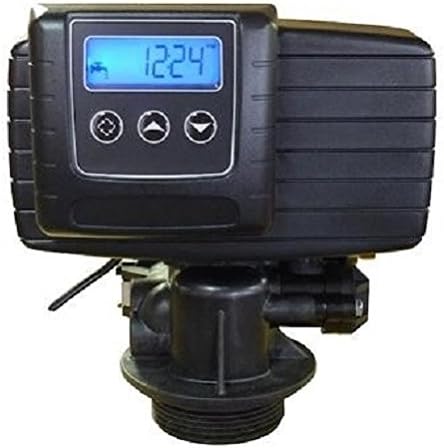
Figure 2: The 5600 SXT Control Valve Head with digital display.
- Connect Bypass Valve: Attach the bypass valve to the back of the control valve. The Quick Connect Installation Kit utilizes John Guest fittings for easy connection.

Figure 3: Bypass valve assembly with quick connect fittings for water lines.
- Plumbing Connections: Connect the main water supply lines to the bypass valve using the Quick Connect fittings. Ensure proper inlet and outlet connections as indicated on the valve.
- Drain Line: Connect the drain line from the control valve to a suitable drain. Ensure an air gap is maintained to prevent back-siphonage.
- Brine Line: Connect the brine line from the control valve to the brine tank's safety float assembly.
- Add Salt: Fill the brine tank with water softener salt (pellets or crystals). Do not use rock salt.
- Power Up: Plug the power supply into the control valve and then into a grounded electrical outlet.
- Initial Programming: Refer to the control valve manual for initial programming steps, including setting time, water hardness, and regeneration cycles.
For a visual guide, please refer to the official installation video:
Video 1: Overview of DuraWater whole house water system installation and features.
5. Operating Instructions
The 5600 SXT control valve automates the softening process and regeneration cycles. Once programmed, the system operates largely on its own.
5.1 Control Valve Display and Buttons
The digital display shows the current time, remaining capacity, and system status. The buttons allow you to navigate menus and adjust settings.

Figure 4: Close-up of the 5600 SXT control valve display and control buttons.
5.2 Regeneration Cycle
The system automatically regenerates based on your water usage and programmed settings. During regeneration, the softener flushes accumulated hardness minerals to the drain and replenishes the resin with sodium from the brine tank. Softened water will not be available during this cycle unless the bypass valve is engaged.
5.3 Bypass Valve Operation
The bypass valve allows you to manually bypass the softener, providing unsoftened water to your home. This is useful for outdoor watering or if the softener requires service. To bypass, turn the handles on the bypass valve to the bypass position (typically indicated by arrows).
6. Maintenance
Regular maintenance ensures optimal performance and extends the life of your water softener.
- Salt Level: Check the salt level in the brine tank monthly. Keep the tank at least one-quarter full, but no more than two-thirds full. Use only high-quality water softener salt.
- Brine Tank Cleaning: Periodically inspect the brine tank for salt bridges or sludge buildup. Clean the tank every few years or as needed.
- System Inspection: Annually inspect all connections for leaks and ensure the drain line is clear.
- Resin Replacement: The resin media typically lasts 10-15 years, depending on water quality and usage. Consult a professional for resin replacement.
7. Troubleshooting
This section addresses common issues you might encounter with your water softener.
| Problem | Possible Cause | Solution |
|---|---|---|
| Water is not soft | Low salt level Salt bridge in brine tank Incorrect hardness setting Bypass valve open | Add salt Break up salt bridge Adjust hardness setting on control valve Close bypass valve |
| System regenerates too often/not enough | Incorrect water hardness setting Incorrect capacity setting | Verify and adjust water hardness setting Verify and adjust capacity setting |
| Loss of water pressure | Resin tank clogged Drain line restricted | Contact support for inspection Clear drain line obstruction |
| Brine tank overflowing | Faulty safety float Clogged drain line | Inspect and replace safety float Clear drain line |
If you encounter issues not listed here or require further assistance, please contact DuraWater customer support.
8. Specifications
| Feature | Detail |
|---|---|
| Model | 48k 5600 SXT |
| Capacity | 48,000 Grains |
| Control Valve | Fleck 5600 SXT Digital Metered |
| Installation Kit | Quick Connect (John Guest fittings) |
| Resin Type | Standard 8% Crosslink Cation Resin (pre-loaded) |
| Manufacturer | Pentair (Control Valve) |
| Item Weight | Approximately 99 pounds |
| Product Dimensions | Approximately 24 x 10 x 62 inches |
| Color | Almond (Tank) |
| Power Requirements | 120V AC (via included power supply) |
9. Warranty Information
DuraWater products are manufactured to high-quality standards. Specific warranty details for your 48k 5600 SXT Water Softener are typically provided at the time of purchase or can be obtained by contacting DuraWater customer support. Generally, warranties cover defects in materials and workmanship under normal use and service.
Please retain your proof of purchase for warranty claims. Unauthorized repairs or modifications may void your warranty.
10. Customer Support
For technical assistance, parts, or warranty inquiries, please contact Aplus Water LLC, the seller and authorized support provider for DuraWater products.
- Seller: Aplus Water LLC
- Contact: Refer to your purchase documentation or the Amazon seller page for current contact information.
- Online Resources: Additional installation videos and support documents may be available through the seller's online channels.