
1. Introduction
This manual provides essential information for the safe and efficient operation, installation, and maintenance of your Teka LP9 840 freestanding dishwasher. Please read these instructions carefully before using the appliance and keep them for future reference. Proper use and care will ensure optimal performance and extend the lifespan of your dishwasher.
2. Safety Information
Always follow basic safety precautions when using electrical appliances to reduce the risk of fire, electric shock, and injury. This appliance is intended for household use only.
- Ensure the dishwasher is properly grounded.
- Do not operate the dishwasher if it is damaged or malfunctioning.
- Keep children away from the dishwasher, especially when it is operating or when the door is open.
- Use only detergents and rinse aids specifically designed for automatic dishwashers.
- Do not touch the heating element during or immediately after operation.
- Sharp items should be loaded with points down to prevent injury.
- In case of a malfunction, disconnect the appliance from the power supply before attempting any repairs.
3. Product Overview
The Teka LP9 840 is a freestanding dishwasher designed for efficient cleaning of up to 13 place settings. It features a stainless steel finish and a user-friendly control panel with a built-in display.
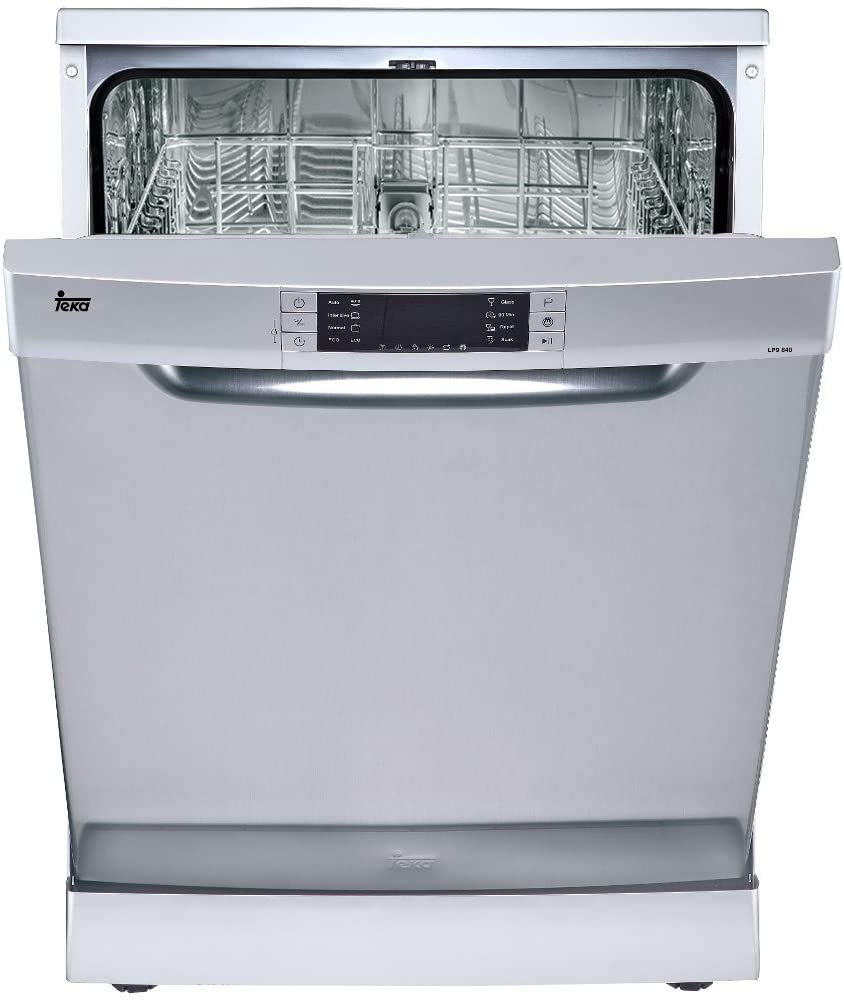
Figure 3.1: Front view of the Teka LP9 840 Dishwasher. This image shows the stainless steel door and the integrated control panel at the top.
Key Features:
- Capacity: 13 place settings
- Wash Programs: 8 programs, including ECO, Quick 40', and Half Load
- Wash Temperatures: 5 settings (40°C, 45°C, 55°C, 62°C, 65°C)
- Energy Efficiency: A++ Class
- Drying Efficiency: A Class
- Noise Level: 47 dB
- Safety System: AQUASTOP
- Convenience: Digital delayed programming (1-24 hours), height-adjustable upper basket (push up)
- Control Panel: Stainless steel with buttons and built-in display
4. Installation and Setup
Proper installation is crucial for the performance and safety of your dishwasher. It is recommended that installation be performed by a qualified technician.
- Positioning: Place the dishwasher on a level, stable surface. Ensure adequate space for door opening and ventilation.
- Water Connection: Connect the water inlet hose to a cold water supply with a minimum pressure of 0.04 MPa and a maximum of 1 MPa. Ensure the AquaStop system is correctly installed.
- Drain Connection: Connect the drain hose to a suitable drain pipe, ensuring it is not kinked or obstructed. The drain hose should be positioned at a height between 40 cm and 100 cm from the floor.
- Electrical Connection: Connect the appliance to a properly grounded electrical outlet (220-240V AC). Do not use extension cords or adapters.
- Leveling: Adjust the dishwasher's feet to ensure it is perfectly level, preventing water leaks and ensuring proper door closure.
5. Operating Instructions
5.1 Loading the Dishwasher
- Scrape off large food particles from dishes before loading.
- Place larger items in the lower basket and smaller, more delicate items in the upper basket.
- Ensure that items do not block the spray arms from rotating freely.
- Load cutlery into the cutlery basket with handles down for forks and spoons, and points down for knives.
- Adjust the upper basket height if needed using the push-up mechanism to accommodate taller items.
5.2 Adding Detergent and Rinse Aid
- Fill the detergent dispenser with the appropriate amount of dishwasher detergent according to the program selected and water hardness.
- Check the rinse aid indicator and refill the rinse aid dispenser if necessary. Rinse aid helps with drying and prevents streaks.
5.3 Selecting a Wash Program
The Teka LP9 840 offers 8 wash programs to suit various needs:
- ECO Program: Energy-efficient program for normally soiled dishes.
- Intensive Program: For heavily soiled dishes and pots.
- Normal Program: For daily use with normally soiled dishes.
- Glass Program: Gentle wash for delicate glassware.
- 90 Min Program: For normally soiled dishes requiring a quicker wash.
- Rapid 40' Program: Quick wash for lightly soiled dishes without drying.
- Half Load Program: For smaller loads, saving water and energy.
- Pre-wash: For rinsing dishes that will be washed later.
Use the control panel buttons to select your desired program. The built-in display will show the selected program and remaining time.
5.4 Delayed Start Function
To delay the start of a wash cycle, press the delay button repeatedly to set the desired delay time (1-24 hours). The dishwasher will start automatically after the set time has elapsed.
6. Maintenance and Cleaning
Regular maintenance ensures optimal performance and hygiene of your dishwasher.
- Cleaning the Filters: Regularly check and clean the coarse, fine, and micro filters located at the bottom of the wash tub. Remove food debris and rinse under running water.
- Cleaning the Spray Arms: Periodically remove the spray arms and clean the nozzles to ensure they are not clogged.
- Cleaning the Interior: Wipe the interior of the dishwasher with a damp cloth after each use. For deeper cleaning, run an empty cycle with a dishwasher cleaner.
- Cleaning the Exterior: Wipe the stainless steel exterior with a soft, damp cloth and a mild detergent. Avoid abrasive cleaners.
- Salt Reservoir: If your water is hard, ensure the salt reservoir is filled with dishwasher salt to prevent limescale buildup.
7. Troubleshooting
Before contacting customer service, refer to the following table for common issues and their solutions:
| Problem | Possible Cause | Solution |
|---|---|---|
| Dishwasher does not start | Power cord not plugged in; door not closed properly; fuse blown; delayed start active. | Check power connection; ensure door is latched; check household fuse; cancel delayed start. |
| Dishes are not clean | Improper loading; spray arms blocked; insufficient detergent; clogged filters; wrong program. | Reload dishes correctly; clear spray arms; add more detergent; clean filters; select appropriate program. |
| Water not draining | Drain hose kinked or blocked; clogged filter; drain pump malfunction. | Check and clear drain hose; clean filters; contact service if pump issue. |
| Excessive noise | Dishes rattling; foreign object in pump; improper installation. | Rearrange dishes; check for foreign objects; ensure dishwasher is level. |
| Water leaks | Door seal damaged; hose connections loose; excessive suds. | Check door seal; tighten hose connections; use less detergent. |
8. Specifications
| Model Number | LP9 840 (Technical: 40782392) |
| Capacity | 13 Place Settings |
| Number of Programs | 8 |
| Number of Temperatures | 5 (40°C, 45°C, 55°C, 62°C, 65°C) |
| Energy Efficiency Class | A++ |
| Drying Efficiency Class | A |
| Noise Level | 47 dB |
| Annual Water Consumption | 2800 L |
| Annual Energy Consumption | 262 kWh |
| Energy Consumption per Cycle | 0.92 kWh |
| Dimensions (WxDxH) | 598 x 610 x 845 mm |
| Cycle Time (Standard Program) | 195 min |
| AquaStop Function | Yes |
| Delayed Start | 1-24 hours |
| Control Type | Buttons with Built-in Display |
| Door Color | Stainless Steel |
| AC Input Voltage | 220 - 240 V |
9. Warranty and Support
For warranty information, please refer to the documentation provided at the time of purchase or contact your retailer. Teka offers a standard manufacturer's warranty covering defects in materials and workmanship under normal use.
For technical support, spare parts, or service requests, please contact Teka customer service or an authorized service center. You may need to provide your appliance's model number (LP9 840) and technical model number (40782392) when seeking assistance.
You can find more information and contact details on the official Teka website: www.teka.com


