Introduction
Thank you for choosing the Philco Coffe Express 15 Bar Coffee Maker. This manual provides essential information for the safe and efficient operation, maintenance, and troubleshooting of your new appliance. Please read it thoroughly before first use and keep it for future reference.
The Philco Coffe Express 15 Bar is designed to prepare delicious espresso coffee with a 15-bar pressure system, ensuring rich flavor and crema. It features a removable filter and a cup warmer for an optimal coffee experience.

Image: Front view of the Philco Coffe Express 15 Bar Coffee Maker, showcasing its control panel, portafilter, and steam wand.
Important Safety Information
- Always verify the electrical voltage of your region matches the product's voltage (127 Volts for this model) before plugging in.
- Do not use adapters or "benjamins" (multi-plugs) with this appliance.
- Keep the appliance away from water and other liquids. Do not immerse the appliance in water.
- Ensure the power cord is not damaged and does not come into contact with hot surfaces.
- This appliance is for household use only.
- Supervise children to ensure they do not play with the appliance.
- Unplug the appliance before cleaning and when not in use.
- Do not operate the appliance if it is damaged or malfunctioning. Contact authorized service for repairs.

Image: INMETRO safety certification logo, indicating compliance with Brazilian safety standards (BRA18/00668).
Product Components
Familiarize yourself with the main parts of your Philco Coffe Express 15 Bar Coffee Maker:
- Water Reservoir: Located at the back, for filling with fresh water. Capacity: 1600 ml.
- Control Panel: Includes power button, coffee brewing button, and steam function button.
- Function Selector Knob: To select between standby, coffee brewing, and steam/hot water.
- Portafilter: Holds ground coffee. Designed for easy insertion and locking.
- Filter Basket: Removable, fits inside the portafilter.
- Steam Wand: For frothing milk and dispensing hot water.
- Drip Tray: Removable tray to collect excess liquid.
- Cup Warmer: Top surface of the machine, designed to keep cups warm.
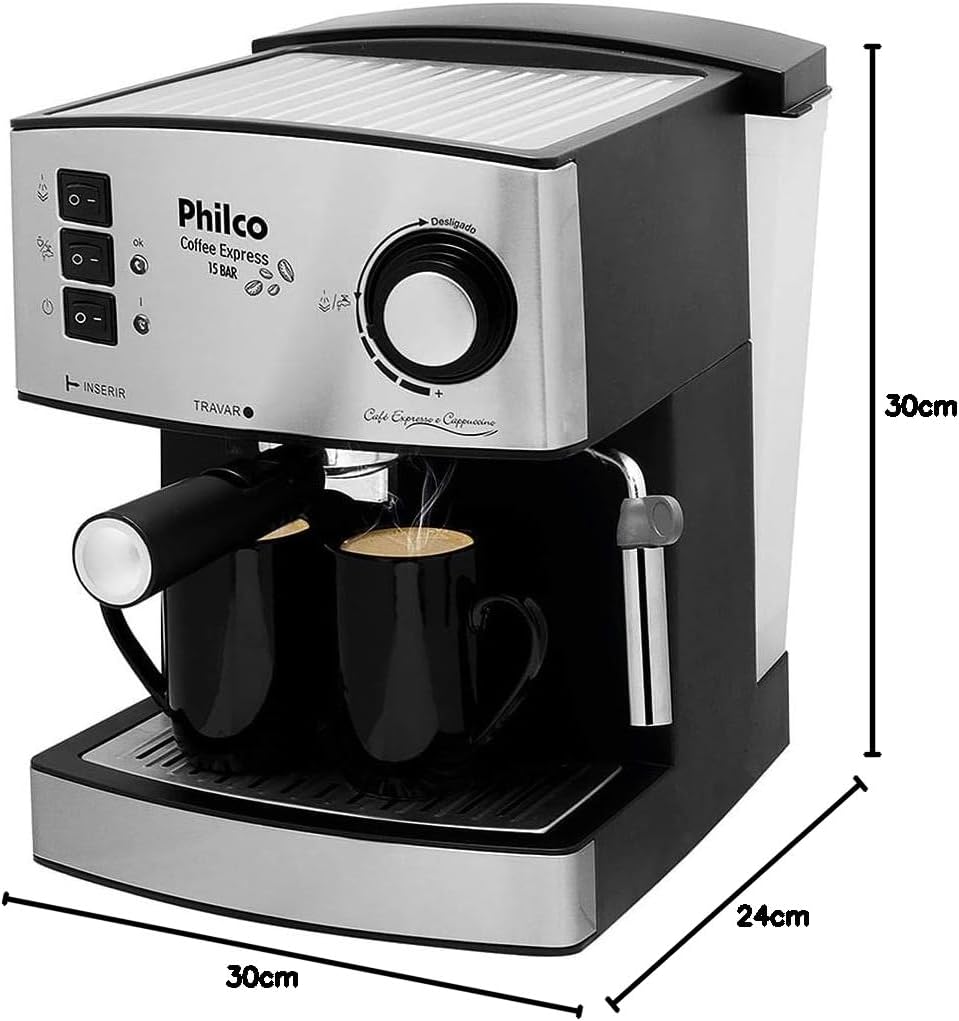
Image: Diagram showing the dimensions of the coffee maker: approximately 30cm (height), 24cm (depth), and 30cm (width).
Setup and First Use
- Unpacking: Carefully remove all packaging materials. Ensure all components are present and undamaged.
- Placement: Place the coffee maker on a stable, flat, heat-resistant surface, away from water sources and direct sunlight. Ensure adequate ventilation around the unit.
- Clean Components: Wash the water reservoir, portafilter, and filter basket with warm soapy water. Rinse thoroughly and dry.
- Fill Water Reservoir: Fill the water reservoir with fresh, cold water up to the MAX level.
- Initial Rinse Cycle:
- Plug the appliance into a suitable 127V power outlet.
- Press the power button (usually indicated by a power symbol). The orange light will illuminate.
- Wait for the green heating light to illuminate, indicating the machine is ready.
- Place an empty cup or container under the portafilter.
- Turn the function selector knob to the coffee brewing position (coffee cup symbol) and let water run through for about 30 seconds.
- Turn the knob back to the standby position.
- Repeat this process for the steam wand: place a container under the steam wand, turn the knob to the steam position (steam symbol), and let steam/hot water run for a few seconds. Turn off.
Operating Instructions
Making Espresso Coffee
- Ensure the water reservoir is filled with fresh water.
- Plug in the machine and press the power button. Wait for the green heating light to turn on.
- Add ground coffee to the filter basket. For a single shot, use one scoop; for a double shot, use two scoops. Do not overfill.
- Lightly tamp the coffee grounds. If using fine coffee, avoid excessive tamping to prevent clogging.
- Insert the portafilter into the brewing head. Align it with the "INSERT" mark and turn it to the right until it locks securely at the "LOCK" mark.
- Place one or two espresso cups on the drip tray, directly under the portafilter spouts. The product does not include cups.
- Turn the function selector knob to the coffee brewing position (coffee cup symbol). Coffee will begin to dispense.
- Once the desired amount of coffee is brewed, turn the knob back to the standby position to stop the flow.
- Carefully remove the portafilter by turning it to the left. Dispose of the used coffee grounds and rinse the filter basket.

Image: A hand demonstrating the insertion and locking of the portafilter into the coffee maker's brewing head.

Image: The coffee maker actively brewing espresso into two black cups, demonstrating its dual-cup capacity.
Frothing Milk (for Cappuccino/Latte)
- Fill a stainless steel frothing pitcher with cold milk (preferably whole milk) up to one-third full.
- Ensure the machine is powered on and the green heating light is illuminated.
- Turn the function selector knob to the steam position (steam symbol). The machine will start heating for steam production.
- Once steam is ready (indicated by a steady steam flow), position the steam wand just below the surface of the milk in the pitcher.
- Open the steam valve by turning the knob. Steam will be released.
- Move the pitcher up and down slightly to create foam. Continue until the milk is frothed to your desired consistency and temperature.
- Close the steam valve by turning the knob back to the standby position.
- Immediately clean the steam wand with a damp cloth to prevent milk residue from drying. Briefly release steam into an empty cup to clear any internal residue.
Maintenance and Cleaning
Regular cleaning ensures optimal performance and extends the lifespan of your coffee maker.
- Daily Cleaning:
- After each use, remove and empty the portafilter. Rinse the filter basket and portafilter under running water.
- Wipe down the steam wand immediately after frothing milk.
- Empty and rinse the drip tray. The drip tray is removable for easy cleaning.
- Wipe the exterior of the machine with a damp cloth. Do not use abrasive cleaners.

Image: A close-up view of the coffee maker's removable drip tray, showing its slotted design for liquid collection.
- Water Reservoir Cleaning: Clean the water reservoir periodically with warm soapy water and rinse thoroughly.
- Descaling: Depending on water hardness and frequency of use, descaling should be performed every 2-3 months. Use a commercial descaling solution suitable for coffee makers and follow the product's instructions. Run the descaling solution through the machine, then rinse thoroughly with several cycles of fresh water.
Troubleshooting
| Problem | Possible Cause | Solution |
|---|---|---|
| No coffee dispenses or flow is very slow. |
|
|
| Coffee is weak or watery. |
|
|
| Steam wand not producing steam. |
|
|
| Machine leaks water. |
|
|
Specifications
| Feature | Detail |
|---|---|
| Brand | PHILCO |
| Model Name | Coffe Express 15 Bar |
| Model Number | 53901026 |
| Color | Black/Silver |
| Voltage | 127 Volts |
| Pressure | 15 Bar |
| Water Reservoir Capacity | 1600 Milliliters |
| Material Type | Plastic and Metal |
| Product Dimensions (L x W x H) | 30 x 24 x 30 cm |
| Item Weight | 3.18 kilograms |
| Special Features | Cup warmer, Removable filter |
| Inmetro Registration | BRA18/00668 |
Warranty and Support
This product comes with a manufacturer's warranty. Please refer to the warranty card included in the product packaging for specific terms and conditions, including warranty duration and coverage.
For technical assistance, spare parts, or further inquiries, please contact Philco customer support. You can find contact information on the official Philco website or through the retailer where you purchased the product.
Online Resources:
- Visit the official Philco store on Amazon: Philco Official Store
Please have your product model number (53901026) and purchase date ready when contacting support.