
Introduction
Thank you for purchasing the PIXEL TW283-E3 Wireless Timer Remote Control. This device is designed to provide precise control over your camera's shutter, offering both wireless and wired operation, along with advanced timer functions. Please read this manual carefully to ensure proper setup and operation.
Package Contents
- TW-283 Transmitter x 1
- TW-283 Receiver x 1
- Shutter Connecting Cable E3 x 1
- User Manual x 1
Note: AAA batteries are not included and must be purchased separately.
Product Overview

Figure 1: Transmitter and Receiver Components

Figure 2: Transmitter and Receiver Dimensions
Transmitter (TW-283TX)
- LED Light Indicator
- Power Switch / Backlight Button
- Number Add Button
- Shift Left Button
- Set / Confirm Button
- LCD Screen
- Timer Schedule Start / Stop Button
- Number Reduce Button
- Shift Right Button
- Focus Button / Shutter Button
Receiver (TW-283RX)
- LED Light Indicator
- Power Switch / Backlight Button
- LCD Screen
- Backlight / Channel Add Button
Battery Installation
Both the transmitter and receiver require two AAA batteries each. Ensure correct polarity when inserting batteries.


Figure 3: Battery Installation for Transmitter and Receiver
Setup and Connection
Connecting to Your Camera
The TW283-E3 connects to your camera via the provided E3 shutter connecting cable. Plug one end into the receiver and the other into your camera's remote control port.

Figure 4: Shutter Connecting Cable E3
Channel Synchronization
To ensure proper communication, the transmitter and receiver must be set to the same channel. The TW283-E3 offers 30 channels to avoid interference.
- Turn on both the transmitter and receiver by long-pressing their respective power buttons.
- On the transmitter, use the left/right buttons to navigate to the CH mode. Press the Set/Confirm button to enter adjustment mode.
- On the receiver, press both CH- and CH+ buttons simultaneously to enter parameter adjustment mode.
- Adjust the channel on both devices to match using the up/down buttons on the transmitter and CH-/CH+ buttons on the receiver. Press Set/Confirm on the transmitter and both CH-/CH+ on the receiver again to confirm.
Video 1: Demonstration of PIXEL TW283 Wireless Timer Remote Control setup and channel synchronization.
Operating Modes
The TW283-E3 supports various shooting modes:

Figure 5: Four Shutter Release Modes
- Single Shooting: Press the shutter button once for a single photo. Half-press to focus, full-press to shoot.
- Continuous Shooting: Set your camera to continuous shooting mode. Half-press to focus, then full-press and hold the shutter button on the remote for continuous shots.
- BULB Shooting (Long Exposure): Set your camera to BULB mode. Press the shutter button once to open the shutter, and press it again to close the shutter. The remote will display the elapsed exposure time.
- Delay Shooting: Set a delay time (1s to 59s) and number of shots (1 to 99) on the remote. The camera will shoot after the set delay.
Timer Schedule Shooting
The TW283-E3 offers advanced timer functions for precise control over your shooting sequences. All timer functions can be set from 0 seconds to 99 hours, 59 minutes, and 59 seconds in one-second increments.
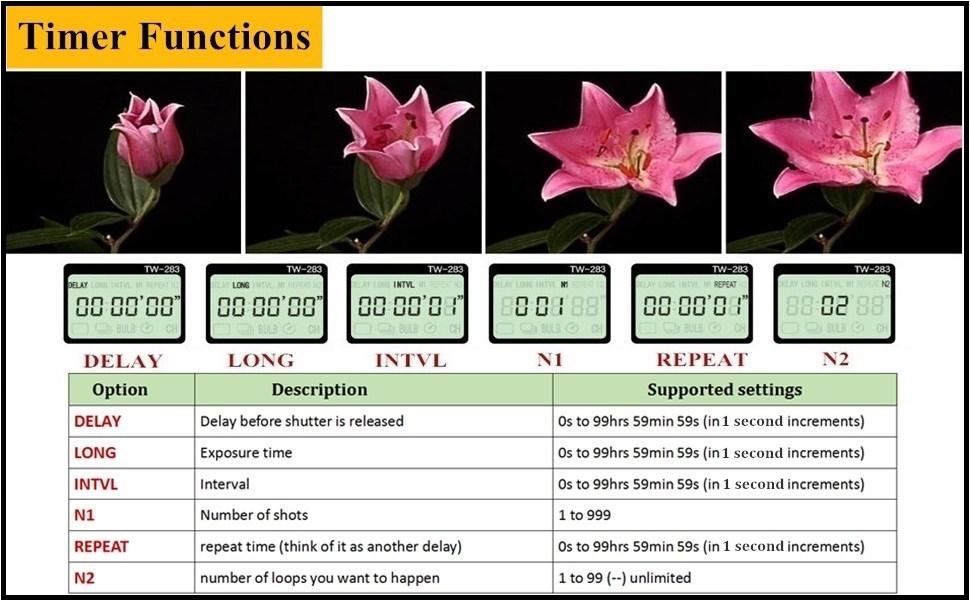
Figure 6: Timer Functions Overview
- Delay Timer (DELAY): Sets the delay before the first shot.
- Long Exposure Timer (LONG): Sets the exposure time for each shot (used in conjunction with camera's BULB mode).
- Interval Timer (INTVL): Sets the time between each shot in a sequence.
- Number of Shots (N1): Sets the total number of shots to be taken (1 to 999).
- Repeat Interval (REPEAT): Sets the delay between repeated sequences of shots.
- Repeat Times (N2): Sets the number of times the entire shooting sequence (N1 shots) will repeat (1 to 99, or "--" for unlimited).
To set timer parameters, press the Set/Confirm button to enter adjustment mode. Use the up/down buttons to increase/decrease values and left/right buttons to select parameters. After adjusting all parameters, press the Start/Stop button to begin the timer schedule shooting.
Specifications
| Feature | Description |
|---|---|
| Brand | PIXEL |
| Model Name | TW283-E3 |
| Connectivity Technology | Radio Frequency |
| Maximum Range | 80 Meters |
| Number of Channels | 30 |
| Compatible Devices | Canon EOS R100, R8, R6 Mark II, R6 Mark III, R7, R10, R6, R, RA, RP, R50 V, 850D, 90D, 80D, 70D, 77D, 60D, 60Da, 250D, 200D, 200DII, 100D, 800D, 760D, 750D, 700D, 650D, 600D, 550D, 500D, 450D, 400D, 1500D, 1300D, 1200D, 1100D, 1000D, 2000D, M5, M6, M6 Mark II; Canon PowerShot SX50HS, SX60HS, SX70HS, G1X Mark III, G1X Mark II, G1X, G3X, G5X, G10, G11, G12, G15, G16; Rebel: XT, XTi, XS, XSi, T1i, T2, T2i, T3, T3i, T4, T4i, T5, T5i, T6, T6i, T7, T7i, T8i, SL1, SL2, SL3; Fuji GFX50S, GFX100S II, X-T5, X-H2, X-H2S, GFX100, GFX100S, GFX50R, GFX50SII, GFX100 IR, X-Pro3, X-T3, X-T4, X-T30, X-T30 II, X-T30 III, X-A7, X-E1, X100V; Olympus SYSTEM OM-1, OM-1 Mark II, OM-5 Mark II, SYSTEM OM-5, E-M1X, E-M1 Mark II, E-M1 Mark III, E-M5 Mark III; Pentax 645Z, K-1 Mark II, K100D, K110D, K200D, K-500, K100D, K20D, K10D, K-30, K-50, K-7, K-5, K-5II, K-5IIs, K-3, K-3II, K-1; *ist D, *ist DL, *ist DS, *ist DS2; Samsung GX-1L, GX-1S, GX-10, GX-20, NX100, NX11, NX10, NX5; Contax 645, N1, NX, N Digital; Sigma Sd1 |
| Power Source | 4 x AAA batteries (2 for transmitter, 2 for receiver) |
| Special Feature | Backlit LCD |
| Color | Black |
| Item Weight | 0.11 Grams |
Troubleshooting
- Device not powering on: Ensure batteries are correctly installed with proper polarity and are not depleted. Replace with fresh AAA batteries if necessary.
- Remote not triggering camera:
- Verify that both the transmitter and receiver are powered on.
- Confirm that the transmitter and receiver are set to the same channel.
- Check that the shutter connecting cable is securely plugged into both the receiver and the camera's remote port.
- Ensure your camera is set to a compatible shooting mode (e.g., single shot, continuous, BULB).
- Check camera battery level.
- Interference: If experiencing unreliable connection, try changing the channel on both the transmitter and receiver to a different number.
- LCD not visible: Gently press the backlight button on the remote or receiver to illuminate the screen.
Warranty and Support
For warranty information or technical support, please refer to the product packaging or contact PIXEL customer service directly. Keep your purchase receipt for warranty claims.