1. Introduction
This manual provides essential information for the safe and efficient operation of your InFocus IN112XV Presentation Projector. The IN112XV is designed for business presentations and educational use, offering a long lamp life, high brightness, and clear image quality.
- Extended Lamp Life: Enjoy over 15,000 hours of viewing.
- High Brightness: 3800 lumens for clear images in various lighting conditions.
- Contrast Ratio: 26000:1 for distinct whites and blacks.
- Flexible Viewing: Projects images from 28 inches to 300 inches diagonally.
- Connectivity: Features HDMI input and SVGA (800 x 600) resolution.
2. Package Contents
Verify that all items listed below are included in your package:
- InFocus IN112XV Projector
- Power Cord
- Remote Control
- VGA Cable
- Documentation (this manual and other guides)
3. Product Overview
Familiarize yourself with the components and controls of your InFocus IN112XV projector.
3.1 Front View
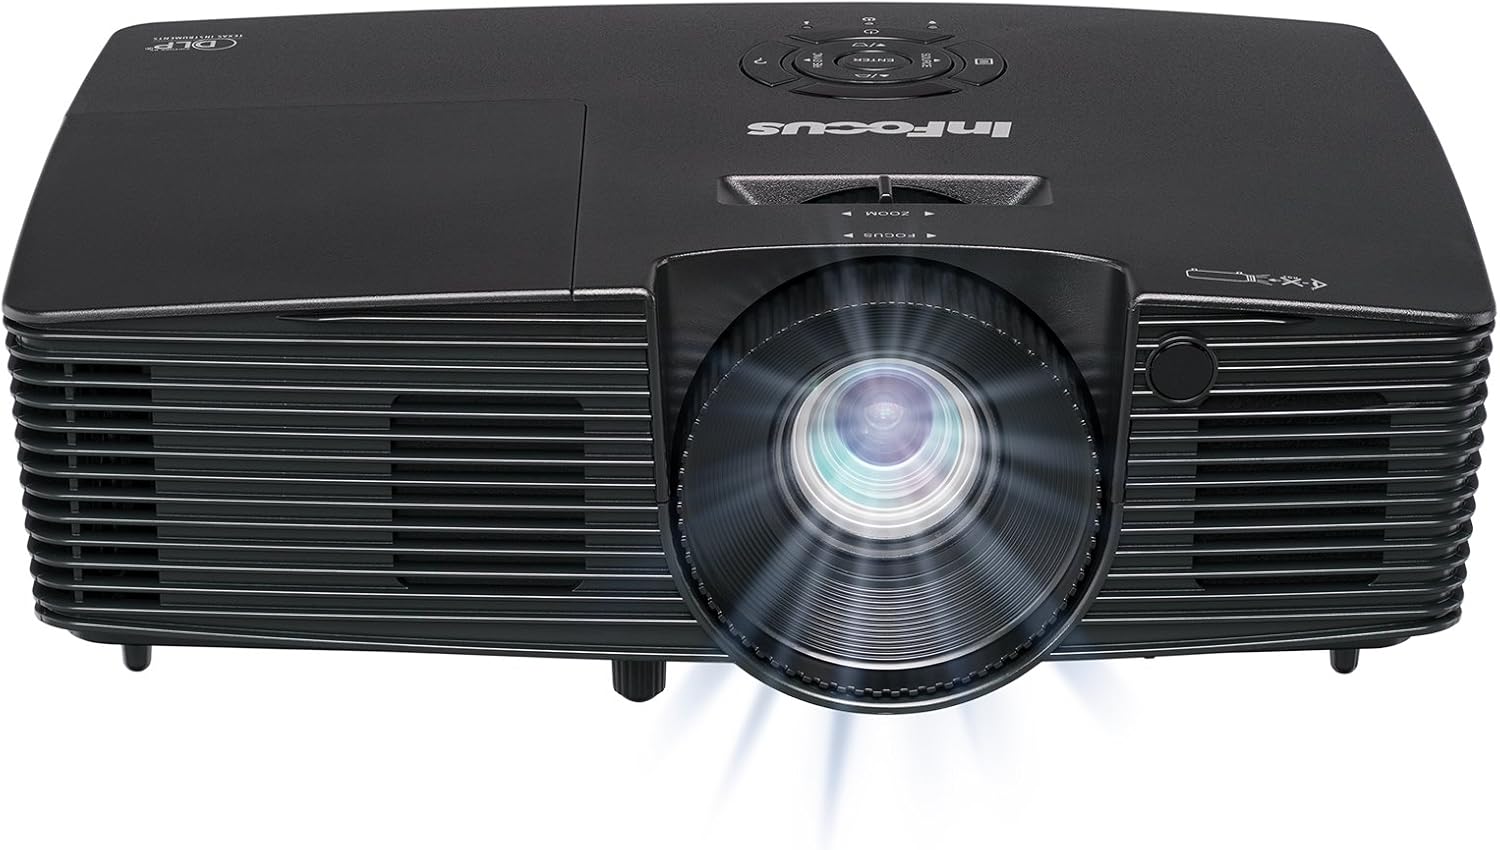
Image 3.1: Front view of the InFocus IN112XV projector. This image highlights the main projection lens and the front ventilation grilles.
3.2 Top View and Control Panel

Image 3.2: Top view of the InFocus IN112XV projector. The control panel is visible on the right, featuring buttons for power, source selection, menu navigation, keystone adjustment, and volume. The focus and zoom adjustment rings are located around the lens.
The control panel on the top of the projector allows for basic operation without the remote. Key buttons include:
- Power: Turns the projector on or off.
- Source: Cycles through available input sources.
- Menu: Accesses the on-screen display (OSD) menu.
- Enter: Confirms selections in the OSD menu.
- Arrow Keys: Navigate menu options and adjust settings.
- Re-Sync: Synchronizes the image.
3.3 Rear View and Connection Ports

Image 3.3: Rear view of the InFocus IN112XV projector. This image displays the available connection ports, including Video In, S-Video In, Computer In (VGA), HDMI, and the power input.
The rear panel provides various ports for connecting external devices:
- Video In: For composite video sources.
- S-Video In: For S-Video sources.
- Computer In (VGA): For connecting to computers via VGA cable.
- HDMI: For digital video and audio sources.
- Service: For service and maintenance purposes.
- Power Input: Connects the power cord to an electrical outlet.
3.4 Remote Control

Image 3.4: Remote control for the InFocus IN112XV projector. The remote provides full control over the projector's functions, including power, source selection, menu navigation, keystone correction, and volume.
The remote control offers convenient access to all projector functions. Ensure batteries are correctly installed.
4. Setup
4.1 Placement
Position the projector on a stable, flat surface or mount it securely. Ensure there is adequate space around the projector for ventilation.
4.2 Power Connection
- Connect the power cord to the projector's power input port.
- Plug the other end of the power cord into a grounded electrical outlet.
4.3 Connecting Input Sources
The projector supports various input sources. Choose the appropriate cable for your device:
- HDMI: Connect an HDMI cable from your source device (e.g., laptop, media player) to the projector's HDMI port.
- VGA (Computer In): Connect a VGA cable from your computer to the projector's Computer In port. This is a plug-and-play connection.
- Video In / S-Video In: Use composite video or S-Video cables for older video sources.
- Mobile Devices: To connect an iPad or smartphone, a LightCast Key (sold separately) is required.
5. Operating Instructions
5.1 Powering On/Off
- To Power On: Press the Power button on the projector's control panel or the remote control. The power indicator light will change.
- To Power Off: Press the Power button again. A confirmation message may appear. Press again to confirm shutdown. Allow the projector to cool down before unplugging.
5.2 Selecting an Input Source
After connecting your source device, select the correct input:
- Press the Source button on the projector's control panel or the remote control to cycle through available inputs (HDMI, VGA, Video, S-Video).
- Alternatively, use the dedicated input buttons (HDMI, VGA, Video) on the remote control.
5.3 Adjusting Focus and Zoom
For a clear and appropriately sized image, adjust the lens rings:

Image 5.1: Manual Focus Adjustment. This image illustrates the effect of adjusting the focus ring, transforming a blurry projection into a clear and sharp image.
- Focus: Rotate the Focus ring on the projector lens until the image appears sharp and clear.
- Zoom: Rotate the Zoom ring on the projector lens to adjust the size of the projected image.
5.4 Keystone Correction
If the projected image appears trapezoidal (wider at the top or bottom), use keystone correction to square it:
- Press the Keystone+ or Keystone- buttons on the remote control to adjust the image geometry.
5.5 Menu Navigation
Access the On-Screen Display (OSD) menu for advanced settings:
- Press the Menu button on the remote or control panel.
- Use the arrow keys to navigate through menu options.
- Press Enter to select an option or confirm a setting.
- Press Menu again to exit the OSD.
6. Maintenance
6.1 Lamp Life
The projector lamp has an estimated life of over 15,000 hours. When the lamp reaches the end of its life, the projector may display a warning message or the image brightness may significantly decrease. Refer to the full service manual for lamp replacement procedures if necessary.
6.2 Cleaning
- Projector Casing: Use a soft, dry cloth to wipe the exterior of the projector. Do not use abrasive cleaners or solvents.
- Lens: Gently clean the lens with a lens cleaning cloth and specialized lens cleaning solution. Avoid touching the lens surface with your fingers.
- Ventilation Openings: Periodically check and clean the ventilation openings to ensure proper airflow and prevent overheating. Use a soft brush or compressed air to remove dust.
7. Troubleshooting
This section addresses common issues you might encounter with your projector.
| Problem | Possible Cause | Solution |
|---|---|---|
| No image displayed |
|
|
| Image is blurry |
|
|
| Image is trapezoidal |
|
|
| Projector runs hot or smells of burning plastic |
|
|
| No audio |
|
|
Important Note: This projector is not recommended for high-definition movie viewing. While it can accept a 1080p input signal, it projects at its native SVGA (800 x 600) resolution.
8. Specifications
| Feature | Detail |
|---|---|
| Model Number | IN112XV |
| Display Technology | DLP |
| Native Resolution | SVGA (800 x 600) |
| Brightness | 3800 Lumens |
| Contrast Ratio | 26000:1 |
| Lamp Life | Up to 15,000 hours |
| Connectivity | HDMI, VGA (Computer In), Video In, S-Video In |
| Special Feature | 3D-Ready |
| Recommended Uses | Business, Education |
| Product Dimensions | 8.8 x 12.4 x 4 inches |
| Item Weight | 5.5 pounds |
9. Warranty and Support
9.1 Warranty Information
The InFocus IN112XV projector is backed by a 2-year warranty. This warranty covers defects in materials and workmanship under normal use. Please retain your proof of purchase for warranty claims.
9.2 Customer Support
For technical assistance, troubleshooting beyond this manual, or warranty service, please contact InFocus customer support. Contact information can typically be found on the official InFocus website or in the documentation included with your product.


