
Introduction
The SharkBite PEX Crimping Tool, Model 24675, is designed for professional and DIY plumbing installations involving PEX tubing. This tool efficiently compresses copper crimp rings to create secure connections with barbed PEX fittings. It is suitable for PEX pipe sizes ranging from 1-1/4 inches to 2 inches.
This manual provides essential information for the safe and effective operation of your crimping tool. Please read all instructions carefully before use.
Safety Information
WARNING: Always wear appropriate personal protective equipment, including safety glasses, when operating this tool.
- Keep hands and fingers clear of the crimping jaws during operation to prevent pinching injuries.
- Ensure the tool is clean and free from debris before and after each use.
- Do not modify the tool or use it for purposes other than its intended design.
- Store the tool in a dry, secure location, out of reach of children.
- Use only genuine SharkBite or compatible PEX crimp rings and fittings.
Package Contents
Verify that all components are present before beginning your installation:
- SharkBite PEX Crimping Tool (Model 24675)
- Interchangeable Crimping Dies (e.g., 1-1/4", 1-1/2", 2" - specific sizes may vary based on kit)
- Go/No-Go Gauge for crimp verification
- Hex Key for die changes/adjustments
- Carrying Case
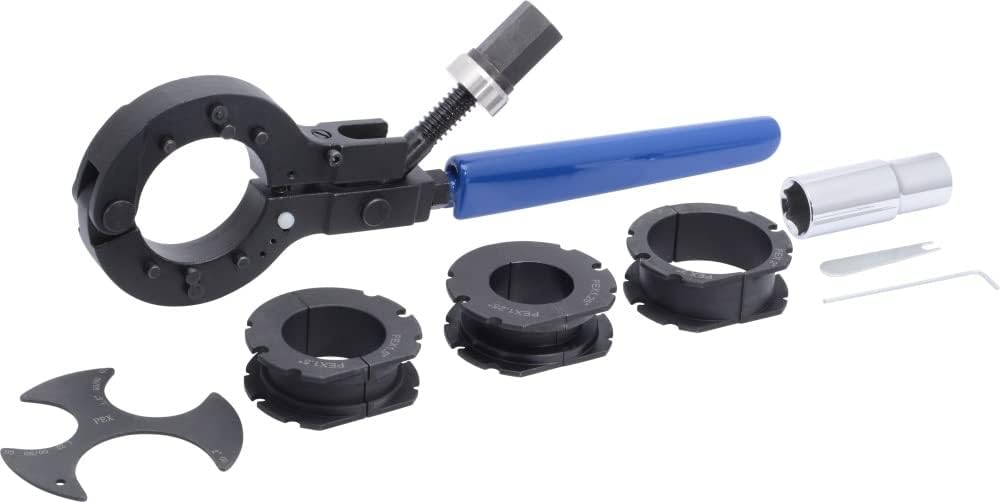
Figure 1: SharkBite PEX Crimping Tool with included dies and accessories. This image shows the main crimping tool, several interchangeable crimping dies for different PEX pipe sizes, a go/no-go gauge for checking crimp quality, and a hex key for adjustments.

Figure 2: The SharkBite PEX Crimping Tool and its accessories neatly organized within its durable carrying case. The case provides protection and easy transport for the tool and its components.
Setup
- Select Correct Die: Identify the PEX pipe size you will be working with (e.g., 1-1/4", 1-1/2", 2"). Choose the corresponding crimping die from your kit.
- Install Die: Open the crimping tool jaws. Insert the selected die into the tool, ensuring it seats correctly. Use the provided hex key to secure the die if necessary, following the tool's specific mechanism for die attachment.
- Prepare PEX Pipe and Fitting: Cut the PEX pipe squarely and deburr the edges. Slide a copper crimp ring onto the PEX pipe, ensuring it is positioned correctly over the area where the fitting will be inserted. Insert the barbed PEX fitting fully into the PEX pipe.
- Position Crimp Ring: Slide the copper crimp ring over the barbed portion of the fitting, positioning it approximately 1/8 inch to 1/4 inch from the end of the PEX pipe, centered over the barb.
Operating Instructions
This tool is designed for use with a ratchet and socket, as manual crimping may not be feasible for larger sizes.
- Position Tool: Place the open jaws of the crimping tool squarely over the copper crimp ring. Ensure the crimp ring is fully seated within the die.
- Apply Pressure: Engage the tool's tightening mechanism. For this model, it typically involves using a ratchet with the supplied socket on the bolt mechanism. Turn the ratchet to gradually close the jaws, compressing the crimp ring.
- Complete Crimp: Continue turning the ratchet until the crimp ring is fully compressed and the tool's jaws are completely closed. The tool is designed to stop when the crimp is complete.
- Release Tool: Reverse the ratchet direction to open the jaws and remove the tool from the crimped connection.
- Verify Crimp: Use the Go/No-Go gauge to check the quality of the crimp.
- The "Go" side of the gauge should slide freely over the crimped ring.
- The "No-Go" side of the gauge should not slide over the crimped ring.
- If the crimp fails either test, the connection is faulty and must be redone. Cut out the faulty crimp and repeat the process with new PEX pipe, fitting, and crimp ring.
Maintenance
- Cleaning: After each use, wipe down the tool with a clean, dry cloth to remove any dirt or debris.
- Lubrication: Periodically apply a light machine oil to the moving parts and pivot points of the tool to ensure smooth operation and prevent corrosion.
- Inspection: Regularly inspect the crimping dies for wear or damage. Replace worn dies to ensure consistent crimp quality. Check the overall condition of the tool for any signs of damage or loose components.
- Storage: Store the tool and its accessories in the provided carrying case in a dry environment to protect it from moisture and physical damage.
Troubleshooting
| Problem | Possible Cause | Solution |
|---|---|---|
| Crimp ring not fully compressed / Loose connection |
|
|
| Tool jams or is difficult to operate |
|
|
| Crimp fails Go/No-Go gauge test |
|
|
Specifications
- Model: 24675
- Brand: SharkBite
- Compatible PEX Sizes: 1-1/4 inch to 2 inch (3.8 cm to 5.1 cm)
- Tool Body Material: Durable Metal Construction
- Handle Material: Plastic, Rubber
- Dimensions (L x W x H): 5.51 x 25.4 x 44.02 cm (2.17 x 10 x 17.33 inches)
- Weight: 3.42 kg (7.54 lbs)
- Handle Type: Ergonomic
- Measurement System: Inches
- Intended Use: PEX pipe installations with copper crimp rings
Warranty and Support
For warranty information or technical support, please refer to the official SharkBite website or contact their customer service directly. Keep your purchase receipt as proof of purchase.
For further assistance, please visit www.sharkbite.com or consult your local authorized dealer.


