1. Product Overview
This document provides detailed instructions for the installation and use of the ICT Billet LS - Sanden 508 A/C Air Conditioner Compressor Bracket Kit, model 551474-3. This kit is designed to integrate a Sanden 508 A/C compressor into an LS engine setup, ensuring proper belt alignment and accessory placement.
The kit includes essential components for mounting the A/C compressor, such as the main bracket, idler pulley, belt tensioner, and all necessary mounting hardware. It is manufactured from aerospace-grade, USA-produced billet aluminum, ensuring durability and precise fitment.

Image 1.1: The ICT Billet LS - Sanden 508 A/C Compressor Bracket Kit shown installed on an LS engine, demonstrating the placement of the A/C compressor and belt routing.
2. Compatibility
This bracket kit is compatible with specific LS engine configurations. Please verify your engine's setup against the following criteria:
- Crank Pulley: Compatible with Truck/SUV or LS3 L99 Camaro crank pulleys.
- Water Pump: Works with any GM LS series water pump.
- A/C Compressor: Designed for use with a Sanden 508 A/C Compressor.
- Engine Series: Compatible with all GM LS series engines.
It is crucial to identify your LS crank pulley spacing to ensure proper fitment and belt alignment. Refer to the LS Crank Spacing Guide below:

Image 2.1: LS Crank Spacing Guide. This diagram illustrates the three common LS crank pulley offsets: Corvette/CTS-V/SS/G8 (Part # ending in -1), 98-02 Camaro/GTO (Part # ending in -2), and Truck/SUV/2010-Up Camaro (Part # ending in -3). This kit is designed for the Truck/SUV/2010-Up Camaro spacing.
3. Kit Contents
Before beginning installation, unpack and verify all components against the list below. If any parts are missing or damaged, contact ICT Billet customer support.

Image 3.1: All components included in the kit. This typically includes the main A/C compressor bracket, a belt tensioner, an idler pulley, various spacers, bolts, and nuts required for mounting.
- A/C Compressor Bracket (Main)
- Belt Tensioner
- Idler Pulley
- Mounting Hardware (various bolts, nuts, and spacers)
4. Installation Instructions
Warning: Professional installation is recommended. Disconnect the vehicle's battery before starting any work. Ensure the engine is cool to prevent burns. Always wear appropriate safety gear, including eye protection and gloves.
4.1 Pre-Installation Steps
- Ensure the engine is off and cool. Disconnect the negative terminal of the vehicle's battery.
- If an existing A/C system is present, ensure it is properly discharged by a certified technician before removing any components.
- Clean the mounting area on the engine block to ensure a secure and flush fit for the new bracket.
- Identify the correct crank pulley spacing for your LS engine (refer to Section 2). This kit is designed for the Truck/SUV/2010-Up Camaro spacing.
4.2 Bracket and Compressor Mounting
- Position the main A/C compressor bracket onto the engine block according to the manufacturer's design.
- Secure the bracket using the provided bolts and spacers. Ensure all fasteners are hand-tightened initially.
- Mount the Sanden 508 A/C compressor to the bracket using the appropriate hardware. Do not overtighten.
- Install the idler pulley and belt tensioner onto their designated locations on the bracket.
- Once all components are in place, progressively tighten all bolts to the manufacturer's specified torque settings. Refer to a service manual for your specific engine for general torque specifications if not provided with the kit.

Image 4.1: A close-up view of the A/C compressor bracket and Sanden 508 compressor mounted on the engine. Note the precise alignment of the pulleys.

Image 4.2: Side view illustrating the compact design and how the bracket positions the A/C compressor relative to other engine accessories.
4.3 Belt Routing
Proper belt routing is essential for the correct operation of the A/C compressor and to prevent premature belt wear. The kit is designed to work with a specific belt length. While the kit provides the necessary pulleys, the belt itself is typically purchased separately based on your specific accessory drive setup.
- Route the serpentine belt around the crank pulley, A/C compressor pulley, idler pulley, and tensioner pulley.
- Use the belt tensioner to apply the correct tension to the belt. The tensioner typically has an indicator to show proper tension.
- Verify that the belt is seated correctly in all pulley grooves and that there is no interference with other engine components.
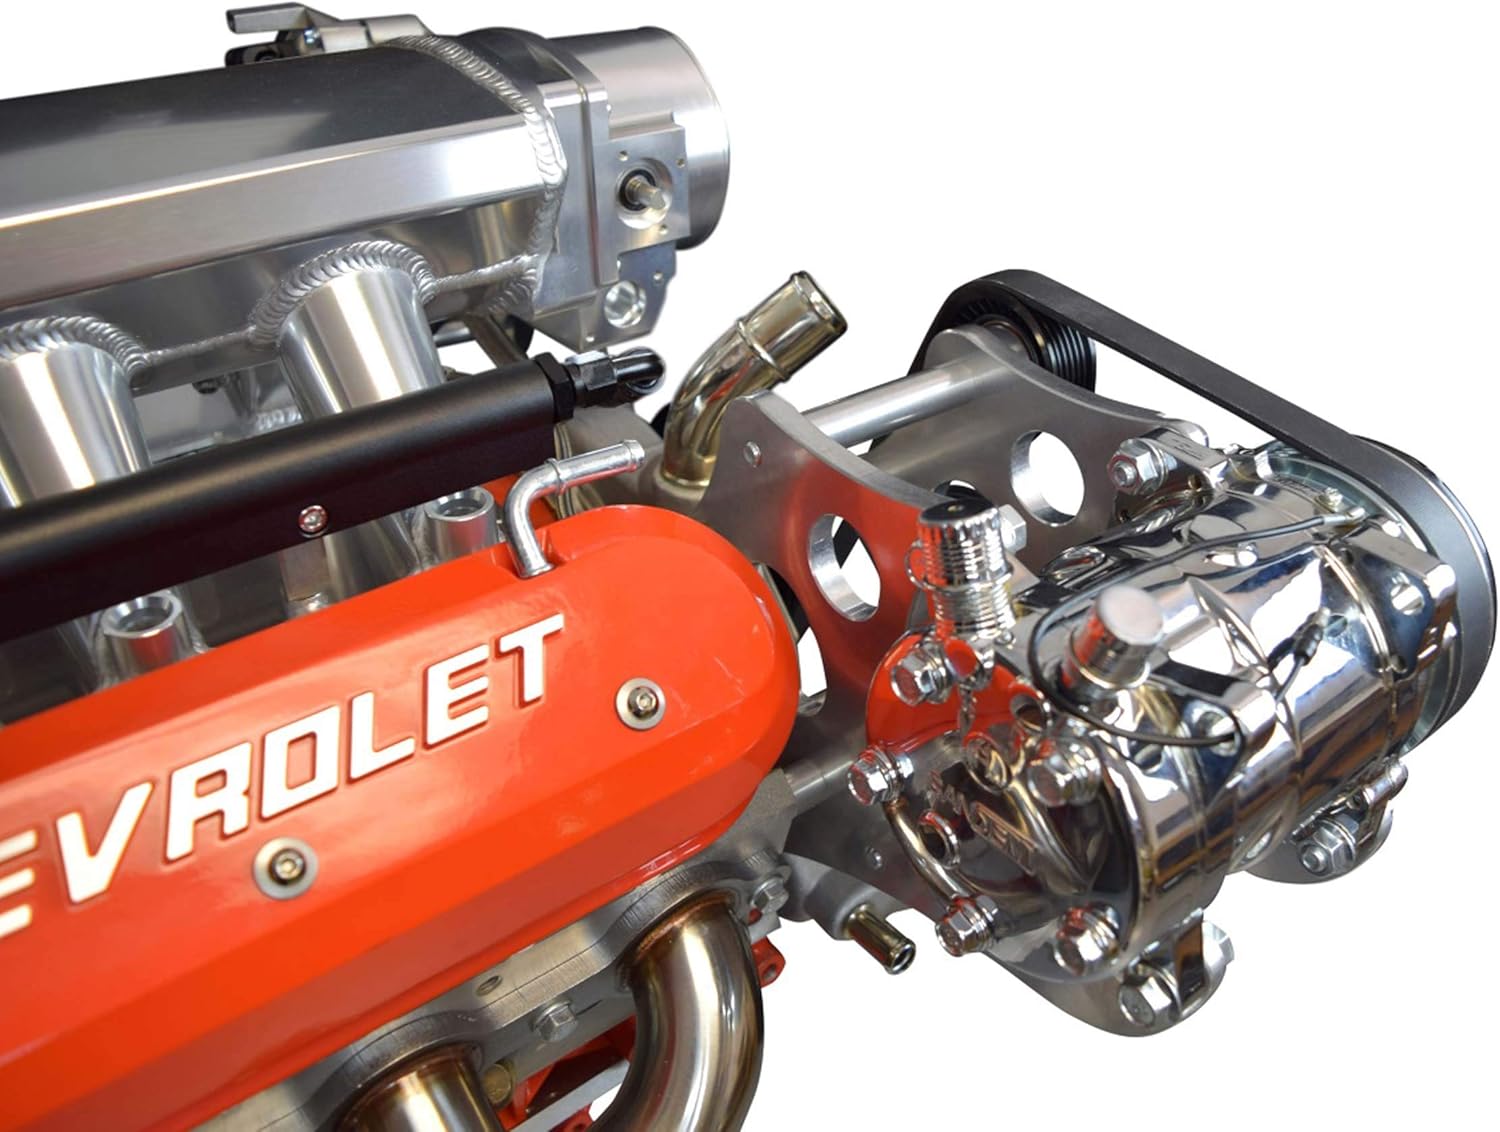
Image 4.3: Detailed view showing the belt path around the A/C compressor, idler, and tensioner pulleys. Ensure the belt is correctly aligned and tensioned.
Note: Some users have reported varying belt length requirements depending on their specific accessory drive setup. Common belt lengths mentioned by users for stock accessory drives and 130 amp alternators include Dayco 5061130 or 4061140. Always measure and confirm the required belt length for your specific application.
5. Operation
Once the ICT Billet A/C compressor bracket kit and Sanden 508 compressor are installed, the A/C system can be charged and operated according to the vehicle manufacturer's specifications. The bracket itself is a static component designed to hold the compressor in place and maintain proper belt alignment.
- Ensure the A/C system is properly evacuated and charged with the correct refrigerant type and amount by a qualified technician.
- Check for any leaks in the A/C system after charging.
- Monitor the A/C system's performance during initial operation.
6. Maintenance
The ICT Billet A/C compressor bracket kit is designed for long-term durability with minimal maintenance. However, periodic checks are recommended:
- Visual Inspection: Regularly inspect the bracket, pulleys, and belt for any signs of wear, damage, or corrosion.
- Fastener Torque: Periodically check the torque of all mounting bolts to ensure they remain secure. Vibrations can sometimes loosen fasteners over time.
- Belt Condition: Inspect the serpentine belt for cracks, fraying, or excessive wear. Replace the belt if necessary.
- Pulley Bearings: Listen for any unusual noises from the idler or tensioner pulleys, which could indicate worn bearings.
7. Troubleshooting
This section addresses common issues that may arise during or after the installation of the A/C compressor bracket kit.
| Problem | Possible Cause | Solution |
|---|---|---|
| Belt squealing or slipping | Incorrect belt tension, worn belt, misaligned pulleys. | Check belt tensioner, inspect belt for wear and replace if needed, verify pulley alignment. |
| Difficulty installing belt | Incorrect belt length, tensioner not fully released. | Ensure correct belt length for your specific setup. Use a belt tensioner tool to fully release tension. |
| Bracket does not fit flush | Debris on mounting surface, incorrect crank pulley spacing. | Clean mounting surfaces thoroughly. Re-verify your LS crank pulley spacing (refer to Section 2). |
| Unusual noise from pulleys | Worn idler or tensioner pulley bearings. | Inspect and replace faulty pulleys. |
8. Specifications
Key specifications for the ICT Billet LS - Sanden 508 A/C Air Conditioner Compressor Bracket Kit (Model 551474-3):
- Manufacturer: ICT Billet
- Model Number: 551474-3
- Material: Aerospace Grade, USA Produced, Billet Aluminum
- Item Weight: 8.18 pounds
- Product Dimensions: 10.3 x 10.3 x 4.7 inches
- Exterior Finish: Metallic Finish
- Compatibility: LS series engines, Truck/SUV or LS3 L99 Camaro Crank Pulley, Sanden 508 A/C Compressor

Image 8.1: Technical drawing providing key dimensions and clearances for the 551474 Sanden 508 A/C Compressor Kit. All measurements are in inches.

Image 8.2: Another technical drawing showing different dimensional aspects of the 551474 Sanden 508 A/C Compressor Kit, useful for fitment planning. All measurements are in inches.
9. Warranty Information
ICT Billet products are manufactured to high standards. For specific warranty terms and conditions, please refer to the official ICT Billet website or contact their customer support directly. Typically, manufacturing defects are covered for a limited period from the date of purchase.
Keep your proof of purchase for any warranty claims.
10. Customer Support
If you have any questions regarding the installation, compatibility, or operation of your ICT Billet LS - Sanden 508 A/C Compressor Bracket Kit, please contact ICT Billet customer support.
- Manufacturer: ICT Billet
- Website: Visit the ICT Billet Store on Amazon (for general product information)
- For direct technical support, please visit the official ICT Billet website or contact them via the information provided with your product packaging.


