1. Introduction
This manual provides essential instructions for the safe and effective operation, maintenance, and troubleshooting of the Megger DLRO10HD NLS Digital Low Resistance Ohmmeter. The DLRO10HD NLS is a robust, portable instrument designed for measuring low resistance values in various electrical applications. It offers dual power capabilities and can deliver up to 10 Amperes of test current. Please read this manual thoroughly before using the instrument.
2. Safety Information
Always observe standard safety precautions when operating electrical test equipment. Failure to do so may result in injury or damage to the instrument.
- Ensure the instrument is in good working condition before use.
- Do not operate the ohmmeter in wet conditions or in the presence of explosive gases or dust.
- Always use appropriate test leads and accessories designed for the DLRO10HD NLS.
- Disconnect all power from the circuit under test before connecting or disconnecting test leads.
- Refer to local safety regulations and guidelines for electrical testing.
3. Instrument Overview
The Megger DLRO10HD NLS features a robust design suitable for field use. Below is an image highlighting the key components of the device.
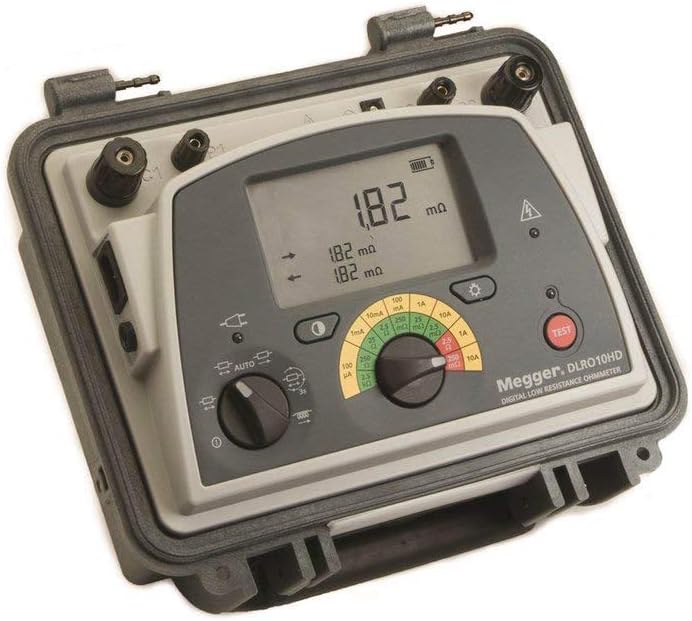
Figure 1: Front panel of the Megger DLRO10HD NLS. This image displays the main digital screen showing a resistance reading of 1.82 mΩ, along with secondary readings. Below the screen are the function selector dial, the test current range selector, and the red 'TEST' button. Four test lead terminals are visible at the top of the unit.
3.1 Key Components
- Digital Display: Main 5-digit display for resistance readings, with two secondary 5-digit displays.
- Function Selector: Dial to select measurement modes (e.g., Auto, Manual).
- Test Current Range Selector: Dial to choose the desired test current (e.g., 10mA, 100mA, 1A, 10A).
- TEST Button: Initiates a resistance measurement.
- Test Lead Terminals: Four terminals for connecting current and potential leads.
- Battery Indicator: Displays current battery charge level.
4. Setup and Preparation
4.1 Power Supply
The DLRO10HD NLS operates on a 6 V, 7Ah sealed lead-acid battery. Ensure the battery is adequately charged before use. The instrument can also be powered via an external AC supply for continuous operation and battery charging.
4.2 Connecting Test Leads
Connect the appropriate test leads (not included with the NLS model) to the four terminals on the top of the instrument. Ensure a secure connection for accurate measurements. The four-terminal (Kelvin) method is used to eliminate the resistance of the test leads from the measurement.
- Connect the current leads to the outer terminals.
- Connect the potential leads to the inner terminals.
- Attach the other ends of the test leads to the object under test, ensuring good contact.
5. Operating Instructions
5.1 Powering On and Off
To power on the instrument, rotate the function selector dial from the 'OFF' position to the desired measurement mode. To power off, rotate the dial back to 'OFF'.
5.2 Selecting Measurement Mode and Current
Use the function selector dial to choose between automatic or manual measurement modes. The test current range selector allows you to set the desired current for the test. The instrument is capable of delivering 10 A into measurements up to 250 mΩ and 1 A into measurements up to 2.5 Ω.
5.3 Performing a Resistance Test
- Ensure the test leads are correctly connected to the instrument and the object under test.
- Select the appropriate measurement mode and test current.
- Press and hold the red TEST button to initiate the measurement. The test duration can be up to 60 seconds for each test.
- The resistance value will be displayed on the main digital screen. Secondary displays may show additional information such as test current or voltage.
- Release the TEST button to end the measurement.
5.4 Interpreting Results
The main display shows the measured resistance in milliohms (mΩ) or ohms (Ω). Pay attention to the units displayed. The instrument's accuracy is specified with a temperature coefficient of less than 0.01% per °C, from 5 °C to 40 °C.
6. Maintenance
6.1 Cleaning
Clean the instrument's casing with a damp cloth and mild detergent. Do not use abrasive cleaners or solvents. Ensure no moisture enters the instrument.
6.2 Battery Care
To prolong battery life, recharge the 6 V, 7Ah sealed lead-acid battery regularly, especially after prolonged storage. Avoid fully discharging the battery. If the instrument will not be used for an extended period, store it with a partially charged battery and recharge periodically.
6.3 Storage
Store the DLRO10HD NLS in a cool, dry place, away from direct sunlight and extreme temperatures. Ensure the instrument is powered off before storage.
7. Troubleshooting
| Problem | Possible Cause | Solution |
|---|---|---|
| Instrument does not power on. | Discharged battery or power supply issue. | Charge the battery or connect to an external AC power source. Check power connections. |
| Inaccurate readings. | Poor test lead connections, incorrect mode/current selection, or damaged leads. | Ensure leads are securely connected. Verify correct mode and current range. Inspect leads for damage and replace if necessary. |
| "OVERLOAD" or "OL" displayed. | Resistance value exceeds selected range or open circuit. | Select a higher current range or check for an open circuit in the test object. |
| Instrument shuts down unexpectedly. | Low battery or internal fault. | Recharge the battery. If the problem persists, contact customer support. |
8. Specifications
- Model: DLRO10HD-NLS
- Measurement Type: Digital Low Resistance Ohmmeter
- Test Current Ranges: 10mA, 100mA, 1A, 10A (up to 250 mΩ at 10A, up to 2.5 Ω at 1A)
- Maximum Test Duration: 60 seconds per test
- Display: Main 5-digit + 2 x 5-digit secondary displays
- Power Source: 6 V, 7Ah sealed lead-acid battery (internal), or external AC supply
- Temperature Coefficient: < 0.01% per °C (from 5 °C to 40 °C)
- Maximum Altitude: 2000 m (6562 ft)
- Dimensions (L x W x H): Approximately 1 x 1 x 1 inches (Note: These dimensions may refer to packaging; actual unit size may vary.)
- Weight: Approximately 1 pound (Note: This weight may refer to packaging; actual unit weight may vary.)
9. Warranty Information
Megger products are manufactured to high standards and are warranted against defects in materials and workmanship. For specific warranty terms and conditions applicable to your DLRO10HD NLS, please refer to the warranty card included with your product or visit the official Megger website.
10. Customer Support
If you require technical assistance, service, or have questions regarding your Megger DLRO10HD NLS, please contact Megger customer support. Contact details can typically be found on the Megger official website or in the documentation supplied with your instrument.


