
Proster PDM-6000NCV
Proster 800A TRMS Auto Ranging Digital Clamp Multimeter User Manual
Model: PDM-6000NCV
Brand: Proster
1. Introduction
Thank you for choosing the Proster 800A TRMS Auto Ranging Digital Clamp Multimeter. This device is a professional, safe, and reliable measuring instrument designed for various electrical measurements including AC/DC voltage, AC/DC current, resistance, capacitance, frequency, temperature, diode, and continuity tests. It features True RMS measurement, auto-ranging, NCV (Non-Contact Voltage) detection, a large backlit LCD display, and an automatic power-off function for enhanced usability and safety. This manual provides detailed instructions for proper operation, maintenance, and troubleshooting.
2. Safety Information
Please read all safety warnings and operating instructions carefully before using this meter. Improper use of this meter can cause damage, shock, or serious injury. Always adhere to local and national safety codes.
- Do not exceed the maximum input value specified for each measurement range.
- Do not use the meter if it or the test leads appear damaged.
- Exercise extreme caution when working with voltages above 30V AC RMS, 42V peak, or 60V DC. These voltages pose a shock hazard.
- Always disconnect the test leads from the circuit before changing functions or ranges.
- Ensure the battery cover is securely closed before operation.
- Remove the batteries if the meter is not used for a long period.
3. Product Overview and Components

Image: The Proster Digital Clamp Multimeter shown with its included accessories: test leads (red and black), K-type thermocouple, alligator clips, screwdriver, and a soft carrying case.
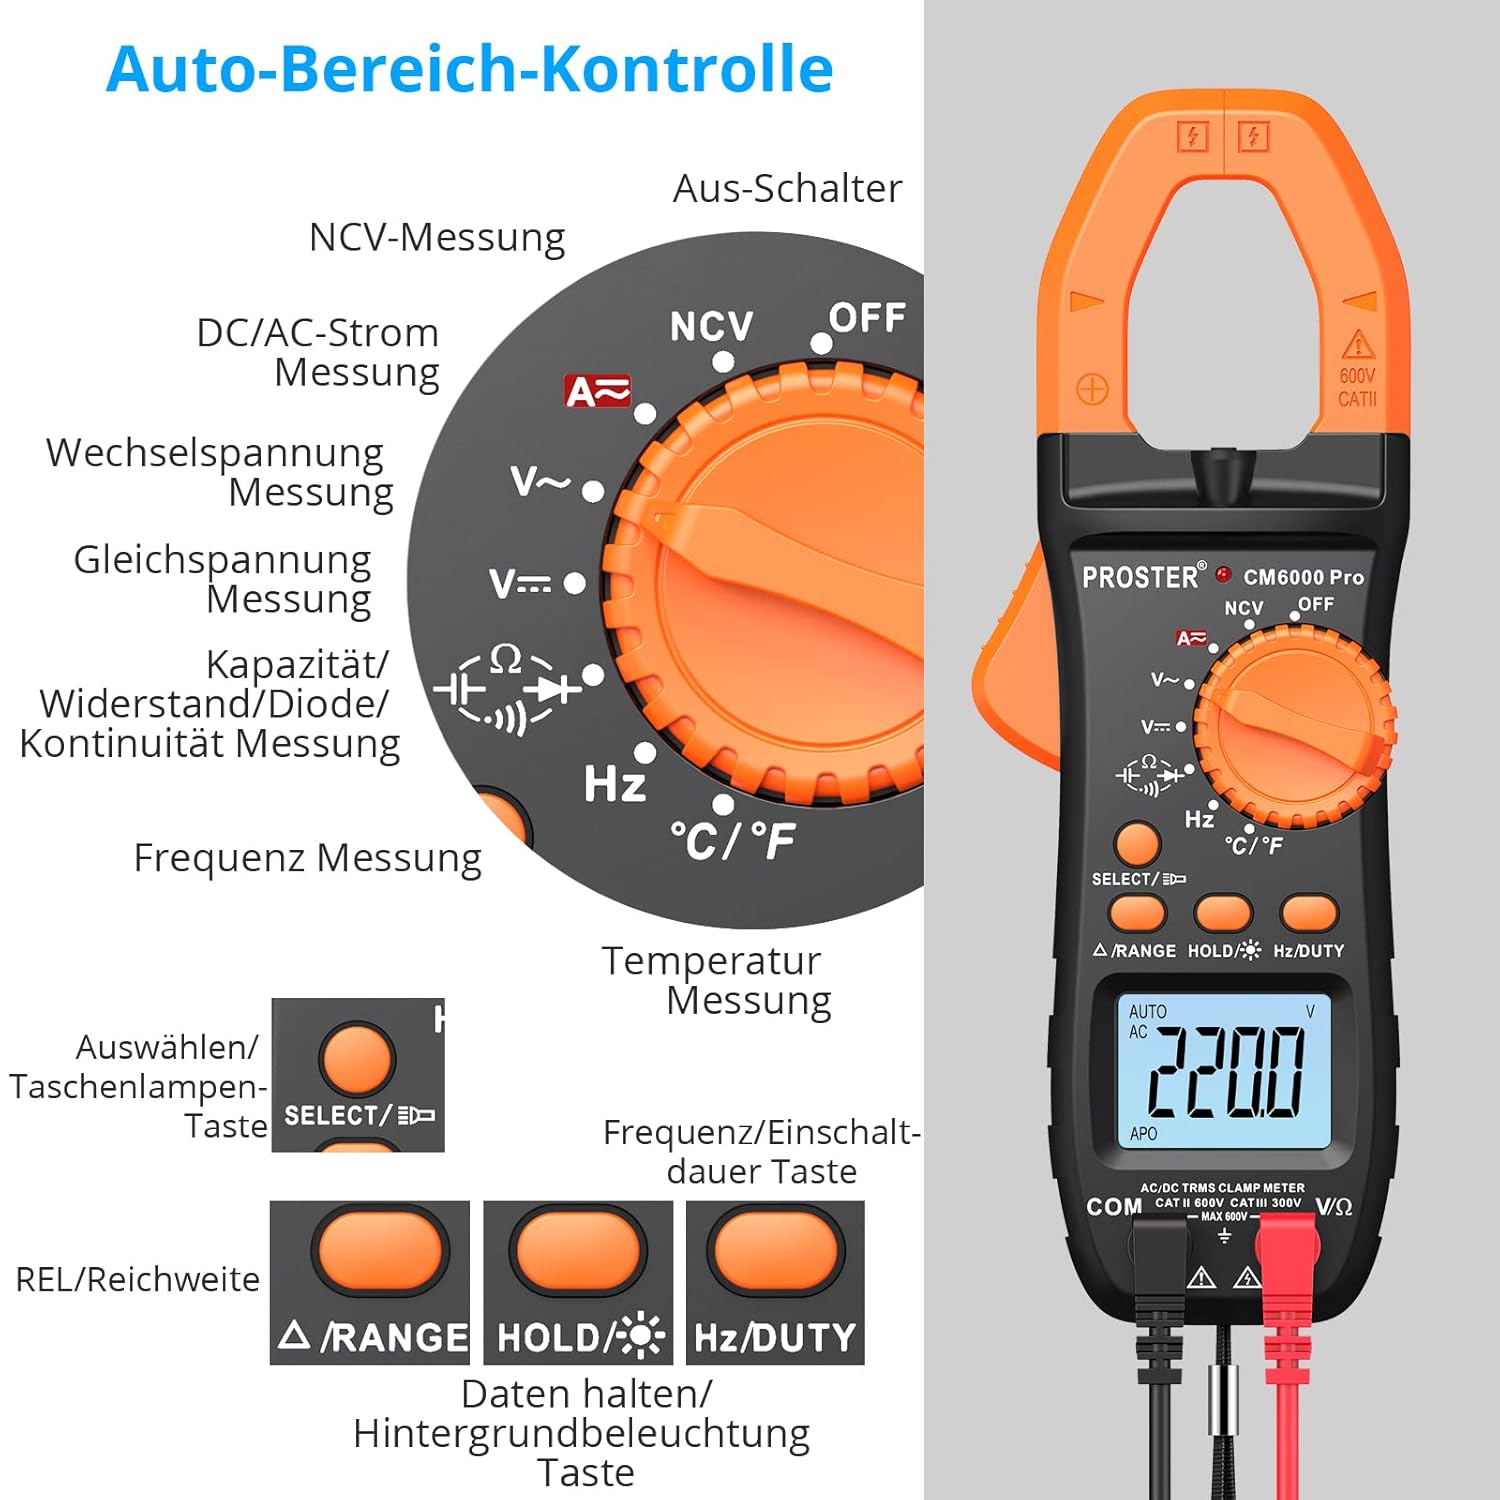
Image: A detailed diagram illustrating the various functions available on the rotary dial of the clamp multimeter, including NCV, AC/DC current, AC/DC voltage, capacitance, resistance, diode, continuity, frequency, and temperature measurement.

Image: Close-up views highlighting key features of the multimeter: the 28mm clamp jaw, the multi-function rotary switch, the clear LCD screen, and the connection points for the test leads.
Key Features:
- True RMS Measurement: Provides accurate readings for non-sinusoidal waveforms.
- Auto-Ranging: Automatically selects the appropriate measurement range.
- 6000 Counts Display: High resolution for precise measurements.
- Non-Contact Voltage (NCV) Detection: Safely detects AC voltage without direct contact.
- Large Backlit LCD Display: Improves visibility in low-light conditions.
- Clamp Measurement: Measures AC current up to 800A without breaking the circuit, with a 28mm jaw opening.
- Automatic Power Off: Conserves battery life after 15 minutes of inactivity.
- Data Hold Function: Freezes the displayed reading for easy recording.
- LED Light: Integrated light for illuminating dark work areas.
4. Setup
4.1 Battery Installation
The meter requires 2 AAA batteries (included). To install or replace batteries:
- Ensure the meter is turned OFF.
- Locate the battery compartment on the back of the meter.
- Use a screwdriver to loosen the screw on the battery cover and remove the cover.
- Insert the 2 AAA batteries, observing the correct polarity (+ and -) as indicated inside the compartment.
- Replace the battery cover and tighten the screw.
4.2 Connecting Test Leads
For most measurements (voltage, resistance, capacitance, frequency, diode, continuity, temperature), connect the test leads:
- Insert the black test lead into the "COM" (common) input jack.
- Insert the red test lead into the "VΩHz" input jack.
For current measurements using the clamp, no test leads are required.
5. Operating Instructions
5.1 Power On/Off
Turn the rotary switch from the "OFF" position to any desired measurement function to power on the meter. To power off, turn the rotary switch back to "OFF". The meter will automatically power off after 15 minutes of inactivity.
5.2 AC/DC Voltage Measurement (V∼ / V—)

Image: The multimeter displaying DC voltage (15.68V) and AC voltage (220.0V) measurements, demonstrating its capability for both types of voltage readings.
- Connect the test leads as described in Section 4.2.
- Turn the rotary switch to the "V∼" (AC Voltage) or "V—" (DC Voltage) position. The meter will automatically select the range.
- Touch the test probes to the circuit points where you want to measure the voltage.
- Read the voltage value on the LCD display.
5.3 AC/DC Current Measurement (A∼ / A—)

Image: The clamp multimeter measuring AC current on a cable inside a circuit breaker box, demonstrating its ease of use for non-invasive current measurement in tight spaces.

Image: The clamp multimeter measuring DC current from a power supply, showing the versatility of the clamp for both AC and DC current measurements.
- Turn the rotary switch to the "A∼" (AC Current) or "A—" (DC Current) position.
- Open the clamp jaws by pressing the trigger.
- Enclose only one conductor (wire) within the clamp jaws. Ensure the jaws are fully closed.
- Read the current value on the LCD display.
5.4 Resistance, Capacitance, Diode, Continuity Measurement (Ω •))) •|• •||)
- Connect the test leads as described in Section 4.2.
- Turn the rotary switch to the "Ω •))) •|• •||" position.
- Press the "SELECT" button to cycle through Resistance (Ω), Capacitance (•||), Diode (•|•), and Continuity (•))) functions.
- For Resistance: Connect the probes across the component.
- For Capacitance: Discharge the capacitor before connecting the probes.
- For Diode: Connect the red probe to the anode and the black probe to the cathode.
- For Continuity: Connect the probes across the circuit. A continuous beep indicates continuity.
5.5 Frequency Measurement (Hz)
- Connect the test leads as described in Section 4.2.
- Turn the rotary switch to the "Hz" position.
- Connect the test probes to the circuit where you want to measure frequency.
5.6 Temperature Measurement (°C/°F)

Image: The multimeter displaying a temperature reading (89 degrees) while a K-type thermocouple is immersed in a glass of water, illustrating its temperature measurement capability.
- Turn the rotary switch to the "°C/°F" position.
- Connect the K-type thermocouple to the input jacks, observing polarity.
- Place the thermocouple probe at the point where you want to measure the temperature.
- Press the "SELECT" button to switch between Celsius (°C) and Fahrenheit (°F).
5.7 Non-Contact Voltage (NCV) Detection

Image: The multimeter's NCV sensor detecting the presence of AC voltage near a wall outlet, with the display showing 'NCV' and signal strength indicators, highlighting its non-contact safety feature.
- Turn the rotary switch to the "NCV" position.
- Move the NCV sensor (located at the top of the clamp jaw) close to the conductor or power outlet.
- The meter will beep and the LED light will flash, with the display showing signal strength bars, indicating the presence of AC voltage.
5.8 Additional Functions
- HOLD Button: Press to freeze the current reading on the display. Press again to release.
- Backlight/LED Light Button: Press and hold to turn on/off the display backlight. A short press activates the LED work light.
- RANGE Button: In auto-ranging modes, press to switch to manual ranging. Press again to cycle through ranges. Press and hold to return to auto-ranging.
6. Maintenance
6.1 Cleaning
Wipe the meter with a damp cloth and mild detergent. Do not use abrasives or solvents. Keep the input terminals clean.
6.2 Storage
If the meter is not to be used for an extended period, remove the batteries to prevent leakage and corrosion. Store the meter in a cool, dry place, away from direct sunlight and extreme temperatures.
7. Troubleshooting
| Problem | Possible Cause | Solution |
|---|---|---|
| Meter does not power on | Dead or incorrectly installed batteries | Replace batteries, check polarity. |
| No reading or "OL" displayed | Overload, incorrect range, or open circuit | Check if the measured value exceeds the range. Ensure test leads are properly connected and the circuit is complete. |
| Inaccurate readings | Low battery, external interference, or dirty test leads/jacks | Replace batteries. Move away from strong electromagnetic fields. Clean test leads and input jacks. |
| Continuity buzzer not working | Open circuit or resistance too high | Ensure the circuit is closed and resistance is below the threshold for continuity. |
8. Specifications
| Parameter | Value |
|---|---|
| Model Number | PDM-6000NCV |
| Display Counts | 6000 Counts |
| AC/DC Current | Up to 800A |
| AC/DC Voltage | 600V Max |
| Resistance | 60MΩ Max |
| Capacitance | 40mF Max |
| Frequency | 10MHz Max |
| Temperature Range | -40°C to 1000°C (0°F to 1832°F) |
| Jaw Opening | 28mm |
| Power Source | 2 x AAA Batteries |
| Product Dimensions | 18.5 x 6.5 x 3.2 cm |
| Item Weight | 350 g |
| Material | ABS |
| Certification | CE |
9. What's Included
The package includes:
- Proster Digital Clamp Multimeter
- K-Type Thermocouple
- Test Leads (Red and Black)
- Alligator Clips
- Soft Carrying Case
- Screwdriver
- AAA Batteries (Pre-installed or separate)
10. Warranty and Support
Proster products typically come with a standard manufacturer's warranty. For specific warranty details, technical support, or service inquiries, please refer to the warranty card included with your product or visit the official Proster website. Keep your purchase receipt as proof of purchase for warranty claims.
For further assistance, you may contact Proster customer service through the contact information provided on their official website or the retailer from whom you purchased the product.
Related documentsPDM-6000NCV

Ask a question about this manual
Ask about setup, troubleshooting, compatibility, parts, safety, or missing instructions. Manuals+ will review the question and use this page’s manual context to help answer it.