
1. Introduction
This manual provides comprehensive instructions for the proper setup, operation, and maintenance of your Douk Audio Little Bear T7 Vacuum Tube Phono Preamplifier. Please read this manual thoroughly before using the device to ensure optimal performance and longevity.
2. Product Overview
The Douk Audio Little Bear T7 is a versatile audio component designed to function as both an MM (Moving Magnet) Turntable Preamplifier and a Hi-Fi Tube Pre-Amplifier. It incorporates 6J1 vacuum tubes to deliver a warm, rich audio signature, enhancing the listening experience for record players and other audio sources. Its compact design and robust aluminum chassis make it suitable for various home audio setups.

Image 2.1: Front view of the Little Bear T7 Preamplifier, showcasing the vacuum tubes and controls.
3. Features
- Functions as an MM Turntable Preamp or a Hi-Fi Tube Pre-Amplifier.
- Utilizes 6J1 vacuum tubes for a vintage warm sound. Tubes are replaceable with compatible types such as GE5654, 6AK5, EF95.
- Compact size for portability and integration into various audio environments.
- Durable aluminum body construction.
- External gain switch for convenient adjustment (35dB/40dB).
- Optimized circuit design for reduced noise levels.
4. Package Contents
- 1 x Douk Audio Little Bear T7 Preamplifier
- 1 x Power Supply (AC12~18V)
- 2 x 6J1 Tubes
5. Specifications
| Parameter | Value |
|---|---|
| Model Number | 6543849841 |
| Brand | Douk Audio |
| Product Dimensions (D x W x H) | 3.15" x 4.57" x 1.1" (80mm x 116mm x 28mm) |
| Item Weight | 8.5 ounces (0.24 Kg) |
| RIAA Freq Response | 20Hz-20kHz +/- 0.5dB |
| S/N Ratio (RIAA) | > 85dB |
| THD (RIAA) | < 0.05% |
| Input Sensitivity (RIAA) | 3.0mV |
| Gain (RIAA) | 40dB (Adjustable to 35dB) |
| Nominal / Max Output (RIAA) | 300mV / 1.8V |
| Output Impedance (RIAA) | 200 ohms |
| Input Impedance (RIAA) | 47k ohm / 220 pF |
| Input Voltage (AUX) | AC12 ~ 18V |
| Frequency Response (AUX) | 20 HZ - 20 KHZ |
| Input Sensitivity (AUX) | 300 mv |
| SNR (AUX) | 96 db |
| Total Harmonic Distortion (AUX) | <3% (1 KHZ) |
| Power Range Output (AUX) | 0.2 W |
| Output Impedance (AUX) | 100K |
| Input Impedance (AUX) | 50K |
6. Setup Instructions
6.1. Tube Installation
- Carefully unpack the two 6J1 vacuum tubes from their protective packaging.
- Align the pins of each tube with the corresponding holes in the tube sockets on the top of the preamplifier. Ensure the keyway on the tube base aligns with the slot in the socket.
- Gently but firmly push each tube straight down into its socket until it is fully seated. Avoid twisting or forcing the tubes.

Image 6.1: Close-up view of the tube sockets and the gain switch on the Little Bear T7.
6.2. Connecting Your Devices
Refer to the rear panel image below for connection points.
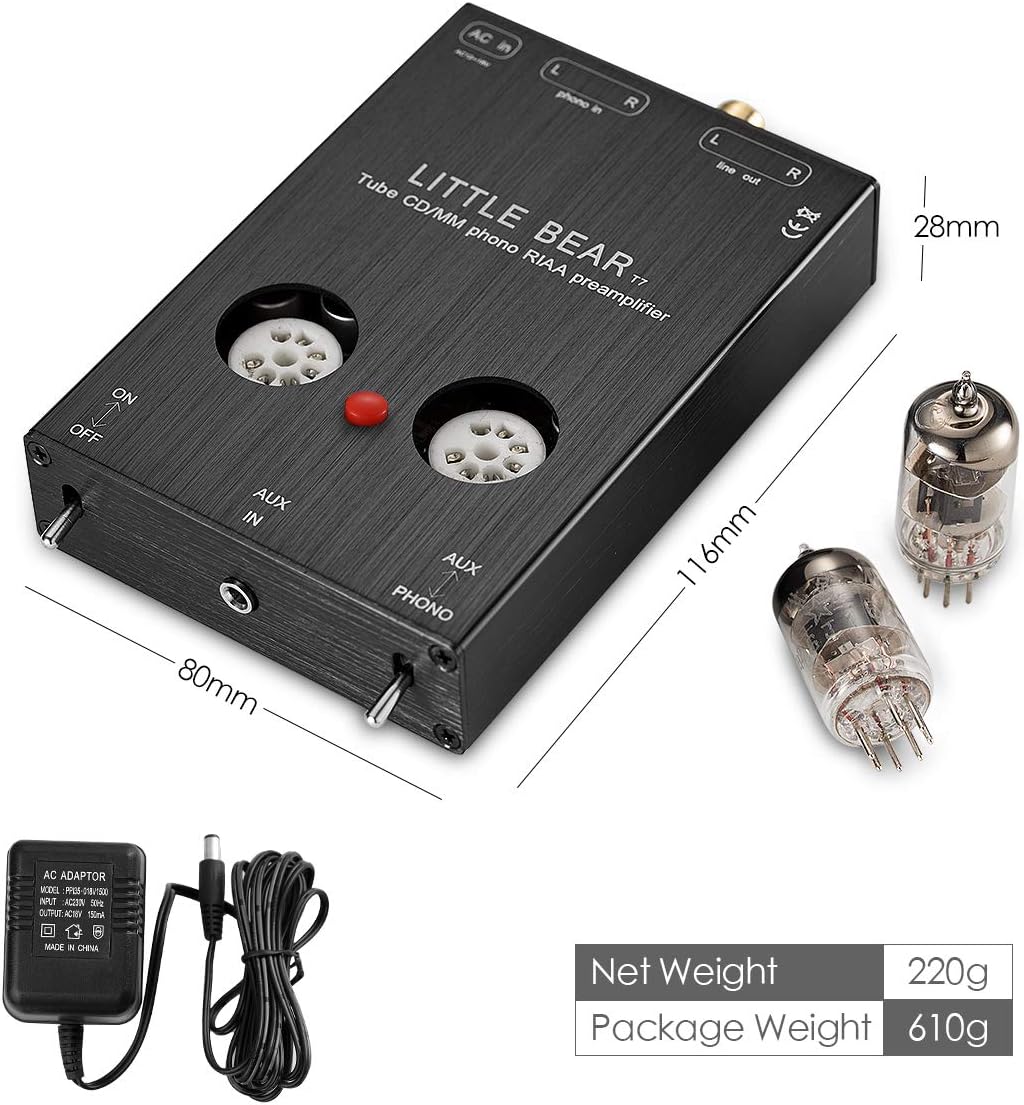
Image 6.2: Rear panel connections of the Little Bear T7 Preamplifier.
- Ground Connection: Connect the ground wire from your turntable to the GND jack on the rear of the T7. This connection is crucial for minimizing background noise. To connect, press the ground clamp, insert the ground wire, and release the clamp.
- Phono Input: Connect the RCA output cables from your MM turntable to the 'PHONO IN' (L/R) jacks on the rear of the T7. Ensure left (white) and right (red) channels are correctly matched.
- AUX Input: If using the T7 as a general Hi-Fi pre-amplifier for a non-turntable source (e.g., CD player), connect its RCA output to the 'AUX IN' (L/R) jacks on the rear.
- Line Output: Connect the 'LINE OUT' (L/R) jacks of the T7 to an available line-level input on your stereo amplifier, active speakers, or receiver. Do not connect to a phono input on your amplifier/receiver, as this will result in over-amplification and distortion.
- Power Connection: Connect the provided AC power adapter to the 'AC IN' port on the rear of the T7, then plug the adapter into a suitable wall outlet.
6.3. Gain Setting
The T7 features an external gain switch located between the tubes on the top panel. This switch allows you to select between 35dB and 40dB gain settings for the phono input. Adjust this setting based on your turntable's output and your desired volume level. Start with 35dB and switch to 40dB if more volume is needed, ensuring no distortion occurs.
6.4. Placement Considerations
For optimal performance and to minimize interference, place the Little Bear T7 away from devices that emit strong electromagnetic signals, such as cell phones, Wi-Fi routers, and power transformers.
7. Operating Instructions
7.1. Powering On/Off
Locate the 'ON/OFF' toggle switch on the front panel of the unit. Flip the switch to 'ON' to power on the preamplifier. The tubes will begin to glow. Flip the switch to 'OFF' to power down the unit.
7.2. Input Selection
The T7 has a toggle switch on the front panel to select between 'AUX IN' and 'PHONO IN'. Ensure this switch is set to the correct input corresponding to your active audio source.
7.3. Audio Playback
- Ensure all connections are secure and the unit is powered on.
- Select the appropriate input ('AUX' or 'PHONO') on the T7.
- Begin playback from your audio source (e.g., start your turntable).
- Adjust the volume on your connected amplifier, receiver, or active speakers. The T7 is a preamplifier and does not have its own volume control.
Allow a few minutes for the vacuum tubes to warm up for optimal sound quality. You may notice a slight change in sound as the tubes reach their operating temperature.
8. Maintenance
8.1. Cleaning
To clean the unit, power it off and disconnect it from the power source. Use a soft, dry cloth to wipe the exterior. Avoid using liquid cleaners or abrasive materials, as these can damage the finish or internal components.
8.2. Tube Replacement
The 6J1 vacuum tubes have a finite lifespan. If you notice a degradation in sound quality or if a tube fails, they can be replaced. Compatible tube types include GE5654, 6AK5, and EF95. Ensure the unit is powered off and unplugged before attempting to replace tubes. Carefully pull the old tubes straight out of their sockets and insert the new tubes as described in Section 6.1.
9. Troubleshooting
- No Sound:
- Check all cable connections (input, output, power).
- Ensure the T7 is powered on and the tubes are glowing.
- Verify the input selector switch on the T7 is set to the correct source (PHONO or AUX).
- Confirm your amplifier/receiver is set to the correct input connected to the T7.
- Check the volume level on your amplifier/receiver.
- Excessive Background Noise/Hum:
- Ensure the turntable's ground wire is securely connected to the T7's GND jack.
- Move the T7 away from other electronic devices that may cause interference (e.g., cell phones, Wi-Fi routers, power supplies).
- Check for loose or faulty RCA cables.
- If using an old MM cartridge, consider upgrading to a newer version, as some older cartridges may contribute to higher noise levels.
- Distorted Sound:
- Ensure the gain setting (35dB or 40dB) is appropriate for your turntable's output. If the sound is distorted at 40dB, try switching to 35dB.
- Verify that the T7's output is connected to a line-level input on your amplifier/receiver, not another phono input.
- Check the condition of your turntable's stylus and cartridge.
- Tubes Not Glowing:
- Ensure the unit is powered on and the power adapter is securely connected and receiving power.
- Check if the tubes are properly seated in their sockets.
- If tubes are old, they may need replacement.
10. Warranty and Support
For warranty information and technical support, please refer to the official Douk Audio website or contact your retailer. Keep your purchase receipt as proof of purchase.


