1. Product Overview
The TecTake Aluminium Side Awning is a versatile and retractable privacy screen designed for outdoor spaces such as balconies, patios, and gardens. It provides effective sunshade, UV protection, and rain resistance, while also serving as a privacy barrier and windbreak. Constructed from durable aluminium and polyester, this awning offers effortless operation and a modern aesthetic.

Image 1.1: The TecTake Aluminium Side Awning in its fully extended position, showcasing its beige fabric and grey aluminium frame. This image highlights the main components including the wall-mounted cassette and the pull-out post.

Image 1.2: The side awning installed on a patio, providing privacy and shade. The image shows the awning extended between a wall and a freestanding post, blending with outdoor furniture.
2. Safety Information
Please read all safety instructions carefully before installation and use. Failure to follow these instructions may result in injury or damage to the product.
- Ensure the mounting surface (wall or ground) is structurally sound and capable of supporting the awning's weight and tension.
- Use appropriate fasteners for your specific mounting surface. If unsure, consult a professional.
- Do not operate the awning in strong winds or severe weather conditions. Retract the awning to prevent damage.
- Keep children and pets away from the awning during operation to prevent entanglement or injury.
- Avoid applying excessive force when extending or retracting the awning.
- Regularly inspect all components for wear, damage, or loose connections.
3. Package Contents
Verify that all components are present and undamaged before beginning installation.
| Item | Quantity | Description |
|---|---|---|
| Side Awning Unit | 1 | Main retractable awning cassette with fabric. |
| End Post | 1 | Receiving post for the awning handle. |
| Installation Materials | Set | Includes screws, wall plugs, and washers for mounting. |
| Installation Instructions | 1 | This manual. |

Image 3.1: Visual representation of the awning's main components, including the wall-mounted cassette, the pull-out handle, the receiving end post, and the included mounting hardware (screws, wall plugs, washers).
4. Setup and Installation
The TecTake Side Awning is designed for user-friendly wall-mounted installation. Ensure you have the necessary tools (drill, level, measuring tape, screwdriver) before starting.
4.1 Choosing the Installation Location
- Select a flat, vertical wall surface for the main awning cassette.
- Determine the desired position for the end post, ensuring it is within 3 meters of the cassette and allows for full extension. The end post can be installed at any point up to 3 meters away.
- Ensure the ground where the end post will be secured is solid (e.g., concrete, sturdy decking). If installing on softer ground like tarmac, consider reinforcing with concrete for stability.
4.2 Mounting the Main Awning Cassette
- Hold the awning cassette against the wall at the desired height and mark the drilling points for the wall brackets.
- Drill holes using an appropriate drill bit for your wall type. Insert wall plugs if necessary.
- Securely attach the awning cassette to the wall using the provided screws. Ensure it is level and firmly fixed.
4.3 Installing the End Post
- Extend the awning fabric slightly to determine the exact position for the end post, ensuring the fabric will be taut when fully extended.
- Position the end post's base plate on the ground and mark the drilling points.
- Drill holes into the ground and secure the base plate using the provided screws. Ensure the post is vertical and stable.
- The end post's base plate is designed to be securely screwed to the ground, ensuring excellent stability.
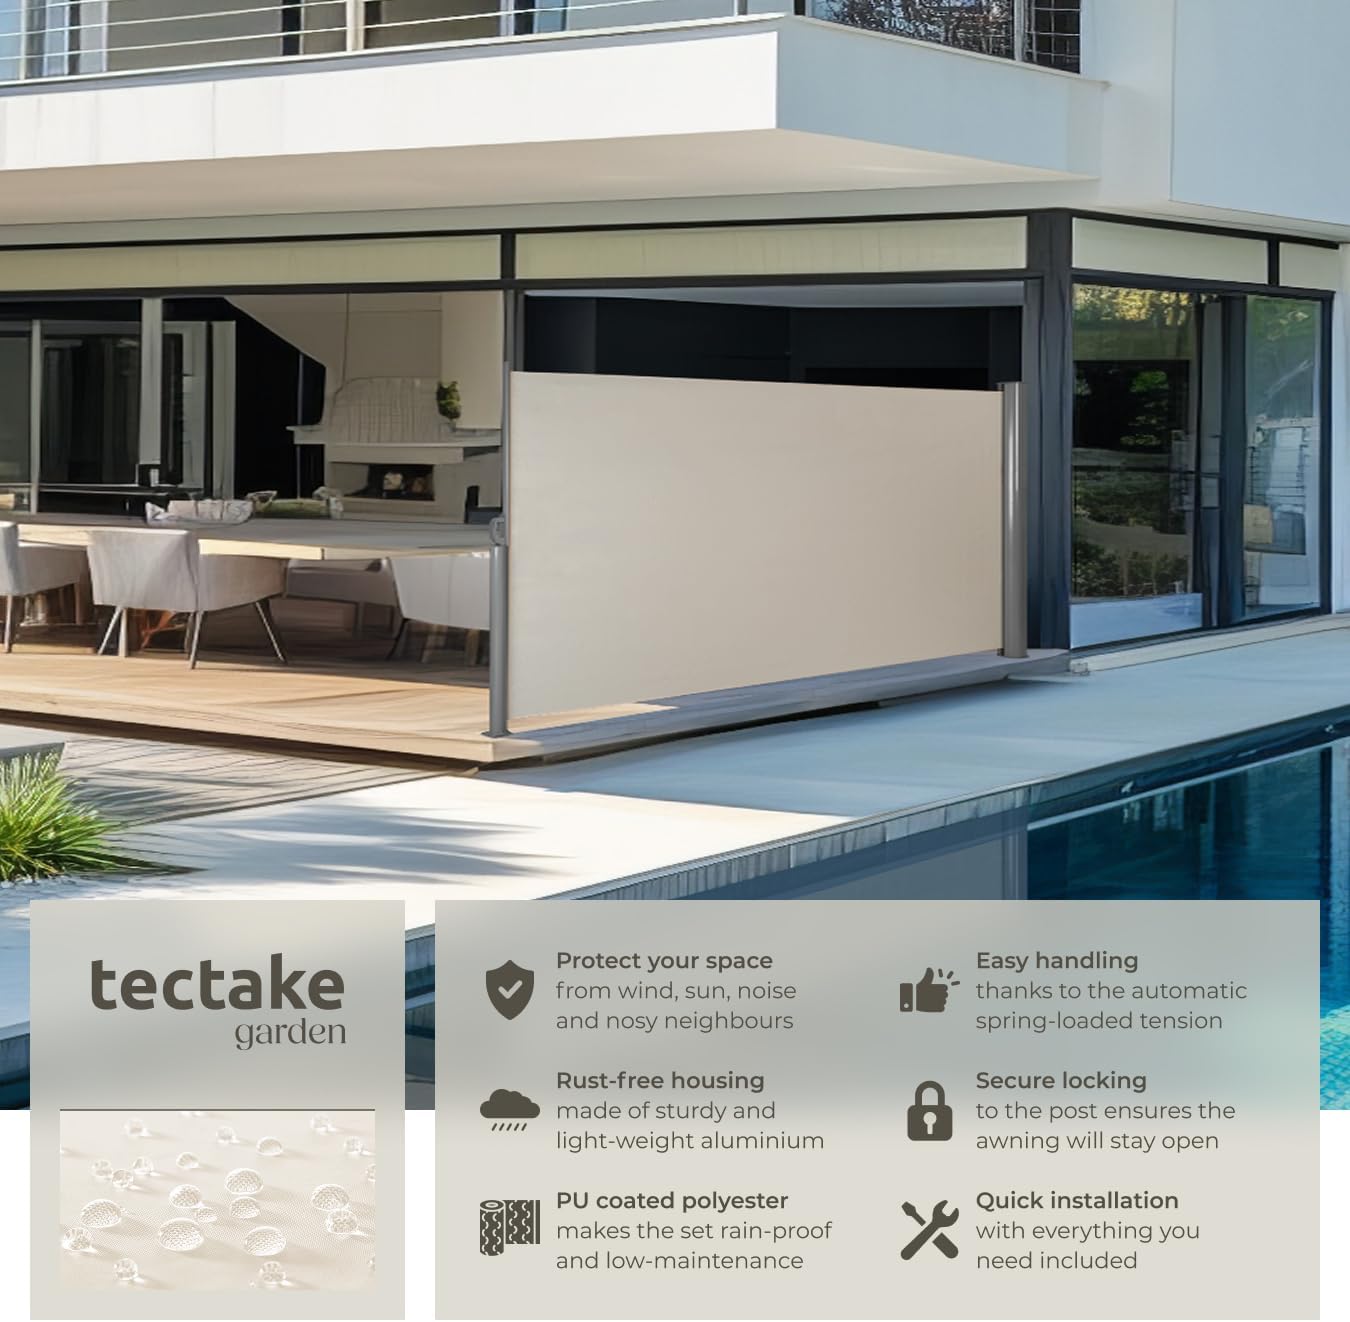
Image 4.1: The awning cassette mounted on a wall and the end post secured to the patio floor, demonstrating a typical installation scenario.

Image 4.2: Illustrates the adjustable nature of the setup, showing how the end post can be positioned at various distances from the main cassette, up to 3 meters, to suit different outdoor spaces.
5. Operating Instructions
The TecTake Side Awning features an automatic retraction mechanism for smooth operation.
5.1 Extending the Awning
- Grasp the ergonomic plastic handle firmly.
- Gently pull the handle horizontally outwards from the main cassette. The automatic spring-loaded tension will assist in the extension.
- Continue pulling until the handle reaches the end post.
- Align the handle with the locking mechanism on the end post and securely lock it into place using the sturdy pin. Ensure the awning fabric is taut.
5.2 Retracting the Awning
- Unlock the handle from the end post.
- Slowly guide the handle back towards the main cassette. The automatic retraction mechanism will smoothly pull the fabric back into the housing.
- Ensure the fabric rolls evenly into the cassette to prevent creasing or damage.

Image 5.1: Detailed view of the automatic retraction mechanism, the ergonomic handle with its locking pin, the solid base plate for the end post, and the water-repellent PU-coated polyester fabric.
6. Maintenance
Regular maintenance will prolong the life and appearance of your TecTake Side Awning.
- Cleaning the Fabric: The PU-coated polyester fabric is low-maintenance and water-repellent. Clean with a soft cloth, mild soap, and water. Rinse thoroughly and allow to air dry completely before retracting to prevent mildew.
- Cleaning the Frame: Wipe the aluminium frame with a damp cloth to remove dirt and debris. Avoid abrasive cleaners.
- Lubrication: Periodically check the retraction mechanism and moving parts. If operation becomes stiff, apply a silicone-based lubricant sparingly to the moving components.
- Inspection: Regularly inspect all screws, bolts, and mounting points for tightness. Tighten any loose fasteners. Check the fabric for tears or excessive wear.
- Winter Storage: While durable, it is recommended to keep the awning retracted during prolonged periods of harsh winter weather to protect it from heavy snow and ice accumulation.
7. Troubleshooting
| Problem | Possible Cause | Solution |
|---|---|---|
| Awning difficult to extend/retract (too much tension). | Spring tension is too high. | The spring tension is factory-set. If it feels excessively strong, ensure you are pulling the handle directly in line with the cassette and maintaining a consistent height. For significant tension issues, contact customer support for guidance on safe adjustment, as this can be dangerous if not done correctly. |
| Fabric sags or is not taut when extended. | End post not securely fixed or leaning; insufficient tension. | Ensure the end post's base plate is firmly secured to a solid surface. If the post leans, consider reinforcing its base with concrete or shimming the base plate to ensure it pulls to vertical when in use. Verify the handle is fully engaged and locked into the end post. |
| Fabric does not roll evenly into the cassette. | Uneven retraction; debris in cassette. | When retracting, guide the handle back slowly and maintain a level height. If the fabric rides up or down, pull it out slightly and re-guide it back into the cassette. Check the cassette for any obstructions. |
| Awning makes noise during operation. | Lack of lubrication; minor friction. | Apply a small amount of silicone-based lubricant to the moving parts of the retraction mechanism. Ensure the fabric is clean and free of debris. |
8. Specifications
| Feature | Detail |
|---|---|
| Model Number | 800289 |
| Dimensions (Open) | 300 cm (Length) x 160 cm (Height) |
| Housing Dimensions | 11 x 10 x 160 cm |
| Awning Fabric Dimensions | 279 x 147.5 cm |
| End Post Baseplate | 10 x 9 cm |
| End Post Diameter | 6 cm |
| Weight | 7 kg |
| Material | Clear coated aluminium, polyester with polyurethane coating, steel, ABS plastic |
| Colour | Beige |

Image 8.1: Diagram illustrating the key dimensions of the side awning when open, including the housing, fabric, and end post measurements.
9. Warranty and Support
TecTake products are manufactured to high-quality standards. For warranty information or technical support, please refer to your purchase documentation or contact TecTake customer service directly.
Contact Information:
- Please visit the official TecTake website for the most up-to-date contact details.
- When contacting support, please have your model number (800289) and purchase date ready.


