
1. Introduction
This manual provides detailed instructions for the installation, operation, and maintenance of your TDPRO 48V 1800W Brushless Electric Motor and Controller with Throttle Grip Set. This system is designed for various electric vehicles including e-bikes, scooters, go-karts, ATVs, mopeds, and motorized bicycles. Please read this manual thoroughly before installation and use to ensure proper function and safety.
Brushless motors offer several advantages over brushed motors, including:
- Reduced electrical and electromagnetic noise.
- Extended lifespan due to the absence of brushes, typically three times longer than brushed motors.
- Lower maintenance requirements as there are no brushes to replace.
- Higher power efficiency, consuming approximately one-third the power of brushed motors.
- Superior efficiency, typically 85-90% compared to 75-80% for brushed DC motors.
The primary difference between brushed and brushless direct current electric motors lies in how electric current is transferred. In a brushed motor, current is transferred mechanically via metallic brushes to a commutator. In contrast, a brushless motor's rotor is turned electronically, eliminating the need for physical contacts.
2. Product Overview
The TDPRO 48V 1800W Brushless Electric Motor and Controller with Throttle Grip Set includes the following components:
- 1 x 48V 1800W Brushless Electric Motor
- 1 x 48V Brushless Electric Controller
- 1 x Throttle Grip Set

The motor features a 9-tooth sprocket designed for T8F chains. The sprocket is replaceable, but the inner dimension of any new sprocket must be 8.5x10mm.

3. Setup and Installation
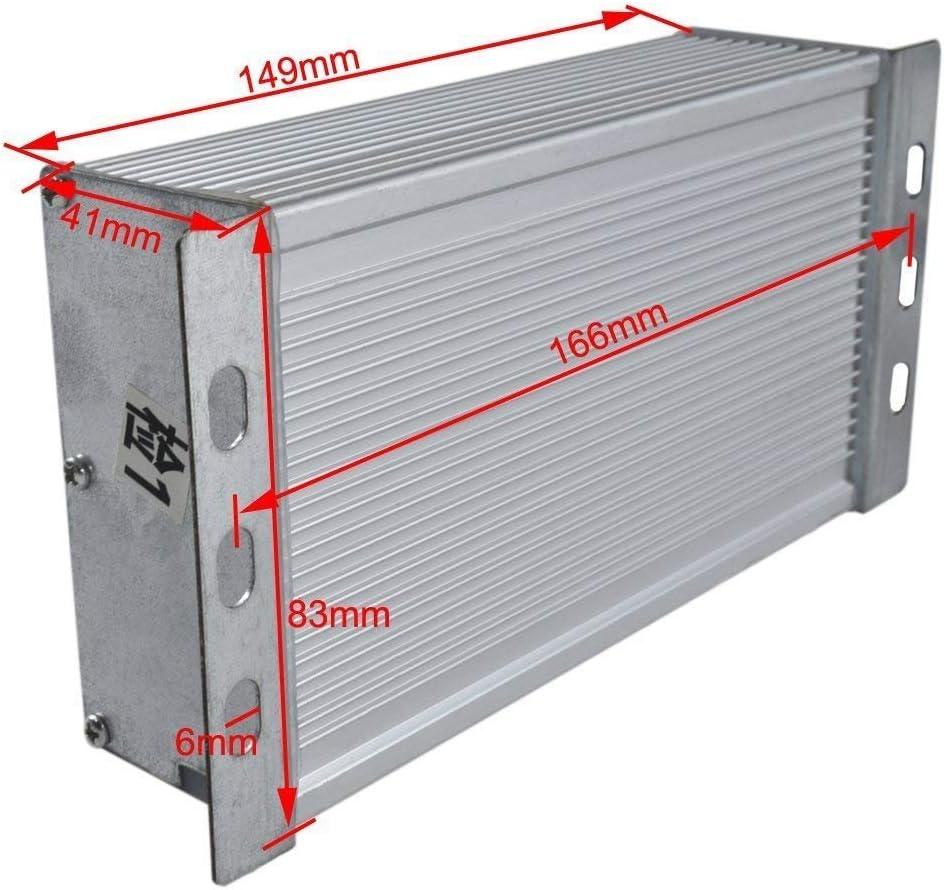
3.1 Component Dimensions
Refer to the following diagrams for the physical dimensions of the motor and controller, which are crucial for planning your installation.

3.2 Wiring Instructions
The controller requires connection of four essential cable groups for normal operation: Battery, Motor, Ignition Lock, and Throttle. Other functions are optional and can be connected based on your application needs.
Standard Wiring Connections:
- Battery: Thick Black (Power Negative) / Thick Red (Power Positive)
- Motor: Thick Yellow (Motor Negative) / Thick Blue (Motor Positive)
- Ignition Switch: Thin Red (VCC) / Thin Blue
- Indicator: Thin Red (Indicator power output) / Thin Black (Indicator negative)
- Brake: Thin Yellow (Brake signal) / Thin Black (Negative Power)
- Speed Governor (Throttle): Thin Blue (Speed handlebar Signal input) / Thin Black (Negative Power) / Thin Red (5V Positive Power)
- Charge Port: Thin Red (Charge input power Positive) / Thin Black (Power negative)
- Brake Light: Thin Red (Power Positive) / Thin Black (Power negative)


3.3 Sprocket Side Wiring Adjustment
Depending on whether the chain sprocket is on the left or right side of your vehicle, specific hall wire and phase wire connections may need adjustment.
- If the chain sprocket is on the left side of the bike:
- The blue hall wire and yellow hall wire should be swapped.
- The blue phase wire and green phase wire should be swapped.
- If the chain sprocket is on the right side of the bike:
- Connect all hall wires one by one with matching colors.
- Connect all phase wires one by one with matching colors.

4. Operation
Once all components are correctly installed and wired, ensure the battery is fully charged. Turn the ignition key (if installed) to the 'ON' position. The throttle grip controls the motor speed. Gently twist the throttle to engage the motor and control acceleration. Release the throttle to reduce speed or apply the brake to stop the vehicle.
5. Maintenance
Brushless motors are known for their low maintenance requirements. However, regular checks are recommended to ensure optimal performance and longevity:
- Wiring Inspection: Periodically check all wiring connections for tightness and signs of wear or damage. Secure any loose connections and replace damaged wires immediately.
- Motor Cleanliness: Keep the motor free from excessive dirt, dust, and debris. A clean motor dissipates heat more efficiently.
- Sprocket and Chain: Inspect the sprocket and chain for wear. Ensure the chain is properly tensioned and lubricated according to your vehicle's specifications.
- Controller Environment: Ensure the controller is mounted in a location that allows for adequate airflow and protection from moisture and physical impact.
6. Troubleshooting
If you encounter issues with your motor and controller set, consider the following basic troubleshooting steps:
- No Power: Check battery charge level and all battery connections. Verify the ignition switch is in the 'ON' position.
- Motor Not Responding: Inspect throttle grip connections and ensure they are secure. Check motor phase wire connections.
- Intermittent Operation: Examine all wiring for loose connections or damaged insulation. Ensure the controller is not overheating.
- Incorrect Sprocket Rotation: Refer to Section 3.3 for sprocket side wiring adjustments.
For complex issues or if basic troubleshooting does not resolve the problem, it is recommended to consult a qualified technician or contact TDPRO customer support.
7. Specifications
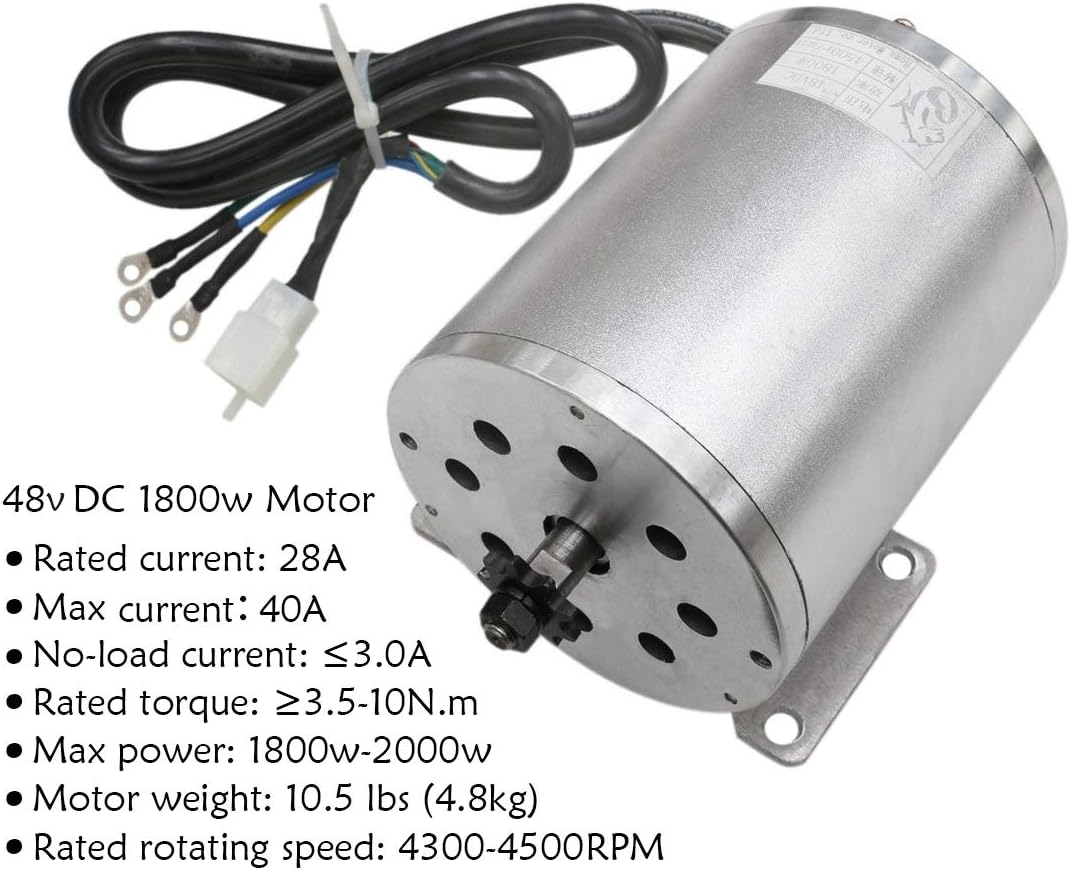
7.1 Brushless Electric Motor Specifications
| Feature | Specification |
|---|---|
| Voltage | 48V DC |
| Power | 1800W |
| Rated Current | 28A |
| Max Current | 40A |
| No-load Current | ≤3.0A |
| Rated Torque | ≥3.5-10N.m |
| Max Power | 1800W-2000W |
| Rated Speed | 4300-4500 RPM |
| Horsepower | 1.8 HP |
| Sprocket | 9-tooth (fits T8F chains) |
| Shaft OD | 12mm (0.47") |
| Material | Metal |
| Weight | 10.5 lbs (4.8 kg) |
7.2 Brushless Electric Controller Specifications
| Feature | Specification |
|---|---|
| Rated Voltage | 48V DC |
| Current Limit | 32A |
| Matching Motor | 48V DC 1800W |
| Conversion Efficiency | 95% |
8. Warranty and Support
For warranty information, technical support, or any inquiries regarding your TDPRO product, please contact the seller or manufacturer directly. Retain your proof of purchase for warranty claims.