
1. Product Overview
The VLIKE VL 2810 is a 3-channel wireless weather station designed to provide comprehensive environmental data. It displays indoor and outdoor temperature and humidity, barometric pressure, weather forecasts, and moon phases. The unit features a radio-controlled clock for accurate timekeeping and supports up to three external sensors for monitoring different locations.
- Displays indoor and outdoor temperature and humidity.
- Records minimum and maximum temperature and humidity readings.
- Barometric pressure display (inHg, mmHg, or hPa) with trend arrows.
- Weather forecast icon based on barometric pressure changes.
- DCF Radio Controlled Time and Date with automatic daylight saving adjustment.
- 12 or 24-hour display format and perpetual calendar.
- Temperature alert with snooze function, ice alarm, and low temperature alarm.
- Moon phase display.
- Supports up to 3 wireless outdoor sensors (one included).
- LED backlight with three brightness levels (HIGH/MIDDLE/OFF).
2. Package Contents
- 1x Display Console
- 1x Remote Sensor (Outdoor Sensor)
- 1x AC Power Adapter
- User Manual
3. Setup
3.1 Powering the Unit
The display console requires an AC power adapter for continuous backlight illumination. Batteries (3x AAA, not included) serve as a backup power source. When operating on battery power only, the backlight will illuminate for 5 seconds after a button press and then turn off to conserve energy.
The outdoor sensor requires 2x AA batteries (not included). Alkaline batteries are recommended for most climates, while lithium batteries are suitable for cold climates. Avoid using rechargeable batteries.
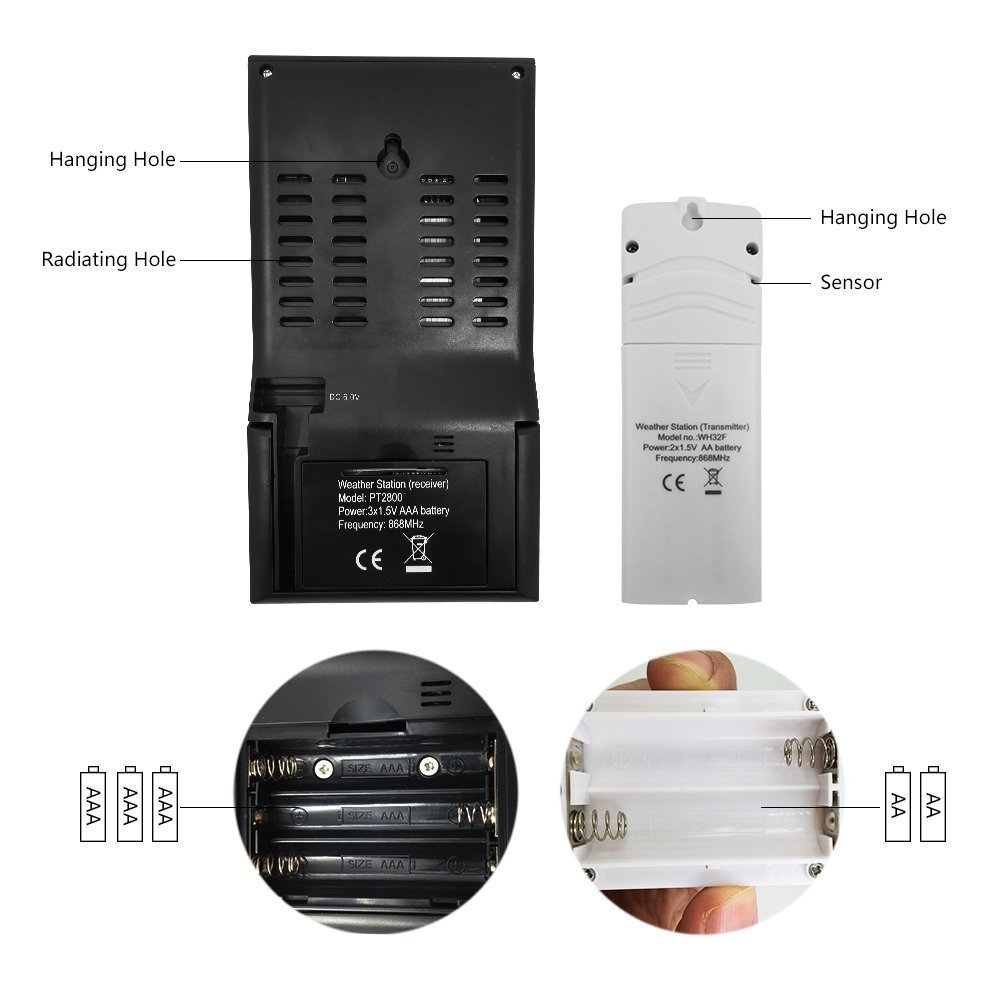
Image: Rear view of the display console and outdoor sensor, illustrating battery compartment access and hanging options. The console uses 3x AAA batteries, and the sensor uses 2x AA batteries.
3.2 Sensor Placement and Pairing
Place the outdoor sensor in a shaded area, protected from direct sunlight and precipitation, to ensure accurate readings. The sensor has a wireless transmission range of up to 300 feet (100 feet under most conditions) line-of-sight.
The weather station supports up to three outdoor sensors. The display console will automatically detect and pair with the sensor(s) upon initial power-up. If adding additional sensors, ensure they are powered on and within range.

Image: The weather station console showing synchronized instant reception from multiple outdoor sensors, illustrating how different channels can monitor various locations.
3.3 Initial Time and Date Setting
The weather station features a DCF radio-controlled clock. Upon initial setup, set your time zone. The unit will then automatically synchronize with the DCF signal to set the correct time and date, including automatic adjustment for daylight saving time. This process may take some time (up to 24 hours) to acquire the signal.
3.4 Calibration
The temperature, humidity, and barometric pressure values can be calibrated for increased accuracy. Refer to the detailed instructions in the full manual for specific calibration procedures. Allow approximately 30 days for barometric pressure calibration to achieve optimal forecast accuracy.
4. Operating Instructions
4.1 Display Overview
The main display console shows a variety of information:
- Time and Date: Radio-controlled time, day of the week, and date.
- Moon Phase: Graphical representation of the current moon phase.
- Weather Forecast: Icons indicating predicted weather conditions based on barometric pressure changes.
- Barometric Pressure: Current pressure reading with trend arrows.
- Outdoor Temperature & Humidity: Readings from the connected outdoor sensor(s), with min/max records and trend arrows.
- Indoor Temperature & Humidity: Readings from the console's internal sensors, with min/max records and trend arrows.

Image: The weather station display showing six color forecast icons that react to changes in barometric pressure, predicting weather for the next 12 hours.
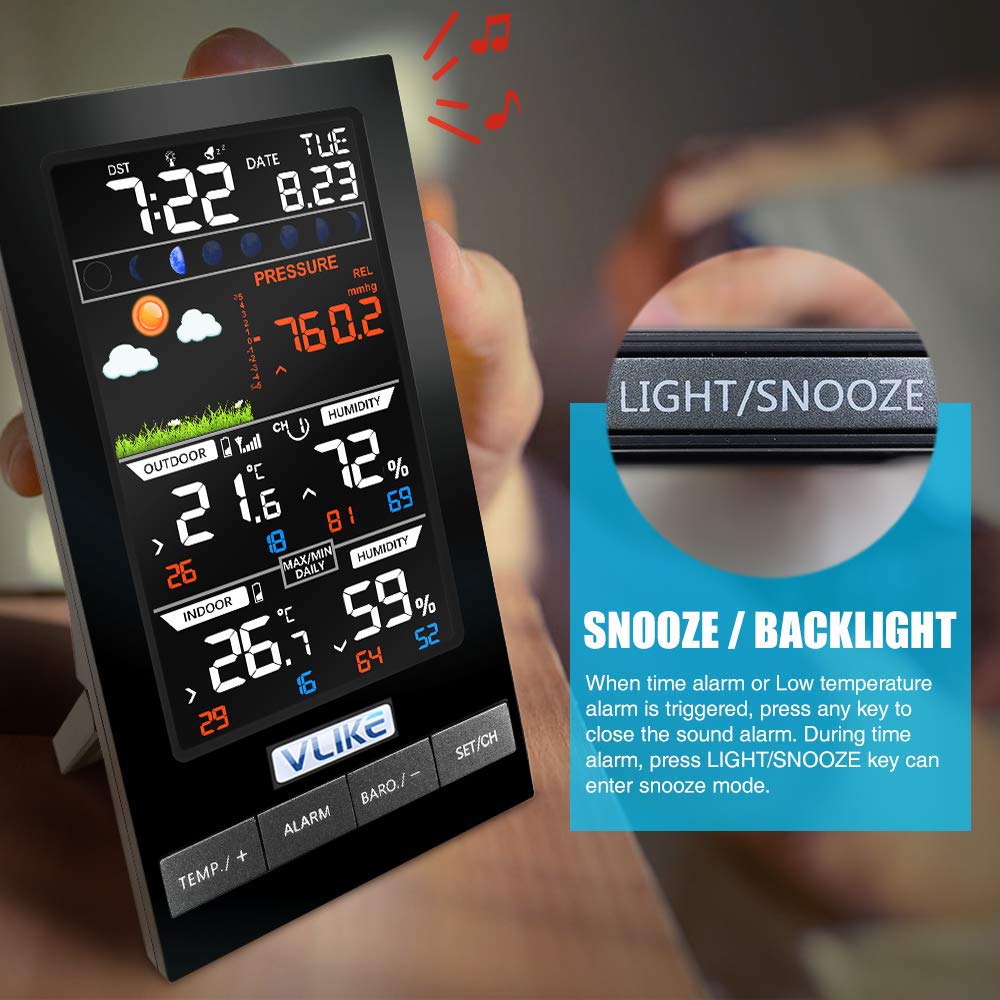
Image: The weather station display illustrating the moon phase feature, showing different lunar cycles.
4.2 Backlight Control
Press the LIGHT/SNOOZE button to adjust the backlight brightness. There are three levels: HIGH, MIDDLE, and OFF. This function is primarily active when the unit is powered by the AC adapter.

Image: The weather station display demonstrating the three brightness levels (OFF, LOW, HIGH) controlled by the LIGHT/SNOOZE button.
4.3 Alarm Functions
The weather station includes several alarm features:
- Time Alarm: Set a daily alarm. When triggered, press any button to silence, or press LIGHT/SNOOZE to activate snooze mode.
- Ice Alarm: An alert for freezing temperatures.
- Low Temperature Alarm: Customizable alarm for low temperature thresholds.

Image: The weather station display showing an active alarm and the function of the SNOOZE / BACKLIGHT button for silencing or entering snooze mode.
4.4 Min/Max Readings
The console automatically records the minimum and maximum indoor and outdoor temperature and humidity readings. These records can be reset daily at midnight or manually by the user.
5. Maintenance
5.1 Battery Replacement
Replace batteries in the display console (3x AAA) and outdoor sensor (2x AA) when the low battery indicator appears on the display. Ensure correct polarity when inserting new batteries.
5.2 Cleaning
Wipe the display console and sensor with a soft, damp cloth. Do not use abrasive cleaners or solvents, as these may damage the surfaces or electronic components.
5.3 Sensor Care
Periodically check the outdoor sensor for any debris or obstructions that might affect its readings. Ensure it remains protected from direct weather elements.
6. Troubleshooting
- No Display / Intermittent Display:
- Ensure the AC adapter is securely connected for continuous backlight.
- Check if batteries are correctly installed and not depleted.
- If running on batteries, the backlight turns off after 5 seconds to save power.
- Outdoor Sensor Not Connecting / Inaccurate Readings:
- Ensure the outdoor sensor has fresh batteries and is powered on.
- Verify the sensor is within the effective transmission range (up to 300 feet line-of-sight, less with obstructions).
- Reduce obstacles between the console and sensor.
- Relocate the sensor to a shaded, protected area away from direct sunlight or heat sources.
- Try re-pairing the sensor by removing and reinserting batteries in both the console and sensor, then power on the sensor first, followed by the console.
- Incorrect Time / Date:
- Ensure the correct time zone is set on the console.
- Allow sufficient time (up to 24 hours) for the DCF radio signal to be acquired.
- Avoid placing the unit near electronic devices that may cause interference.
- Inaccurate Barometric Pressure / Weather Forecast:
- Allow 30 days for the barometric pressure to self-calibrate for optimal forecast accuracy.
- Weather forecasts are based on barometric pressure changes and are approximately 70% accurate. They are not a substitute for official weather reports.
7. Specifications
| Model Number | VL 2810 |
| Dimensions (L x W x H) | 8.51 x 2.01 x 16 cm (Console) |
| Weight | 517.1 grams (Console) |
| Power Source (Console) | AC Adapter (included), 3x AAA Batteries (backup, not included) |
| Power Source (Sensor) | 2x AA Batteries (not included) |
| Wireless Frequency | 868 MHz |
| Wireless Range | Up to 300 feet (line-of-sight) |
| Temperature Accuracy | ±1 °C |
| Temperature Range (Outdoor) | -40 °C to 60 °C |
| Temperature Range (Indoor) | -9.9 °C to 60 °C |
| Humidity Range | 10% to 99% RH |
| Update Rate | 30 seconds |
| Special Features | Barometric pressure-based weather forecast, Moon phase, DCF radio-controlled time, Supports up to 3 external sensors |

Image: Dimensions of the VLIKE weather station display console and outdoor sensor.
8. Important Notes
- The product display is in English.
- Weather forecast accuracy is approximately 70% and is based on barometric pressure changes. It is advisable to consult official weather services for more precise forecasts.
- The backlight requires AC power for continuous illumination. Batteries are for backup only.