1. Introduction
The Godox XPro-C TTL Wireless Flash Trigger is designed for Canon EOS cameras, offering advanced control over various flash units. This trigger utilizes the Godox 2.4G wireless X system, enabling multi-channel triggering and stable signal transmission up to 100 meters. It supports E-TTL II autoflash, high-speed sync (HSS) up to 1/8000s, multi-flash, and manual flash modes.
Key features include a large LCD panel, five dedicated group buttons, and four function buttons for intuitive operation. The XPro-C also incorporates a TCM (TTL-Convert-Manual) transform function, magnification function, one-shoot & multi-shoot settings, group modeling lamp control, and group zooming. Firmware upgrades are supported via a Type-C USB port.
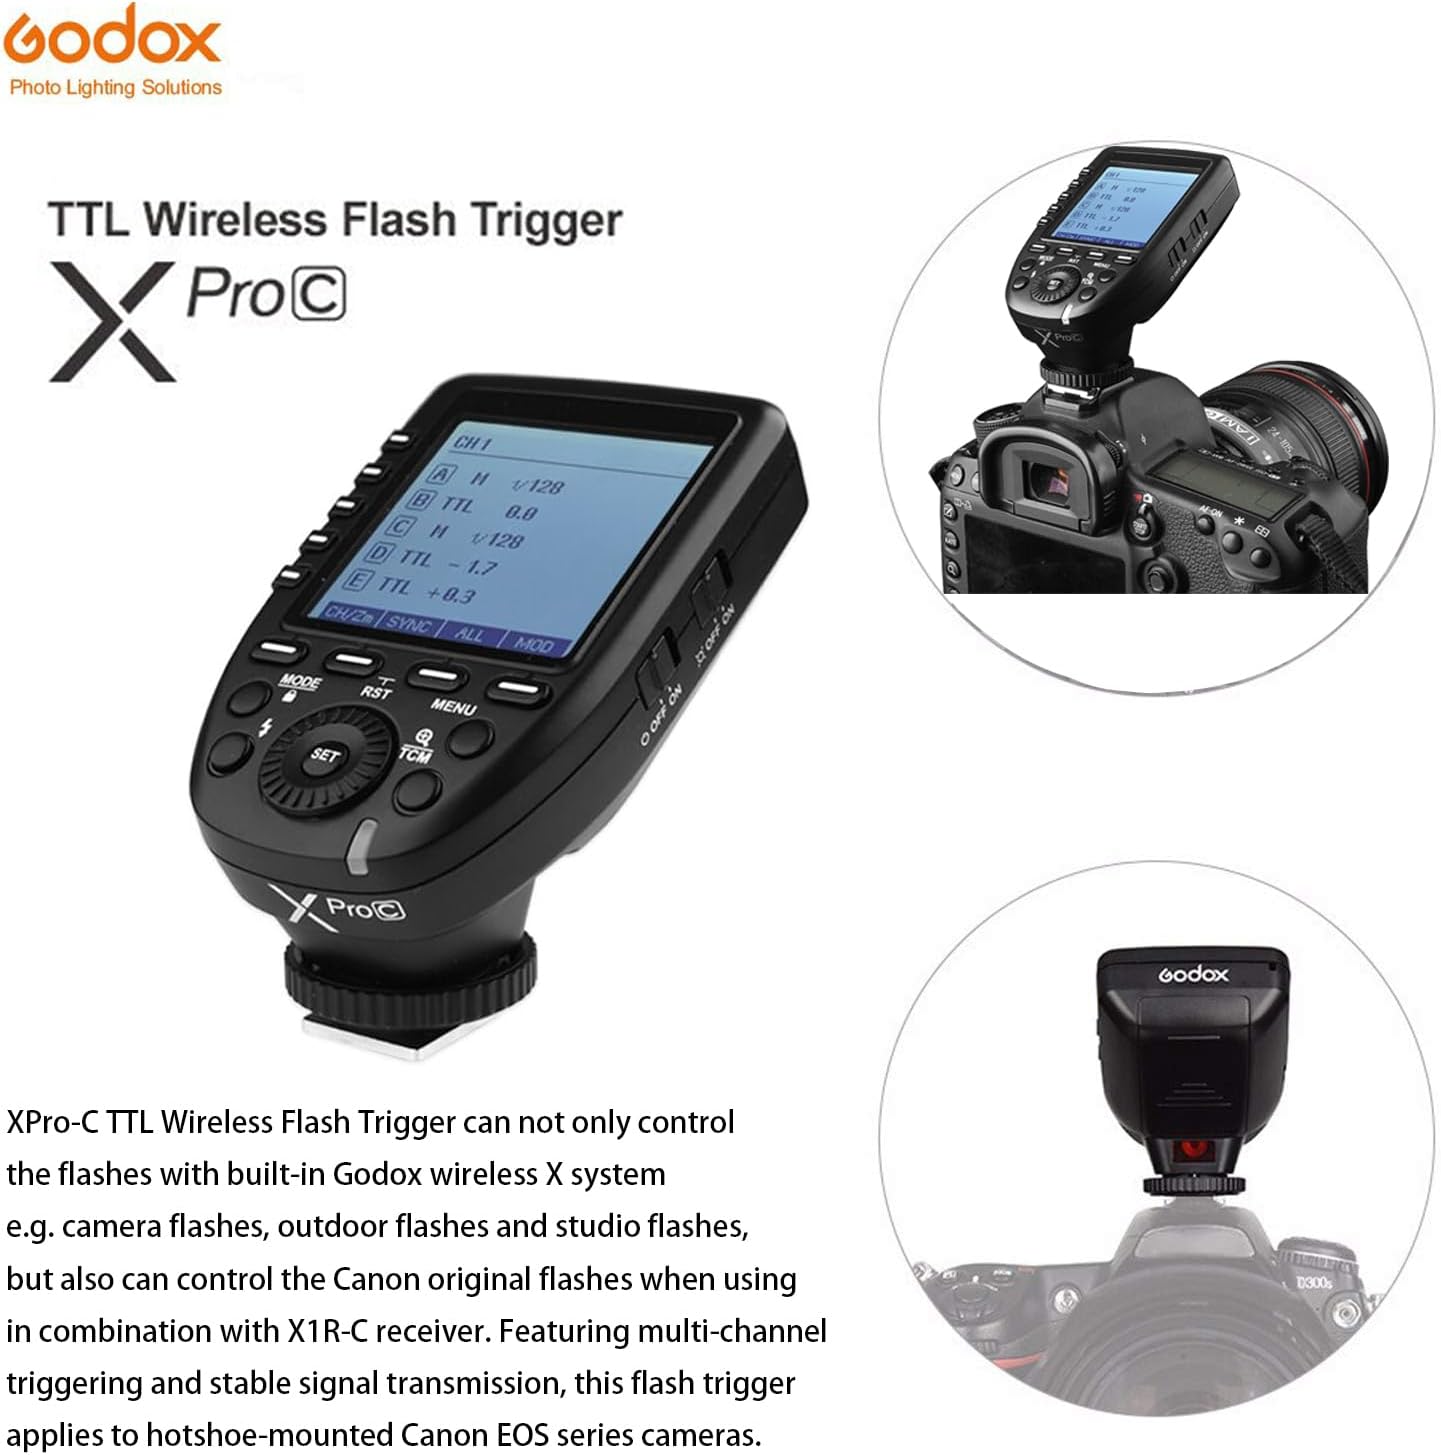
Figure 1.1: Godox XPro-C TTL Wireless Flash Trigger mounted on a Canon camera, showcasing its design and integration.
2. Setup
2.1 Battery Installation
The XPro-C requires two AA batteries for power. To install:
- Locate the battery compartment cover on the side of the unit.
- Slide the cover open.
- Insert two AA batteries, ensuring correct polarity (+/-).
- Close the battery compartment cover securely.

Figure 2.1: Side view of the Godox XPro-C, highlighting the battery compartment and Type-C USB port.
2.2 Mounting on Camera
To mount the XPro-C on your Canon camera:
- Slide the XPro-C's hotshoe foot into your camera's hotshoe.
- Rotate the locking ring clockwise until it is securely tightened.
2.3 Powering On/Off
Use the power switch located on the side of the unit to turn the XPro-C ON or OFF.
Video 2.1: Detailed operation and setup guide for the Godox XPro-C, demonstrating physical features and basic controls.
3. Operating Instructions
3.1 Interface Overview
The XPro-C features an extra-large LCD panel for clear display of settings. On the left side are five group selection buttons (A-E), and below the screen are four function buttons (MODE, RST, MENU, TCM) and a central SET button with a rotary dial.

Figure 3.1: Front view of the Godox XPro-C, illustrating the extra-large LCD panel, group buttons, and function buttons.
3.2 Group and Mode Selection
To control flash groups and modes:
- Select Group: Press one of the dedicated group buttons (A-E) on the left side to select a specific flash group.
- Select Mode: After selecting a group, press the MODE button to cycle through available flash modes: TTL, Manual (M), and OFF.
- Adjust Output/Compensation: Turn the rotary dial to adjust the flash output power (in Manual mode) or Flash Exposure Compensation (FEC) (in TTL mode). Press the SET button to confirm.
3.3 TCM Transform Function
The TCM (TTL-Convert-Manual) function allows you to quickly convert a TTL flash value into a manual power output. This is useful for maintaining consistent lighting when switching from TTL to manual mode.
- Activate TCM: Long press the TCM button for 2 seconds. The current TTL flash value will be transformed and displayed as a manual power output.
3.4 Zoom Setting
To adjust the flash zoom value:
- Enter Zoom Setting: Long press the function button 1 (CH/ZM) for 1-2 seconds.
- Adjust Zoom: Use the rotary dial to change the zoom value (e.g., AUTO, 24mm, 50mm, 80mm, 200mm). Press SET to confirm.
3.5 Channel and Wireless ID Settings
The XPro-C supports 16 groups and 32 channels for wireless control. Additionally, 01 to 99 wireless ID settings can be used to prevent signal interference.
- Set Channel: Short press function button 1 (CH/ZM) to enter channel selection. Use the rotary dial to select a channel (1-32) and press SET to confirm.
- Set Wireless ID: Access the custom function settings (C.Fn) via the MENU button. Navigate to the ID setting and use the rotary dial to select an ID (1-99) or turn it OFF.
3.6 Sync Modes
The XPro-C supports High-Speed Sync (HSS) and Second Curtain Sync.
- Select Sync Mode: Short press function button 2 (SYNC) to cycle through available sync modes.
3.7 Modeling Lamp Control
You can control the modeling lamps of compatible flashes directly from the XPro-C.
- Toggle All Modeling Lamps: Short press function button 4 (MOD) to turn all modeling lamps ON or OFF.
- Toggle Individual Group Modeling Lamps: Select a specific group (A-E) and then short press function button 4 (MOD) to toggle its modeling lamp.
3.8 Screen Lock
To prevent accidental changes to settings, you can lock the screen.
- Lock Screen: Long press the MODE button for 2 seconds.
- Unlock Screen: Long press the MODE button again for 2 seconds.
Video 3.1: Overview of the Godox XPro-C's features and basic operation, including button functions and screen display.
4. Maintenance
4.1 Firmware Upgrade
The XPro-C supports firmware upgrades via its Type-C USB port. This allows for improved functionality and compatibility updates.
- Connect the XPro-C to a computer using a Type-C USB cable.
- Visit the official Godox website to download the latest firmware and update instructions.
4.2 General Care
To ensure the longevity of your XPro-C:
- Keep the unit dry and clean. Avoid exposure to water or excessive humidity.
- Use a soft, dry cloth (like the included LETWING cloth) to clean the unit.
- Store in a cool, dry place when not in use.
- Remove batteries if storing for extended periods to prevent leakage.
5. Troubleshooting
5.1 Factory Reset
If you encounter persistent issues or wish to revert all settings to their default values:
- Long press the function buttons simultaneously for 2-3 seconds to restore factory defaults.
5.2 Common Issues
- Flash not triggering: Ensure the XPro-C is securely mounted, batteries are charged, and the flash unit is powered on and set to a compatible wireless mode (e.g., Godox X system slave mode). Verify channel and ID settings match between the trigger and flash.
- Inconsistent triggering: Check for environmental interference. Ensure the trigger and flash are within the effective transmission range (0-100m).
- Screen not responding: Try locking and unlocking the screen (long press MODE button). If unresponsive, remove and reinsert batteries.
6. Specifications
| Feature | Detail |
|---|---|
| Product Dimensions | 4.8 x 4.8 x 2.44 inches |
| Item Weight | 6.4 ounces |
| Power Supply | 2*AA batteries (not included) |
| Wireless System | Godox 2.4G Wireless X System |
| Transmission Range | Approx. 0-100m |
| Flash Sync Speed | Up to 1/8000s (HSS) |
| Flash Modes | TTL Autoflash, Manual Flash, Multi Flash |
| Flash Exposure Compensation | ±3 stops in 1/3 stop increments |
| Groups | 16 Groups (A-F, 0-9) or 5 Groups (A-E) |
| Channels | 32 Channels |
| Wireless ID Settings | 01-99 (for newer flashes) |
| Firmware Upgrade | Type-C USB port |
| Sync Cord Jack | 2.5mm |
7. Compatibility
7.1 Compatible Canon Camera Models
The Godox XPro-C is compatible with Canon EOS cameras that support E-TTL II autoflash and have a PC sync socket. Tested models include, but are not limited to:
- 1Dx Mark II, 1Dx, 5Ds/5Dsr, 5DIV, 5D Mark III, 5D Mark II, 5D
- 7D Mark II, 7D, 6D, 80D, 70D, 60D, 50D
- 500D, 450D, 400D Digital, 350D DIGITAL, 100D, 1200D, 1000D, 1100D
- M5, M3
For other Canon camera models, self-testing is recommended to confirm compatibility.
7.2 Compatible Godox Flashes and Receivers
The XPro-C can control flashes with built-in Godox wireless X system (e.g., camera flashes, outdoor flashes, studio flashes). It can also control Canon original flashes when used with an X1R-C receiver.
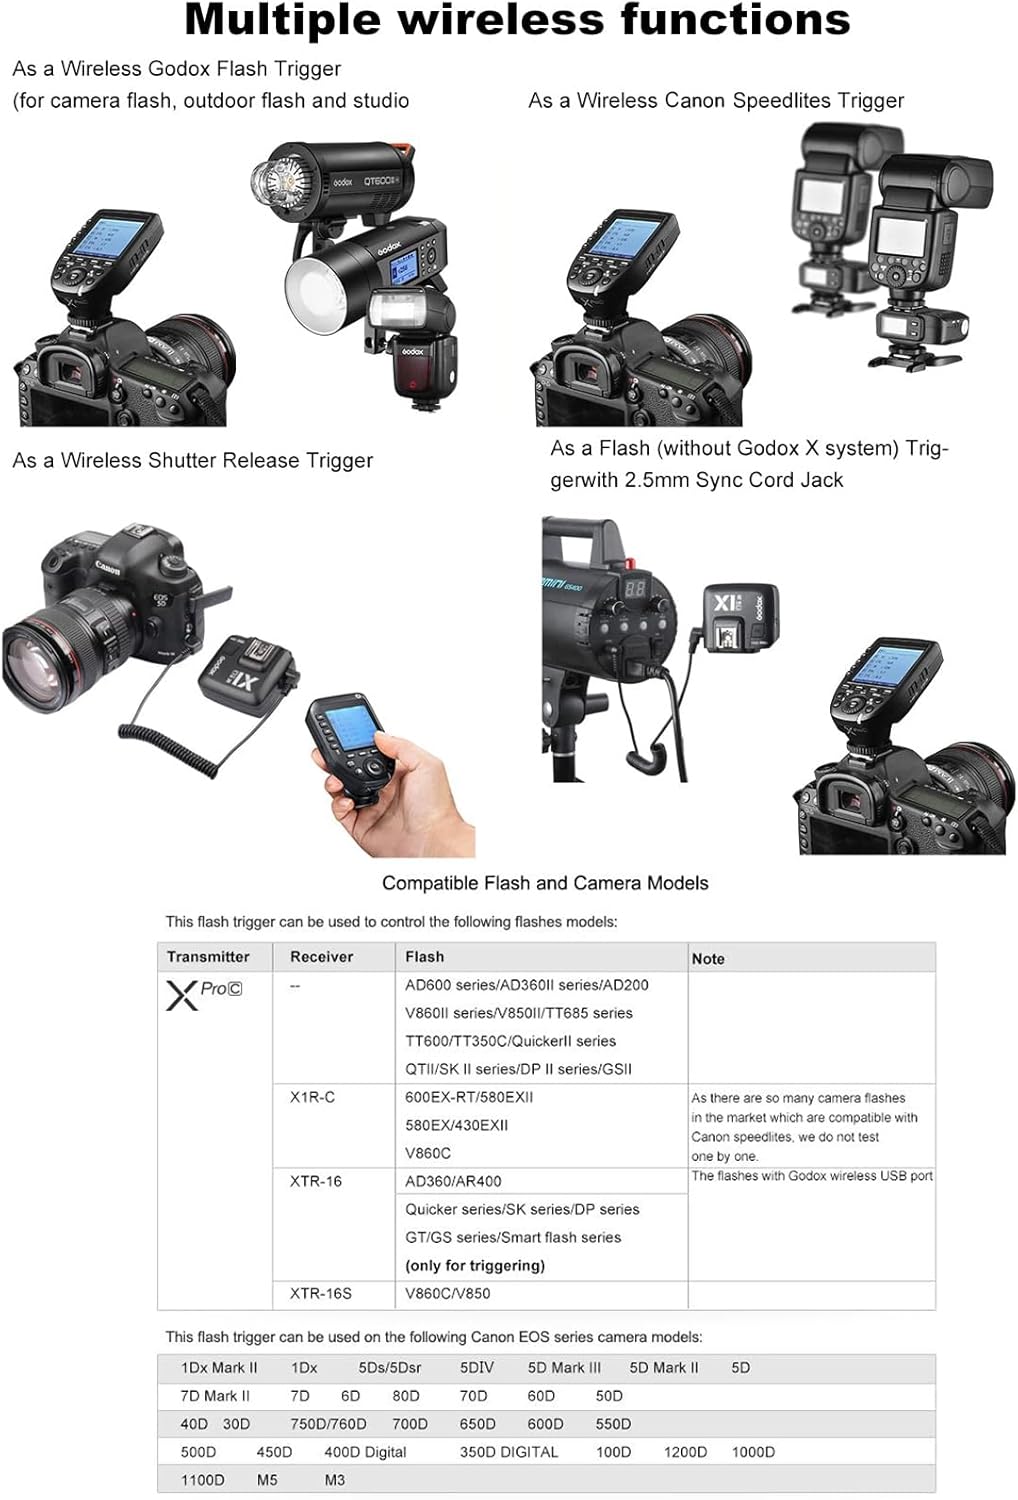
Figure 7.1: The Godox XPro-C trigger shown in a setup controlling multiple Godox flash units, demonstrating its versatility.
8. Warranty and Support
8.1 Warranty Information
Please refer to the warranty card included with your product for detailed warranty terms and conditions. Warranty coverage typically includes manufacturing defects for a specified period from the date of purchase.
8.2 Customer Support
For technical assistance, troubleshooting, or service inquiries, please contact Godox customer support through their official website or the contact information provided in your product packaging. Keep your purchase receipt and product serial number handy for faster service.


