1. Introduction
The Fortinet FortiGate-60E-POE is a compact, all-in-one network security appliance designed to deliver comprehensive threat protection for small to medium-sized businesses and branch offices. This device integrates multiple security functions, including firewall, VPN, intrusion prevention, antivirus, web filtering, and application control, into a single platform. The Power over Ethernet (PoE) capabilities simplify deployment for connected devices. This manual provides essential information for the proper installation, configuration, and maintenance of your FortiGate-60E-POE appliance.
2. Safety Information
Please read all safety instructions before operating the device. Failure to follow these instructions may result in electric shock, fire, or damage to the product. Keep this manual for future reference.
- Power Source: Use only the power adapter supplied with the device. Ensure the power outlet is properly grounded.
- Ventilation: Do not block any ventilation openings. Ensure adequate airflow around the device to prevent overheating.
- Environment: Operate the device in a dry, well-ventilated area, away from direct sunlight, heat sources, and moisture.
- Servicing: Do not attempt to service this product yourself. Refer all servicing to qualified service personnel.
3. Package Contents
Verify that your package contains the following items. If any item is missing or damaged, please contact your vendor.
- FortiGate-60E-POE Appliance
- Power Adapter
- Ethernet Cable
- Quick Start Guide
4. Product Overview
4.1 Front Panel
The front panel of the FortiGate-60E-POE features status indicators and network ports for connectivity and monitoring.

Figure 4.1: Front view of the FortiGate-60E-POE. This image displays the front panel of the FortiGate-60E-POE, featuring the Fortinet logo, model name, and various LED indicators. From left to right, the LEDs include PWR (Power), STATUS, HA (High Availability), and PoE status indicators (A and B). To the right are individual Link/Act and Speed LEDs for each of the network ports (A, B, 1-5, DMZ, WAN1, WAN2).
- PWR LED: Indicates power status. Green for normal operation.
- STATUS LED: Indicates system status.
- HA LED: Indicates High Availability status.
- PoE LEDs (A, B): Indicate Power over Ethernet status for respective ports.
- Link/Act LEDs: Indicate network link and activity for each port.
- Speed LEDs: Indicate connection speed for each port.
4.2 Rear Panel
The rear panel provides essential connectivity ports for power, console access, USB devices, and network interfaces.
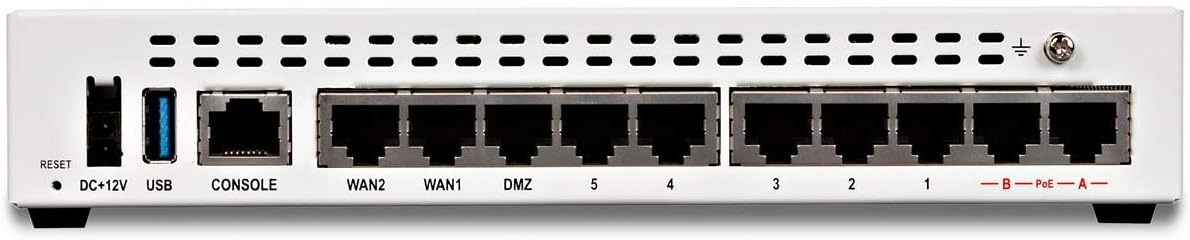
Figure 4.2: Rear view of the FortiGate-60E-POE. This image displays the rear panel of the FortiGate-60E-POE. From left to right, it shows a Reset button, DC+12V power input, a USB port, a CONSOLE port (RJ45), WAN2, WAN1, DMZ, and five LAN ports (1-5). On the far right, there are two PoE ports labeled A and B, and a grounding screw.
- RESET Button: Used to restore factory default settings.
- DC+12V: Power input connector.
- USB Port: For connecting USB devices (e.g., external storage, 3G/4G modem).
- CONSOLE Port: RJ45 port for command-line interface (CLI) access.
- WAN1/WAN2 Ports: Wide Area Network interfaces for internet connectivity.
- DMZ Port: Demilitarized Zone port for public-facing servers.
- LAN Ports (1-5): Local Area Network ports for internal network devices.
- PoE Ports (A, B): Power over Ethernet ports for compatible devices.
5. Setup
5.1 Physical Installation
- Placement: Place the FortiGate appliance on a stable, flat surface or mount it in a rack (if applicable, using a separately purchased rackmount kit). Ensure proper ventilation.
- Power Connection: Connect the supplied power adapter to the DC+12V port on the rear panel and then plug it into a grounded electrical outlet.
- Grounding: For optimal protection, connect a grounding wire to the grounding screw on the rear panel and to a suitable earth ground.
5.2 Initial Network Connection
- Connect to LAN: Connect an Ethernet cable from one of the LAN ports (e.g., port 1) on the FortiGate to your management computer.
- Connect to WAN: Connect an Ethernet cable from your internet service provider's modem or router to the WAN1 port on the FortiGate.
- Power On: Ensure the power adapter is connected and the device powers on. The PWR LED on the front panel should illuminate green.
5.3 Basic Configuration Access
You can access the FortiGate for initial configuration via a web browser (GUI) or the command-line interface (CLI).
- GUI Access: Open a web browser on your management computer and navigate to
https://192.168.1.99(default IP address). Log in with the default usernameadminand no password. - CLI Access: Connect a console cable from your computer's serial port to the CONSOLE port on the FortiGate. Use a terminal emulator (e.g., PuTTY) with settings: 9600 baud, 8 data bits, no parity, 1 stop bit, no flow control.
6. Operating
Once the initial setup is complete, you can configure the FortiGate-60E-POE to secure your network. The device operates as a Unified Threat Management (UTM) appliance, providing multiple layers of security.
- Firewall Policies: Configure rules to control incoming and outgoing network traffic.
- VPN: Set up Virtual Private Networks for secure remote access or site-to-site connectivity.
- Intrusion Prevention System (IPS): Protect against known exploits and vulnerabilities.
- Antivirus/Anti-malware: Scan traffic for malicious software.
- Web Filtering: Control access to websites based on categories or specific URLs.
- Application Control: Manage and monitor application usage on your network.
- PoE Functionality: The PoE ports (A, B) can power compatible devices such as IP phones or wireless access points, simplifying cabling.
For detailed configuration steps, refer to the FortiGate Administration Guide available on the Fortinet support website.
7. Maintenance
Regular maintenance ensures optimal performance and security of your FortiGate appliance.
- Firmware Updates: Regularly check for and apply the latest firmware updates from Fortinet to ensure you have the most current features and security patches.
- Configuration Backup: Periodically back up your FortiGate configuration. This allows for quick restoration in case of an issue.
- Monitoring: Monitor system logs and performance metrics to identify potential issues early.
- Cleaning: Keep the device free from dust. Use a soft, dry cloth to clean the exterior. Do not use liquid cleaners.
8. Troubleshooting
This section provides solutions to common issues you might encounter.
- No Power: If the PWR LED is off, ensure the power adapter is securely connected to both the device and a working electrical outlet.
- No Network Connectivity: Check Ethernet cable connections. Verify Link/Act LEDs are illuminated. Ensure correct IP configuration on your management computer.
- Cannot Access GUI: Verify your computer's IP address is in the same subnet as the FortiGate (e.g., 192.168.1.x). Try clearing your browser's cache or using a different browser.
- Forgot Password: If you forget the admin password, you may need to perform a factory reset using the RESET button or via the console port. Refer to the Fortinet documentation for the exact procedure.
- Slow Performance: Check system resource utilization (CPU, memory) via the GUI or CLI. Review firewall policies and security profiles for potential bottlenecks.
9. Specifications
| Feature | Specification |
|---|---|
| Brand | FORTINET |
| Model Number | FG-60E-POE-BDL-950-60 |
| Product Dimensions | 6.3 x 8.5 x 1.5 inches |
| Item Weight | 2.2 pounds |
| Special Feature | WPS (Wireless Protected Setup) |
| Compatible Devices | Laptop |
| Control Method | App |
| UPC | 739420810356, 609378724510 |
| Date First Available | September 13, 2017 |
10. Warranty and Support
Your FortiGate-60E-POE appliance includes a 5-year 24x7 FortiCare and FortiGuard Unified (UTM) Protection bundle, as indicated by the model FG-60E-POE-BDL-950-60. This bundle provides comprehensive support and security services.
- FortiCare: Offers technical support, hardware replacement, and firmware upgrades.
- FortiGuard: Provides real-time threat intelligence updates for services like antivirus, IPS, web filtering, and anti-spam.
For detailed warranty information, service terms, and to access technical support, please visit the official Fortinet support website: support.fortinet.com.


