1. Introduction
This manual provides detailed instructions for the safe and efficient operation of your SANSUI SMC-300BT Vacuum Tube Hybrid Amplifier CD Stereo System. Please read this manual thoroughly before using the product and retain it for future reference.

Figure 1.1: SANSUI SMC-300BT CD Stereo System. This image displays the main unit with its central display and control knobs, flanked by two matching speakers.
2. Product Features
The SANSUI SMC-300BT system integrates advanced audio technologies to deliver a superior listening experience:
- Hybrid Amplifier Design: Features a vacuum tube in the pre-amplifier's first stage, generating even-order harmonic distortion for a rich, warm, and natural sound. The second stage incorporates a digital power amplifier for dynamic, delicate, and powerful audio reproduction.
- Advanced Speaker Cone Technology: Utilizes a unique "double papermaking method" inspired by traditional Japanese paper. The speaker cone surface uses "Mitsumata" Japanese paper for clear mid-high frequencies, while the reverse side employs highly elastic pulp material for rich low frequencies.
- Multiple Playback Options: Supports CD, CD-R, CD-RW, CD-DA, MP3, and WMA formats.
- Wireless Connectivity: Built-in Bluetooth for seamless streaming from compatible devices.
- FM Tuner: Integrated FM tuner (76-108MHz) for radio reception.
- USB Playback: USB port for playing audio files from USB storage devices.
- External Audio Input: Two auxiliary input systems for connecting external audio sources.
- Output Power: 60 watts total audio output.

Figure 2.1: Feature icons illustrating the system's capabilities including vacuum tube hybrid amp, W-RPM speakers, 60W output, FM tuner, MP3/WMA player, CD, USB, Bluetooth, sleep/on timer, and external inputs.
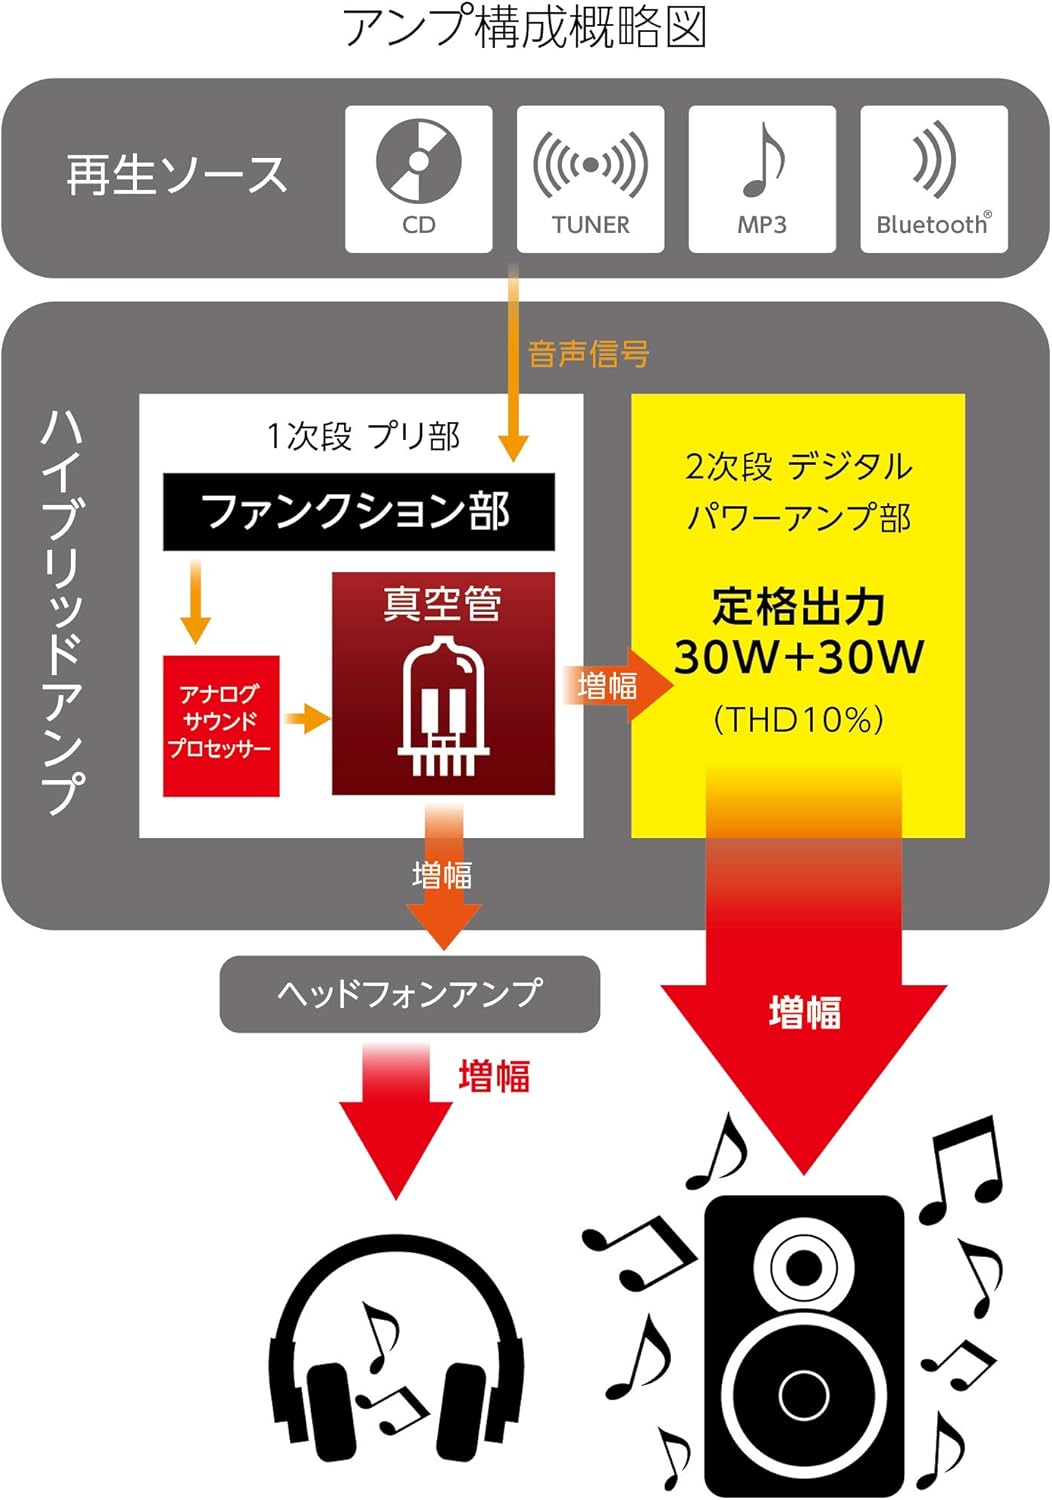
Figure 2.2: Amplifier Block Diagram. This diagram shows the signal flow from playback sources (CD, Tuner, MP3, Bluetooth) through the 1st stage pre-amplifier with vacuum tubes and analog sound processor, then to the 2nd stage digital power amplifier (30W+30W), and also to the headphone amplifier.
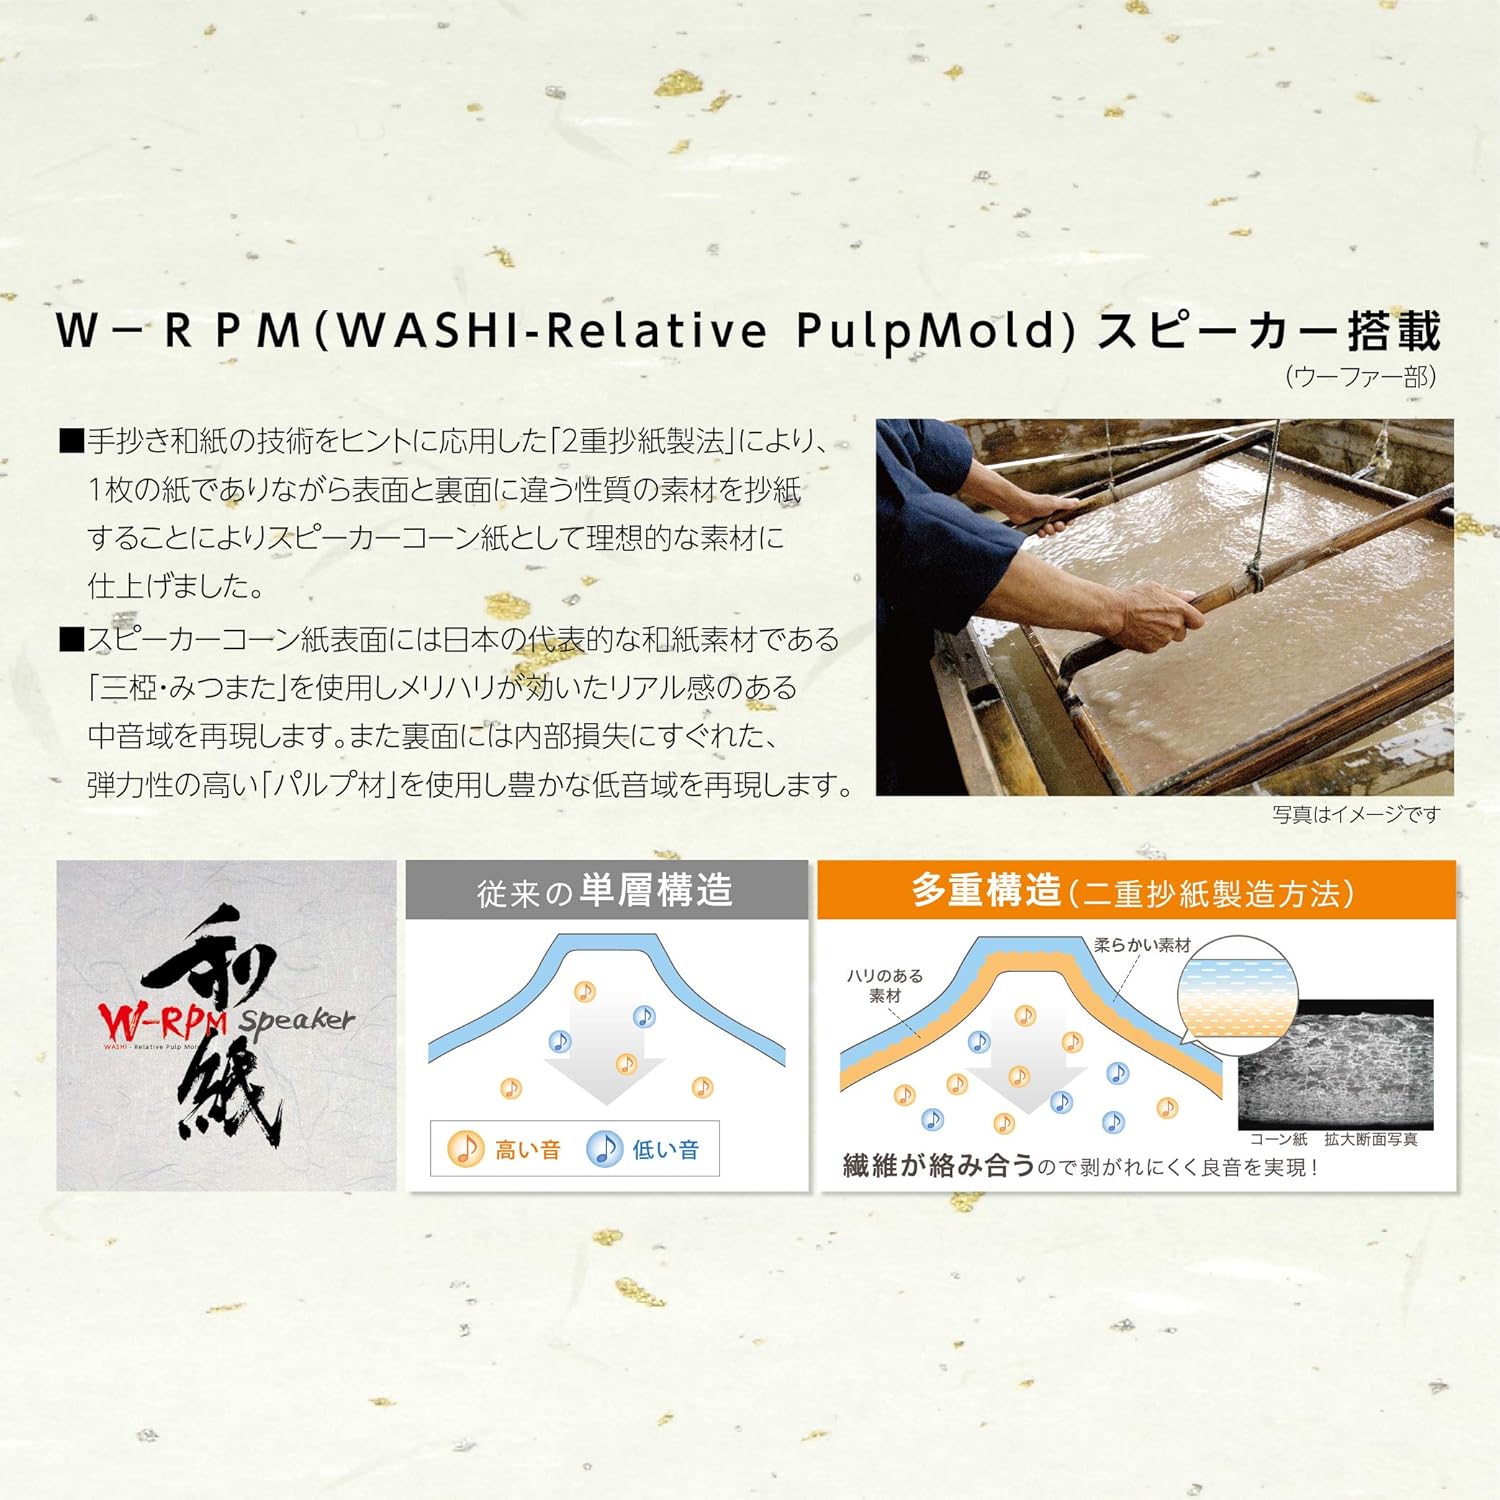
Figure 2.3: W-RPM (WASHI-Relative PulpMold) Speaker Technology. This image illustrates the double papermaking method for speaker cones, showing how different materials are used on the front (Mitsumata for mid-highs) and back (elastic pulp for lows) to achieve optimal sound reproduction, contrasting it with conventional single-layer structures.
3. Components and Controls
3.1 Package Contents
Verify that all items are present in the package:
- Main Unit (Amplifier/CD Player)
- Speakers (x2)
- Remote Control
- Power Cord
- FM Antenna
- User Manual
3.2 Front Panel Controls
The front panel provides access to essential functions:

Figure 3.1: Front Panel Controls. This close-up shows the central display indicating "NO DISC", the vacuum tubes glowing, and control buttons for Audio In, Power, Play/Pause, Skip, Bass, and Treble, along with Source and Volume knobs.
- SOURCE Knob: Selects the input source (CD, Tuner, Bluetooth, USB, Audio In).
- VOLUME Knob: Adjusts the overall volume level.
- AUDIO IN Button: Selects the external audio input.
- POWER Button: Turns the unit on or off.
- PLAY/PAUSE Button: Controls CD playback.
- SKIP Buttons (◀◀ / ▶▶): Skips tracks on CD or tunes radio stations.
- BASS Button: Adjusts bass levels.
- TREBLE Button: Adjusts treble levels.
- Display: Shows current status, track information, or radio frequency.
3.3 Rear Panel Connections
The rear panel houses all necessary connection ports:
- Speaker Terminals: Connect the left and right speakers.
- FM Antenna Input: Connect the supplied FM antenna.
- Audio Input (AUX IN): Connect external audio devices using RCA cables.
- Power Input: Connect the AC power cord.
4. Setup
4.1 Unpacking
Carefully remove all components from the packaging. Retain the packaging materials for potential future transport or service.
4.2 Speaker Connection
- Connect the speaker wires from the left speaker to the LEFT speaker terminals on the main unit. Ensure correct polarity (+ to + and - to -).
- Connect the speaker wires from the right speaker to the RIGHT speaker terminals on the main unit. Ensure correct polarity.
4.3 FM Antenna Connection
Connect the supplied FM antenna to the FM antenna input on the rear panel. Extend the antenna for optimal reception.
4.4 Power Connection
Connect the AC power cord to the power input on the rear panel of the main unit, then plug the other end into a wall outlet.
5. Operating Instructions
5.1 Basic Operation
- Press the POWER button to turn on the unit. Allow approximately 10 seconds for the vacuum tubes to warm up before sound is produced.
- Rotate the SOURCE knob to select your desired input source (CD, Tuner, Bluetooth, USB, Audio In).
- Adjust the volume using the VOLUME knob.
5.2 CD Playback
- Select "CD" as the source using the SOURCE knob.
- Insert a CD into the disc tray.
- Press the PLAY/PAUSE button to start playback.
- Use the SKIP buttons (◀◀ / ▶▶) to navigate between tracks.
5.3 FM Tuner Operation
- Select "TUNER" as the source using the SOURCE knob.
- Use the SKIP buttons (◀◀ / ▶▶) to manually tune to radio stations or perform an auto-scan (refer to remote control instructions for auto-scan).
5.4 Bluetooth Pairing and Playback
- Select "Bluetooth" as the source using the SOURCE knob. The display will indicate pairing mode.
- On your Bluetooth-enabled device, search for available devices and select "SMC-300BT".
- Once paired, you can play audio from your device through the stereo system.
5.5 USB Playback
- Insert a USB storage device containing MP3/WMA files into the USB port.
- Select "USB" as the source using the SOURCE knob.
- The system will automatically begin playing compatible audio files. Use the PLAY/PAUSE and SKIP buttons to control playback.
5.6 External Audio Input
- Connect your external audio device (e.g., smartphone, media player) to the AUDIO IN port on the front panel or the AUX IN ports on the rear panel.
- Select "Audio In" as the source using the AUDIO IN button or SOURCE knob.
- Control playback from your connected external device.
6. Maintenance
6.1 Cleaning
- Always disconnect the power cord before cleaning.
- Use a soft, dry cloth to wipe the exterior surfaces of the main unit and speakers.
- Do not use liquid cleaners, abrasive pads, or chemical solvents, as these may damage the finish.
6.2 Storage
If storing the unit for an extended period, disconnect it from the power supply and store it in a cool, dry place, away from direct sunlight and extreme temperatures.
7. Troubleshooting
Refer to the table below for common issues and their solutions:
| Problem | Possible Cause | Solution |
|---|---|---|
| No power | Power cord not connected; Power outlet faulty | Ensure power cord is securely plugged in; Try a different outlet. |
| No sound | Volume too low; Incorrect source selected; Speaker wires loose; Vacuum tubes not warmed up | Increase volume; Select correct source; Check speaker connections; Wait 10 seconds after power on. |
| CD not playing | Disc inserted incorrectly; Disc scratched/dirty; Incorrect format | Insert disc correctly; Clean or replace disc; Ensure disc is CD-DA, MP3, or WMA. |
| Bluetooth not connecting | Unit not in pairing mode; Device too far; Device already paired with another unit | Select Bluetooth source to enter pairing mode; Move device closer; Disconnect from other devices. |
| Poor FM reception | Antenna not extended; Interference | Extend and reposition the FM antenna; Move unit away from other electronic devices. |
If the problem persists after attempting these solutions, please contact customer support.
8. Specifications
Technical specifications for the SANSUI SMC-300BT:
| Feature | Specification |
|---|---|
| Brand | SANSUI |
| Model Number | SMC-300BT |
| Color | Brown |
| Audio Output | 60 Watts (Total) |
| Tuner Type | FM (76-108MHz) |
| Supported Audio Formats | CD, CD-R, CD-RW, CD-DA, MP3, WMA |
| Connectivity | Bluetooth, USB, 2x External Audio Input |
| Speaker Type | Stereo |
| Power Source | Corded Electric |
| Product Dimensions (W x D x H) | 57 cm x 25 cm x 25 cm |
| Item Weight | 7 kg |
| Wall Mount Compatible | Yes |
| Batteries Included/Required | No |
9. Warranty and Support
9.1 Warranty Information
This product is covered by a manufacturer's warranty. Please refer to the warranty card included in your package for specific terms, conditions, and duration. Keep your proof of purchase for warranty claims.
9.2 Customer Support
For technical assistance, service, or inquiries regarding your SANSUI SMC-300BT, please contact your local SANSUI authorized dealer or customer service center. Contact details can typically be found on the SANSUI official website or on the warranty card.


