Introduction
This manual provides comprehensive instructions for the LoraTap Wireless Remote Control E26 Light Socket. It covers product features, installation, operation, compatibility, maintenance, and troubleshooting to ensure safe and efficient use of your device.

Figure 1: LoraTap Wireless Remote Control E26 Light Socket and Remote.
Product Overview
Key Features:
- Long Range & Magnetic Base: Offers wireless control up to 100ft (30m) indoors and 656ft (200m) outdoors. The remote control features a magnetic base for mountable and movable placement without wall damage.
- Broad Bulb Compatibility: Works with most E26 bulbs including LED, Smart, CFL, Fluorescent, and Corn Light bulbs. Not compatible with Incandescent, Halogen, or Tungsten bulbs.
- Easy Installation & Non-Interference: Simply screw the adapter between the lamp holder and the bulb. Multiple kits can be used in one room without signal interference.
- User-Friendly: Pre-paired at the factory for immediate use, requiring no app. Ideal for elderly individuals, children, and those with limited mobility.
- Memory Function: Remembers the previous ON/OFF state after a power restoration, ensuring energy efficiency.
What's in the Box:
- 1x LoraTap Wireless Remote Control E26 Light Socket
- 1x Wireless Remote Control (with 1 CR2 battery included)
Safety Information
To prevent damage to the light socket and ensure safe operation, this device cannot be used with Incandescent, Halogen, or Tungsten bulbs.
Setup and Installation
- Install the Light Socket: Screw the LoraTap E26 light socket into your existing E26 lamp holder.
- Install the Bulb: Screw your compatible E26 bulb (LED, Smart, CFL, Fluorescent, Corn Light) into the LoraTap E26 light socket.
- Remote Pairing (Pre-paired from factory): The remote and socket are pre-paired for immediate use. If re-pairing is needed, refer to the video below.
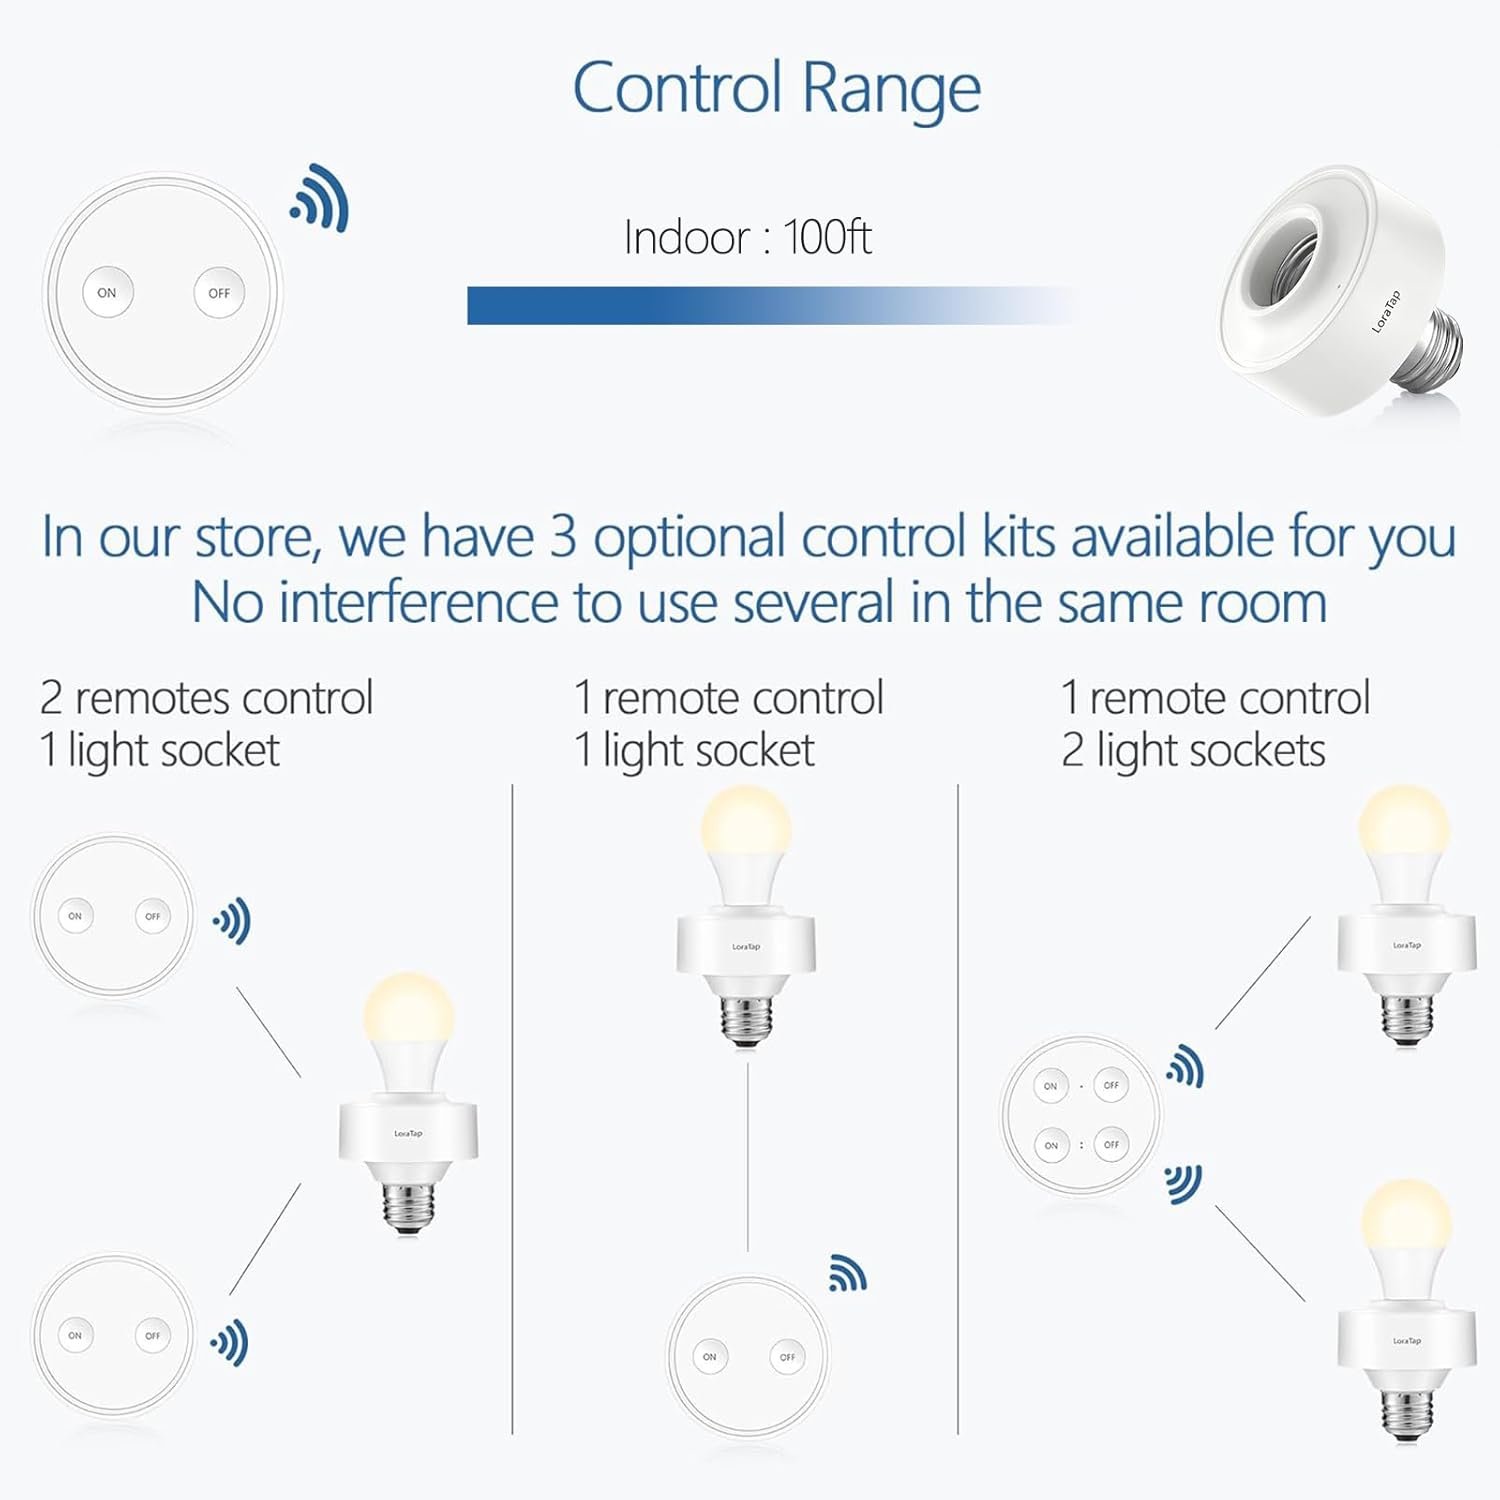
Figure 2: Illustration of screwing the LoraTap E26 light socket into a fixture and then a bulb into the socket.
Pairing and Unpairing Instructions:
Video 1: This video demonstrates the step-by-step process of pairing and unpairing the LoraTap wireless remote control with the E26 light socket. It shows how to put the socket into pairing mode and then link or unlink the remote.
Operation
Once installed and paired, operating the LoraTap Wireless Remote Control E26 Light Socket is straightforward.
- Turn On/Off: Press the "ON" button on the remote to turn the light on, and the "OFF" button to turn it off.
- Remote Placement: The remote features a magnetic base, allowing it to be mounted on a wall or any magnetic surface, or used as a portable handheld device.
- Range: The wireless control operates effectively up to 100ft (30m) indoors and 656ft (200m) outdoors.

Figure 3: Depiction of the wireless remote control being used to activate a light from a distance, showcasing its convenience.

Figure 4: The remote control's magnetic base, illustrating its versatility for fixed or portable use.
Demonstration Videos:
Video 2: This video illustrates the functionality of the LoraTap wireless remote control, including its magnetic base for convenient placement and its ability to control a light.
Video 3: A short video demonstrating the LoraTap Wireless Remote Control E26 Holder in use, highlighting its ease of operation.
Compatibility
The LoraTap E26 Light Socket is designed for use with specific bulb types and power ratings.
- Compatible Bulbs: LED Bulb, Smart Bulb, CFL Bulb, Fluorescent Bulb, Corn Light Bulb.
- Incompatible Bulbs: Incandescent Bulb, Halogen Bulb, Tungsten Bulb, Dimmer Lights. Using these may damage the light socket.
- Power Specifications: Works with 100-120V AC, max load 2.5 amp, max power 30W.
- Heat Resistance: < 248℉/120℃.

Figure 5: Visual guide indicating compatible bulb types (LED, Smart, CFL, Fluorescent, Corn Light) and incompatible types (Incandescent, Halogen, Tungsten, Dimmer Light).

Figure 6: Detailed diagram showing the E26 base, the added length of the socket (1.58in/4cm), and power specifications (Max. Power: 30W).
Maintenance
- Cleaning: Ensure the device is powered off before cleaning. Use a dry, soft cloth to wipe the socket and remote. Do not use liquid cleaners.
- Battery Replacement: The remote control uses a CR2032 coin cell battery. Replace the battery when the indicator light on the remote no longer illuminates or the range decreases significantly.
- Storage: Store the device in a cool, dry place away from direct sunlight and extreme temperatures when not in use for extended periods.
Troubleshooting
| Problem | Possible Cause | Solution |
|---|---|---|
| Light does not turn ON/OFF with remote. | Remote battery is low or depleted. | Replace the CR2032 battery in the remote control. |
| Remote and socket are not paired. | Follow the pairing instructions in the "Setup and Installation" section (Video 1). | |
| Bulb is incompatible or faulty. | Ensure a compatible bulb is used (LED, CFL, etc.) and test with a known working bulb. Refer to "Compatibility" section. | |
| Reduced remote control range. | Remote battery is low. | Replace the CR2032 battery in the remote control. |
| Obstructions between remote and socket. | Minimize physical obstructions (e.g., thick walls, metal objects) between the remote and the light socket. | |
| Light socket gets hot. | Incompatible bulb type or excessive wattage. | Ensure only compatible bulbs are used and the total wattage does not exceed 30W. Refer to "Compatibility" section. |
Specifications
- Brand: LoraTap
- Model: LT-E26-1R1S
- Bulb Base: E26
- Input Voltage: 100-120V AC
- Max Load: 2.5 Amp
- Max Power: 30W
- Wireless Frequency: 915MHz
- Wireless Range: Up to 100ft (30m) indoors, 656ft (200m) outdoors
- Heat Resistance: < 248℉/120℃
- Bulb Socket Dimensions (Dia x H): 2.68 x 2.83 inches
- Added Length to Light Fixture: 1.58 inches (4cm)
- Remote Battery: 1x CR2032 (included)
- Material: Acrylonitrile Butadiene Styrene (ABS)
- Certifications: FCC, CE, RoHS
Warranty and Support
LoraTap provides a 2-year warranty for this product. For technical support, warranty claims, or any inquiries, please contact LoraTap customer service through the retailer's platform or visit the official LoraTap website for contact information.


