1. Introduction
The OWON XSA1015-TG is a high-performance spectrum analyzer designed for precise measurement and analysis of electrical signals. This instrument features a 10.4-inch TFT LCD touch screen, a frequency range from 9 kHz to 1.5 GHz, and an integrated tracking generator. It is suitable for various applications including signal distortion analysis, modulation analysis, spectral purity assessment, and EMI pre-compliance testing. This manual provides essential information for the safe and efficient operation of your device.
Key features of the XSA1015-TG include:
- Frequency Range: 9 kHz to 1.5 GHz
- Displayed Average Noise Level (DANL): -150 dBm
- Phase Noise: -85 dBc/Hz @1 GHz and 10 KHz offset
- Total Amplitude Accuracy: <1.5 dB
- Minimum Resolution Bandwidth (RBW): 10 Hz
- Integrated 1.5 GHz Tracking Generator
- 10.4-inch TFT LCD Display for clear visualization

Figure 1: Front view of the OWON XSA1015-TG Spectrum Analyzer, highlighting its display and control panel.
2. Setup
2.1 Unpacking and Inspection
Carefully remove the spectrum analyzer from its packaging. Inspect the device for any signs of physical damage that may have occurred during transit. Retain the packaging materials for future transportation or storage.
2.2 Power Connection
Connect the provided power cord to the AC input on the rear panel of the device. Ensure the power source meets the specified requirements: 100V - 240V AC, 50/60Hz. The power input is located on the rear of the unit, typically near the fuse holder.

Figure 2: Rear and side views of the spectrum analyzer, illustrating the power input and ventilation.
2.3 Connecting RF Input and Tracking Generator Output
The front panel features the RF Input and Tracking Generator Output connectors. Both are N-type female connectors with a 50 Ω impedance.
- RF Input: Connect the signal to be analyzed to the RF Input connector. Observe the maximum safe reverse level of +30 dBm / 50 VDC.
- Tracking Generator Output: Use this connector to output a tracking signal for characterization of devices under test. The maximum safe reverse level is +20 dBm / 50 VDC.

Figure 3: Detailed view of the RF Input and Tracking Generator Output connectors on the front panel.
2.4 Communication Ports
The rear panel provides various communication ports for external connectivity:
- USB HOST: For connecting USB storage devices to save data.
- USB DEVICE: For connecting the analyzer to a computer.
- LAN: For network connectivity and remote control.
- VGA: For connecting an external display.
- Earphone Port: For audio output.
- 10 M Reference Input: 50 Ω, N-type female connector for an external 10 MHz reference clock.

Figure 4: Rear panel of the spectrum analyzer, displaying the communication and reference input ports.
3. Operating Instructions
3.1 Powering On and Basic Interface
Press the 'On/Off' button on the front panel to power on the device. The 10.4-inch TFT LCD will display the main measurement interface. The interface is designed with clear color, size, and shape distinctions for buttons and function areas, facilitating quick adjustments.
3.2 Setting Frequency Parameters
To set the frequency range for your measurement:
- Press the FREQ button on the control panel.
- Use the soft keys on the display or the numeric keypad to enter values for:
- Center Freq: Sets the center frequency of the displayed span.
- Start Freq: Sets the lowest frequency of the displayed span.
- Stop Freq: Sets the highest frequency of the displayed span.
- Span: Sets the frequency range displayed on the screen.
- Adjust the Resolution Bandwidth (RBW) by pressing the BW button and selecting the desired value. The minimum RBW is 10 Hz.
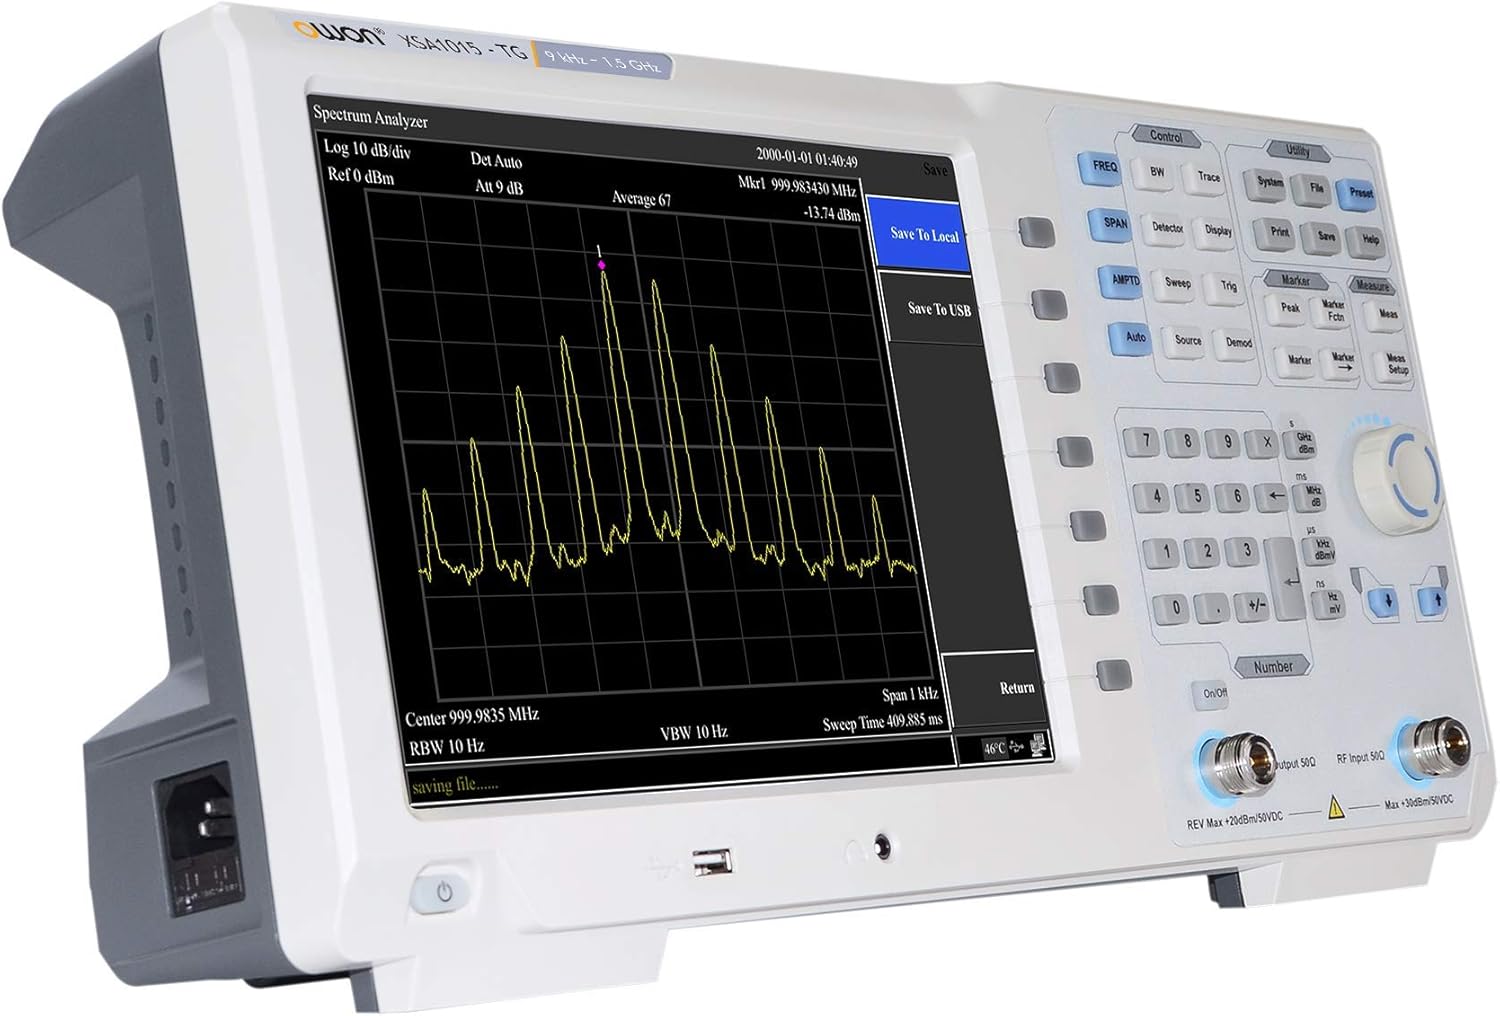
Figure 5: The spectrum analyzer display showing a typical signal measurement with frequency and amplitude settings.
3.3 Setting Amplitude Parameters
To control the vertical scale of the display:
- Press the AMPTD button.
- Adjust the Reference Level to set the top line of the display in dBm.
- Adjust the Attenuation to prevent input overload and optimize the signal-to-noise ratio.
3.4 Using the Tracking Generator
The integrated tracking generator can be used to characterize the frequency response of filters, amplifiers, and other RF components.
- Connect the Tracking Generator Output to the input of the device under test (DUT).
- Connect the output of the DUT to the RF Input of the spectrum analyzer.
- Enable the tracking generator function through the menu.
- Set the desired output power level (range: -30 dBm to 0 dBm).
- The spectrum analyzer will sweep synchronously with the tracking generator, displaying the DUT's frequency response.
3.5 Saving and Recalling Data
To save measurement data or instrument settings:
- Insert a USB storage device into the USB HOST port on the front panel.
- Press the Save button on the control panel.
- Follow the on-screen prompts to save the current trace, screenshot, or instrument settings to the USB device.
- To recall saved data, press the Recall button and select the desired file from the USB device.
4. Maintenance
4.1 Cleaning
To clean the instrument, use a soft, damp cloth. Do not use abrasive cleaners or solvents that could damage the display or casing. Ensure the device is powered off and disconnected from the power source before cleaning.
4.2 Environmental Conditions
For optimal performance and longevity, operate the OWON XSA1015-TG within the following environmental conditions:
- Operating Temperature: 0 °C to 40 °C
- Storage Temperature: -20 °C to 60 °C
- Ensure adequate ventilation around the device. The rear panel includes heat vents to facilitate rapid heat dissipation during prolonged use.
4.3 Safety Precautions
Observe the following safety precautions:
- Do not exceed the maximum safe input levels for the RF Input (+30 dBm / 50 VDC) and Tracking Generator Output (+20 dBm / 50 VDC).
- The instrument contains no user-serviceable components inside. Refer all servicing to qualified personnel.
- Ensure proper grounding of the device.
5. Troubleshooting
This section addresses common issues you might encounter with the OWON XSA1015-TG Spectrum Analyzer.
| Problem | Possible Cause | Solution |
|---|---|---|
| Device does not power on | No power supply; Power cord not connected; Blown fuse | Check power cord connection; Verify power outlet; Inspect and replace fuse if necessary (refer to qualified personnel). |
| No signal displayed | Input signal too low; Incorrect frequency settings; RF input not connected | Increase input signal level; Adjust Reference Level; Verify frequency span and center frequency; Ensure RF input is securely connected. |
| Display is frozen or unresponsive | Software error; Temporary glitch | Restart the device by powering it off and on. If the issue persists, contact support. |
| Cannot save data to USB | USB drive not recognized; USB drive full or corrupted | Ensure USB drive is properly inserted; Try a different USB drive; Format the USB drive (this will erase all data). |
If you encounter issues not listed here or if the suggested solutions do not resolve the problem, please contact OWON customer support for further assistance.
6. Specifications
The following table details the technical specifications of the OWON XSA1015-TG Spectrum Analyzer.
| Parameter | Specification |
|---|---|
| Model | XSA1015-TG |
| Frequency Range | 9 kHz - 1.5 GHz |
| Displayed Average Noise Level (DANL) | -150 dBm |
| Phase Noise | -85 dBc/Hz @1 GHz, 10 KHz offset |
| Total Amplitude Accuracy | <1.5 dB |
| Minimum Resolution Bandwidth (RBW) | 10 Hz |
| Tracking Generator Output Frequency Range | 100 kHz - 1.5 GHz |
| Tracking Generator Output Power Level Range | -30 dBm - 0 dBm |
| Display | 10.4 inches TFT LCD |
| RF Input Connector | 50 Ω, N-type female |
| Tracking Generator Output Connector | 50 Ω, N-type female |
| 10 M Reference Input | 50 Ω, N-type female |
| Communication Ports | USB HOST, USB DEVICE, LAN, earphone port, VGA |
| Power Supply | 100V - 240V AC, 50/60Hz |
| Weight | 5 kg (approx. 11 lbs) |
| Operating Temperature | 0 °C - 40 °C |
| Storage Temperature | -20 °C - 60 °C |
| Certification | EMC, IEC 61010-1:2000-1 |
7. Warranty and Support
7.1 Warranty Information
OWON products are typically covered by a limited warranty against defects in materials and workmanship. The specific terms and duration of your warranty may vary based on your region and point of purchase. Please refer to the warranty card included with your product or contact your local OWON distributor for detailed warranty information.
7.2 Technical Support
For technical assistance, troubleshooting, or service inquiries, please contact OWON customer support. You can typically find contact information on the official OWON website or through your product's documentation. When contacting support, please have your product model number (XSA1015-TG) and serial number ready.
You may also visit the OWON Store on Amazon for additional product information and resources.


