1. Introduction
This manual provides essential information for the proper installation, operation, and maintenance of your Hirose Rotary Hook Assembly, part number 143342. This component is designed for use with various Singer Industrial LockStitch Single Needle Sewing Machines and certain Brother Industrial Sewing Machines. Adhering to these instructions will help ensure optimal performance and longevity of the part.
2. Product Overview
The rotary hook assembly is a critical component in a lockstitch sewing machine, responsible for catching the needle thread and forming a secure stitch with the bobbin thread. This Hirose assembly is manufactured in Japan to precise specifications, ensuring reliable performance in industrial sewing applications.
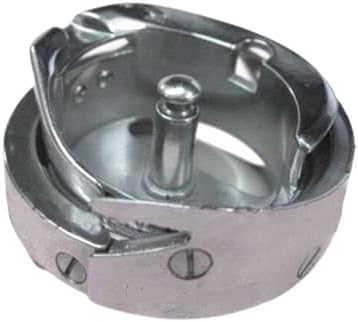
Image 1: Hirose Rotary Hook Assembly. This image displays the Hirose Rotary Hook Assembly, a critical component for industrial lockstitch sewing machines. The assembly is made of metal, featuring a central spindle and a rotating hook mechanism designed to catch the needle thread and form a stitch.
3. Compatibility
This Hirose Rotary Hook Assembly (Part #143342) is compatible with the following Singer Industrial LockStitch Single Needle Sewing Machine models:
- Singer 241
- Singer 245
- Singer 251
- Singer 281
- Singer 291U
- Singer 366K
- Singer 391U
- Singer 400W
- Singer 491D
- Singer 491U
- Singer 600W
- Singer 770
It is also compatible with various Brother Industrial Sewing Machines. Please consult your machine's specific service manual to confirm compatibility before installation.
4. Safety Information
Always prioritize safety when working with sewing machine components. Failure to do so may result in injury or damage to the machine.
- Disconnect Power: Always unplug the sewing machine from its power source before attempting any installation, maintenance, or repair.
- Use Proper Tools: Ensure you have the correct tools for the job to prevent damage to the part or machine.
- Handle with Care: The hook assembly contains precision parts. Handle it carefully to avoid bending or damaging delicate components.
- Professional Assistance: If you are unsure about any step, consult a qualified sewing machine technician.
5. Setup and Installation
Installing a rotary hook assembly requires precision and familiarity with your specific sewing machine model. The following are general guidelines; always refer to your sewing machine's official service manual for detailed, model-specific instructions.
- Preparation: Disconnect the machine from power. Remove the needle plate, feed dogs, and any other covers necessary to access the hook area.
- Remove Old Hook: Carefully unfasten the screws holding the old hook assembly in place. Note the orientation and position of the old hook for reference.
- Clean Area: Thoroughly clean any lint, dust, or old oil from the hook race and surrounding mechanisms.
- Install New Hook: Position the new Hirose Rotary Hook Assembly (Part #143342) into the machine. Ensure it sits correctly in its housing.
- Secure Hook: Fasten the retaining screws, but do not overtighten them initially.
- Timing Adjustment: This is the most critical step. The hook timing must be precisely set in relation to the needle's movement. Incorrect timing will lead to skipped stitches, thread breakage, or machine damage. Refer to your machine's service manual for exact timing procedures, which typically involve adjusting the hook's position relative to the needle at its lowest point.
- Test: Once timing is set, reassemble the machine. Perform a manual test by slowly turning the handwheel to observe the hook and needle interaction. Then, perform a sewing test on scrap fabric.
Note: If you are not experienced with sewing machine repair, it is highly recommended to seek assistance from a certified technician for installation and timing adjustments.
6. Operating Principles
The rotary hook assembly works in conjunction with the needle and bobbin case to create a lockstitch. As the needle descends, it carries the upper thread through the fabric. The rotary hook then rotates, catching the loop of the upper thread formed by the needle. This loop is carried around the bobbin case, intertwining with the bobbin thread to form a secure stitch. Proper functioning of the hook is essential for consistent stitch formation and preventing thread jams.
7. Maintenance
Regular maintenance of the rotary hook assembly is crucial for extending its lifespan and ensuring smooth machine operation.
- Cleaning: Periodically remove the bobbin case and clean the hook race area. Use a small brush or compressed air to remove lint and thread fragments that can accumulate and impede the hook's rotation.
- Lubrication: Apply a small drop of high-quality sewing machine oil to the hook race and other specified lubrication points as indicated in your machine's service manual. Do not over-oil.
- Inspection: Regularly inspect the hook for any nicks, burrs, or damage that could snag thread. If damage is found, the hook may need to be replaced or professionally polished.
8. Troubleshooting
If you experience issues related to stitch formation, the rotary hook assembly may be a contributing factor. Here are common problems and potential solutions:
| Problem | Possible Cause (Hook Related) | Solution |
|---|---|---|
| Skipped Stitches | Incorrect hook timing; damaged hook point; lint in hook race. | Adjust hook timing; inspect/replace hook; clean hook race. |
| Thread Breakage | Burrs or sharp edges on hook; incorrect hook timing; excessive lint. | Inspect/polish/replace hook; adjust hook timing; clean hook race. |
| No Stitch Formation | Severely incorrect hook timing; hook not catching thread loop. | Verify and adjust hook timing; ensure proper needle insertion. |
| Noisy Operation | Lack of lubrication; lint accumulation; worn hook. | Lubricate hook race; clean thoroughly; inspect for wear. |
Always eliminate other common causes of sewing issues (e.g., needle condition, thread quality, tension settings) before focusing solely on the hook assembly.
9. Specifications
- Part Number: 143342
- Brand: Hirose
- Origin: Made in Japan
- Item Model Number (Internal): 795821103
- Type: Rotary Hook Assembly
- Application: Industrial LockStitch Single Needle Sewing Machines
10. Warranty and Support
For information regarding the warranty of this Hirose Rotary Hook Assembly, please refer to the documentation provided at the time of purchase or contact your seller directly. Specific warranty terms may vary depending on the retailer and region.
For technical support or further assistance with installation and troubleshooting, it is recommended to consult a professional sewing machine technician or refer to the official service manual for your specific sewing machine model.


