1. Important Safety Information
WARNING: For outdoor use only. Read all instructions before operating this appliance. Failure to follow these instructions could result in fire, explosion, or burn hazard.
- Always operate the grill in a well-ventilated area. Never use in an enclosed space.
- Keep children and pets away from the grill at all times.
- Do not store or use gasoline or other flammable vapors and liquids in the vicinity of this or any other appliance.
- Perform a leak test on all gas connections before initial use and after any cylinder change.
- Ensure the gas cylinder is securely connected and placed on a stable, level surface.
- Always turn off the gas supply at the cylinder after each use.
- Do not move the grill while it is in operation or still hot.
- Wear protective gloves when handling hot components.
2. Product Overview
The Giantex Portable Gas Grill (Model OP3243) is a compact, two-burner tabletop grill designed for outdoor cooking. Constructed from durable 430 stainless steel, it features a total output of 20,000 BTUs, a push-and-turn ignition system, and a built-in thermometer for precise temperature monitoring. Its foldable legs and lockable lid enhance portability and storage convenience.
Components:
- Grill Body (Stainless Steel)
- Lid with Built-in Thermometer
- Cooking Grates (Removable)
- Flame Tamers (Removable)
- Grease Tray (Easy-to-clean)
- Control Knobs (2)
- Push-and-Turn Ignition System
- Regulator Hose
- Folding Legs

Figure 2.1: Giantex Portable Gas Grill (Model OP3243)
Product Dimensions:

Figure 2.2: Product Dimensions (Overall dimensions: 20.5'' L x 18'' W x 14.5'' H)
3. Setup
3.1 Unpacking and Inspection
- Carefully remove all components from the packaging.
- Inspect all parts for any damage. If any parts are damaged or missing, do not attempt to assemble or operate the grill. Contact customer support.
- Remove any protective films or packaging materials from the grill surfaces.
3.2 Assembly
This grill requires minimal assembly. Typically, you will need to unwrap and place the grease pan, flame tamers, and cooking grates into their designated positions.
3.3 Connecting the Propane Tank
The grill is designed for use with a standard 20 lb propane cylinder (not included).
- Ensure the grill's control knobs are in the "OFF" position.
- Connect the regulator hose to the propane cylinder valve. Hand-tighten firmly. Do not use tools to overtighten.
- Place the propane cylinder on a stable, level surface, away from the grill.

Figure 3.1: Regulator Hose and Propane Cylinder Connection
3.4 Leak Testing
Always perform a leak test before first use and after every gas cylinder change.
- Mix a solution of equal parts liquid dish soap and water.
- Ensure all grill control knobs are in the "OFF" position.
- Turn on the gas supply at the propane cylinder valve.
- Apply the soap solution to all gas connections (hose to regulator, regulator to cylinder, hose to grill inlet).
- Look for bubbles. If bubbles appear, there is a leak. Immediately turn off the gas supply at the cylinder and tighten the connection. Repeat the test. If bubbles still appear, do not use the grill and contact customer support.
- If no bubbles appear, the connections are secure. Turn off the gas supply at the cylinder.
3.5 Initial Burn-Off
Before cooking food for the first time, operate the grill on high heat for 15-20 minutes with the lid closed to burn off any manufacturing residues.
4. Operating Instructions
4.1 Pre-Lighting Checks
- Ensure the grill is on a stable, non-combustible surface.
- Check that the grease tray is properly installed.
- Confirm all gas connections are secure and there are no leaks.
4.2 Ignition Procedure
- Ensure burner controls are in the "OFF" position.
- Turn on the gas at the tank valve.
- Open the grill lid. Always keep the lid open during ignition.
- Push and turn one selected burner control to "HIGH".
- If ignition does not occur in 5 seconds, turn the burner control to "OFF", wait 5 minutes, then repeat the lighting procedure.
- Once the burner is lit, release the control knob.
- Repeat for the second burner if desired.

Figure 4.1: Burners and Thermometer
4.3 Adjusting Heat
Rotate the control knobs between "LOW" and "HIGH" to adjust the flame intensity and cooking temperature. The built-in thermometer provides an approximate internal temperature reading.
4.4 Cooking Tips
- For optimal heat distribution, preheat the grill for 5-10 minutes with the lid closed before placing food on the grates.
- If cooking in windy conditions, position the front of the grill into the wind to maintain heat and prevent flame blow-out.
- The stainless steel cooking grates provide even heat and are easy to clean.
4.5 Shutting Down the Grill
- Turn all burner control knobs to the "OFF" position.
- Turn off the gas supply at the propane cylinder valve.
- Allow the grill to cool completely before cleaning or moving.
5. Maintenance and Care
Regular cleaning and maintenance will extend the life of your grill and ensure safe operation.
5.1 Cleaning the Cooking Grates and Flame Tamers
- After the grill has cooled, remove the cooking grates and flame tamers.
- Scrape off any food residue with a grill brush.
- Wash with warm, soapy water and rinse thoroughly. Dry completely before reinstalling.

Figure 5.1: Removable Grill Grate and Flame Tamers
5.2 Cleaning the Grease Tray
The easy-to-clean grease tray should be emptied and cleaned after each use to prevent grease fires.
- Once the grill is cool, carefully slide out the grease tray.
- Dispose of accumulated grease.
- Wash the tray with warm, soapy water and rinse. Dry thoroughly.
5.3 Exterior Cleaning
Wipe down the stainless steel exterior with a damp cloth and mild detergent. Avoid abrasive cleaners or steel wool, which can scratch the surface and lead to rust.
5.4 Storage
When not in use, especially for extended periods:
- Ensure the grill is clean and completely dry.
- Disconnect the propane cylinder and store it upright in a well-ventilated area, away from direct sunlight or heat sources.
- Fold the legs and secure the lid with the travel locks for compact storage.
- Store the grill in a dry, protected location.
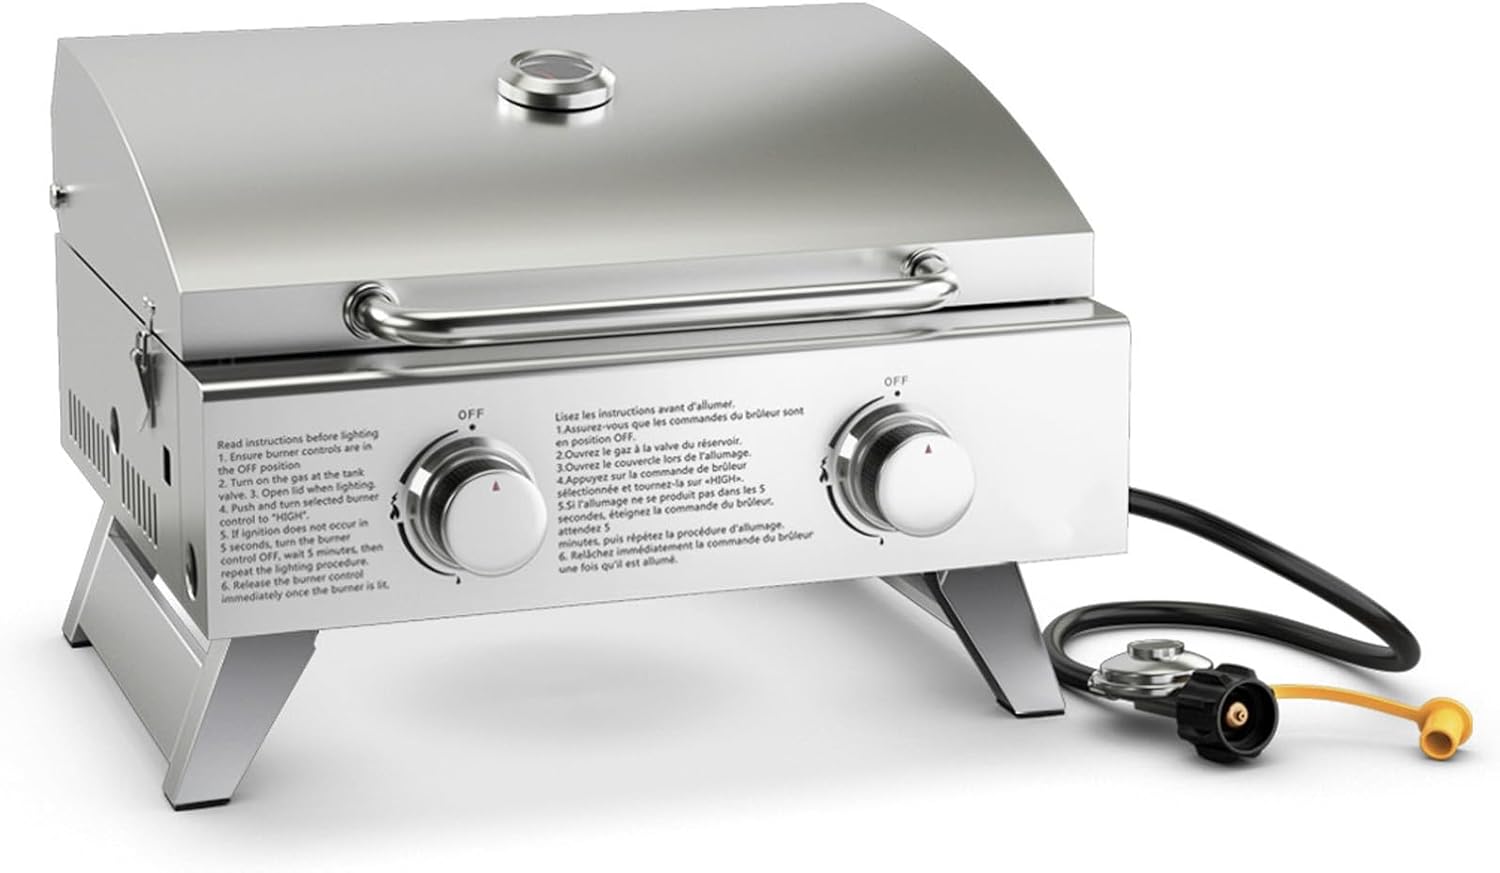
Figure 5.2: Grill in Storage Configuration
6. Troubleshooting
| Problem | Possible Cause | Solution |
|---|---|---|
| Burner fails to ignite | No gas flow; Igniter not sparking; Air in gas line | Check propane tank level; Ensure tank valve is open; Perform leak test; Repeat ignition procedure after waiting 5 minutes. |
| Low flame or uneven heat | Low gas pressure; Blocked burner ports; Regulator issue; Wind interference | Check propane tank level; Clean burner ports; Ensure regulator hose is not kinked; Position grill to minimize wind exposure. |
| Gas smell | Gas leak | Immediately turn off gas at cylinder; Perform leak test; Do not operate if leak persists. Contact customer support. |
7. Specifications
- Model: OP3243
- Brand: Giantex
- Product Dimensions: 20.5" L x 18" W x 14.5" H
- Item Weight: 26.5 lbs
- Fuel Type: Propane Gas
- Total BTU Output: 20,000 BTU (10,000 BTU per burner)
- Burner Count: 2
- Material: 430 Stainless Steel
- Special Features: Portable, Folding Legs, Built-in Thermometer, Travel Locks
- Safety Certification: CSA Standard Approved
8. Warranty and Support
For warranty information, technical support, or to order replacement parts, please contact Giantex customer service. Refer to your purchase documentation for specific warranty terms and contact details.
Please have your model number (OP3243) and purchase date available when contacting support.


