1. Introduction
The Pryme SPM-2083 is a 2-wire surveillance earpiece designed for discreet and dependable communication with Motorola TRBO and APX Series radios. This kit provides a low-profile solution for users requiring clear audio reception and transmission while maintaining a covert appearance. It features an acoustic tube earphone, a slim-line microphone, and a belt-mounted Push-to-Talk (PTT) junction box.
What's in the Box:
- SPM-2083 2-Wire Earpiece Assembly
- Acoustic Tube Earphone
- Hand-held Microphone/PTT Unit
- Belt-Clip PTT/Junction Box
2. Product Features
- 2-Wire Surveillance Kit: Designed for covert communication.
- Acoustic Tube Earphone: Provides clear receive audio and is easily concealable.
- Hand-held Microphone/PTT: Integrated microphone and Push-to-Talk button for convenient communication.
- Belt-Clip PTT/Junction Box: Allows for discreet PTT activation and cable management.
- TWIST CONNECT Acoustic Tube: Enables easy replacement and hygiene for multiple users.
- Durable Construction: Features heavy-duty microphone cable with a strong polyurethane jacket and reinforced strain relief.
- High-Impact Housings: Microphone and junction box housings are made of high-impact polycarbonate for extended field life.
- Concealable Design: Can be worn discreetly under clothing.
3. Compatibility
The Pryme SPM-2083 earpiece is compatible with various Motorola TRBO and APX Series radios. Refer to the detailed compatibility chart below to ensure your radio model is supported.

Image 1: Compatibility chart detailing Motorola radio models (e.g., APX1000, XPR6300) and their corresponding connector types (e.g., X83 (M11), Multi-Pin). This chart helps users identify if their radio is compatible with the SPM-2083 earpiece.
Compatible Motorola Radio Models include:
- APX Series: APX1000, APX4000, APX6000, APX7000
- XPR Series: XPR6100, XPR6300, XPR6350, XPR6500, XPR6550, XPR6580, XPR7550, XPR7580
- DP Series: DP3400
- And other models as listed in the compatibility chart.
4. Setup and Installation
- Connect to Radio: Locate the accessory port on your compatible Motorola radio. Align the earpiece connector with the radio's port and firmly insert it until it clicks into place.

Image 2: The multi-pin connector of the SPM-2083, designed to securely attach to Motorola TRBO and APX series radios.
- Attach Acoustic Tube: If not already attached, gently twist the acoustic tube assembly onto the earphone transducer until secure. Ensure a snug fit for optimal audio.
- Position Earpiece: Place the acoustic tube earphone into your ear. Adjust for comfort and clear audio.
- Conceal Wiring: Route the earpiece wires discreetly under your clothing. The slim design allows the microphone cable to be dropped down a shirt sleeve or clipped to a lapel.
- Secure Microphone/PTT: Position the hand-held microphone/PTT unit where it is easily accessible for speaking and transmitting. It can be clipped to a collar or lapel.
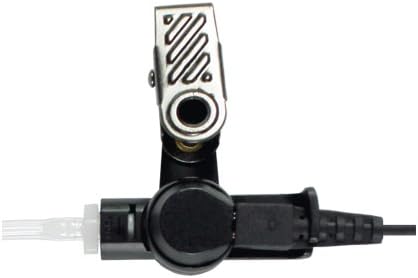
Image 3: The microphone and PTT unit, featuring a robust clip for secure placement on clothing.

Image 4: A side profile of the microphone and PTT unit, showing its ergonomic shape and clip for discreet wear.
- Attach Belt-Clip PTT/Junction Box: Clip the belt-mounted PTT junction box to your belt or another convenient location. This unit provides an additional PTT button for covert communication.

Image 5: The belt-clip PTT junction box, which allows for discreet PTT activation and cable management.
5. Operating Instructions
- Receiving Audio: Ensure the earpiece is properly seated in your ear. Audio from the radio will be transmitted directly through the acoustic tube.
- Transmitting (Push-to-Talk):
- To speak, press and hold either the PTT button on the hand-held microphone unit or the PTT button on the belt-clip junction box.
- Speak clearly into the microphone.
- Release the PTT button when you have finished speaking to return to receive mode.
- Volume Control: Adjust the volume directly on your Motorola radio. The earpiece does not have independent volume control.
6. Maintenance
- Cleaning the Acoustic Tube: Regularly clean the acoustic tube with a mild disinfectant wipe. For thorough cleaning or if the tube becomes discolored, it can be detached and replaced.
- Replacing Acoustic Tube: The TWIST CONNECT design allows for easy removal and replacement of the acoustic tube assembly. Twist the tube counter-clockwise to remove and clockwise to attach a new one.
- General Care: Avoid exposing the earpiece to extreme temperatures, moisture, or harsh chemicals. Store in a clean, dry place when not in use.
- Cable Inspection: Periodically inspect the cable for any signs of wear, cuts, or damage.
7. Troubleshooting
| Problem | Possible Cause | Solution |
|---|---|---|
| No audio from earpiece |
|
|
| Microphone not transmitting |
|
|
| Poor audio quality |
|
|
8. Specifications
- Model: SPM-2083
- Type: 2-Wire Surveillance Kit
- Earphone Type: Acoustic Tube
- Microphone Type: Slim-line, integrated with PTT
- PTT: Dual PTT (Hand-held and Belt-Clip Junction Box)
- Cable Material: Heavy-duty polyurethane jacket
- Housing Material: High-impact polycarbonate
- Compatibility: Motorola TRBO & APX Series Radios (refer to compatibility chart)
9. Warranty and Support
For warranty information, technical support, or to inquire about replacement parts, please contact PRYME customer service directly. Refer to the product packaging or the PRYME official website for the most current contact details.
Note: This manual provides general instructions. Specific radio models may have unique settings or features. Always refer to your radio's user manual for detailed operation.